Welcome to the EnMasse documentation, where you can find information to help you learn about EnMasse and start exploring its features.
From getting started to trying out more advanced installation and configuration, these resources provide what you need to set up and manage EnMasse as a service administrator or a messaging tenant.
1. Overview
EnMasse is an open source project for managed, self-service messaging on Kubernetes and OpenShift. EnMasse can run on your own infrastructure or in the cloud, and simplifies running a messaging infrastructure for your organization.
The service admin can deploy and manage messaging infrastructure, while messaging tenants can request messaging resources, both using both cloud-native APIs and tools.
1.1. Features
-
Built-in authentication and authorization of clients and identity management
-
Runs on Kubernetes and OpenShift: deploy on-premise or in the cloud
-
Different messaging patterns such as request-response, publish-subscribe and events
-
Decouple operation of infrastructure from configuration and use by applications
EnMasse can be used for many purposes, such as moving your messaging infrastructure to the cloud without depending on a specific cloud provider, building a scalable messaging backbone for IoT, or just as a cloud-ready version of a message broker.
EnMasse can provision different types of messaging depending on your use case. A user can request messaging resources by creating an address space.
EnMasse currently supports a standard and a brokered address space type, each with different semantics.
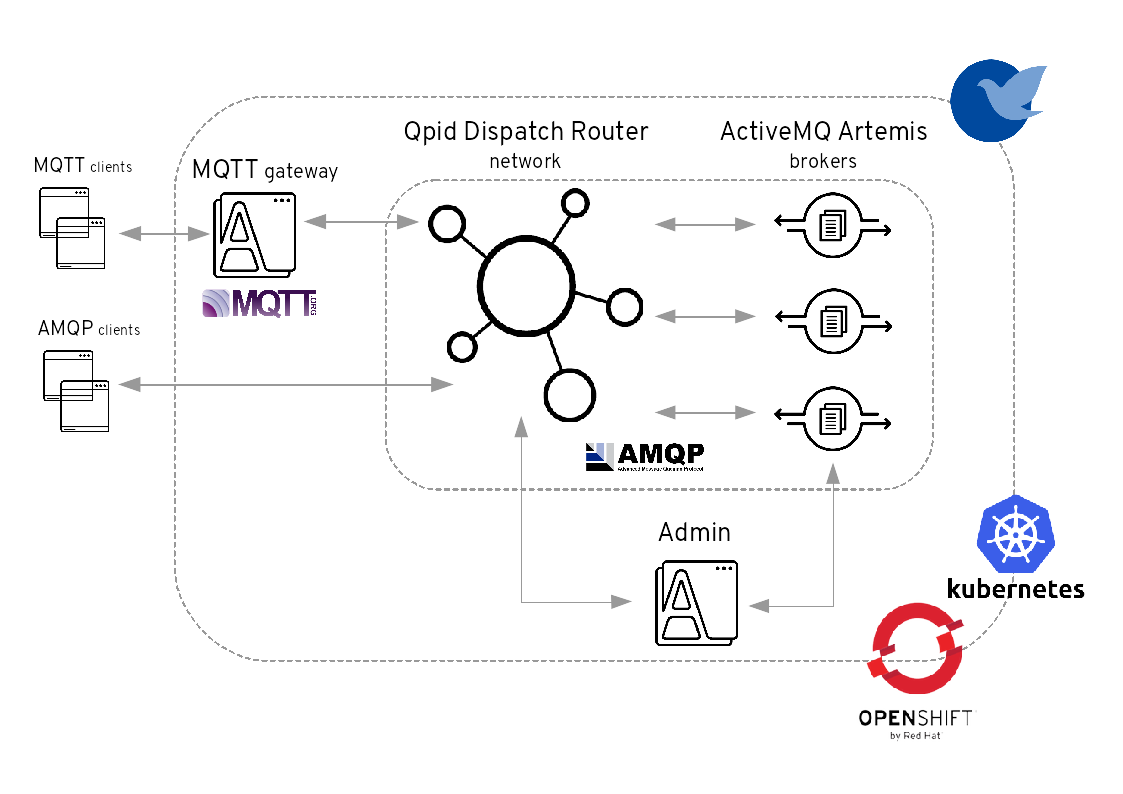
1.1.1. Standard address space
The standard address space type is the default type in EnMasse, and is focused on scaling in the number of connections and the throughput of the system. It supports AMQP and MQTT protocols, with more to come in the future. This address space type is based on other open source projects such as Apache ActiveMQ Artemis and Apache Qpid Dispatch Router and provides elastic scaling of these components. This image illustrates the high-level architecture of the standard address space:
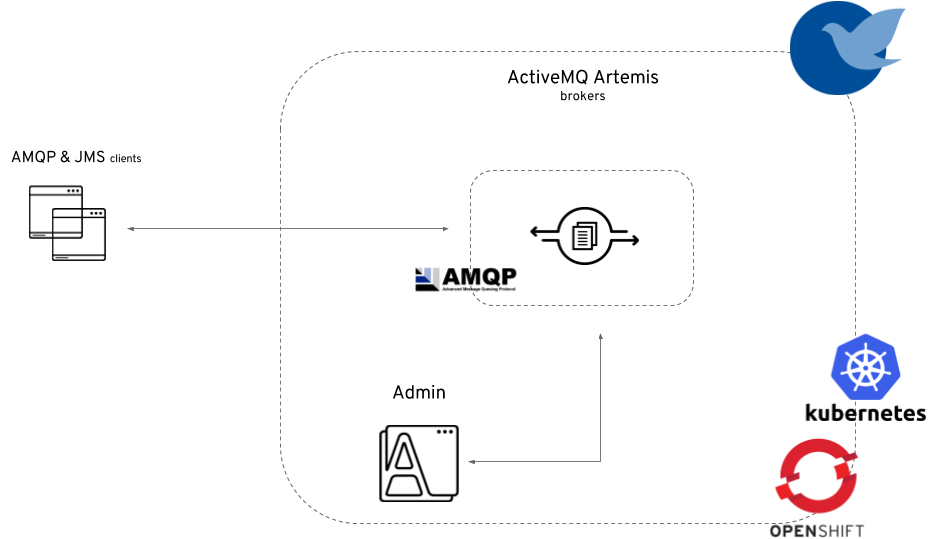
1.1.2. Brokered address space
The brokered address space type is the "classic" message broker in the cloud which supports AMQP, CORE, OpenWire, and MQTT protocols. It supports JMS with transactions, message groups, selectors on queues and so on. These features are useful for building complex messaging patterns. This address space is also more lightweight as it features only a single broker and a management console. This image illustrates the high-level architecture of the brokered address space:
2. Getting started
This guide will walk through the process of setting up EnMasse on Kubernetes with clients for sending and receiving messages.
-
To install EnMasse, you must have Kubernetes installed. You can use minikube if you want to install EnMasse on your laptop.
-
A user on the Kubernetes cluster with
cluster-adminpermissions is required, in order to set up the required cluster roles and API services.
2.1. Downloading EnMasse
-
Download one of the releases from the GitHub repository and unpack it.
2.2. Installing EnMasse using a YAML bundle
The simplest way to install EnMasse is to use the predefined YAML bundles.
-
Create the namespace where you want to deploy EnMasse:
kubectl create namespace enmasse-infra
kubectl config set-context $(kubectl config current-context) --namespace=enmasse-infra
-
Change the directory to the location of the downloaded release files.
-
Deploy using the
enmassebundle:kubectl apply -f install/bundles/enmasse
-
(Optional) Install the example plans and infrastructure configuration:
kubectl apply -f install/components/example-plans
-
(Optional) Install the example roles:
kubectl apply -f install/components/example-roles
-
(Optional) Install the
standardauthentication service:kubectl apply -f install/components/example-authservices/standard-authservice.yaml
2.3. Creating address spaces using the command line
In EnMasse, you create address spaces using standard command-line tools.
-
Create an address space definition:
apiVersion: enmasse.io/v1beta1 kind: AddressSpace metadata: name: myspace spec: type: standard plan: standard-unlimited -
Create the address space:
kubectl create -f standard-address-space.yaml
-
Check the status of the address space:
kubectl get addressspace myspace -o jsonpath={.status.isReady}The address space is ready for use when the previous command outputs
true.
2.4. Creating addresses using the command line
You can create addresses using the command line.
-
Create an address definition:
apiVersion: enmasse.io/v1beta1
kind: Address
metadata:
    name: myspace.myqueue
spec:
    address: myqueue
    type: queue
    plan: standard-small-queue
Prefixing the name with the address space name is required to ensure addresses from different address spaces do not collide. -
Create the address:
kubectl create -f standard-small-queue.yaml -
List the addresses:
kubectl get addresses -o yaml
2.5. Creating users using the command line
In EnMasse users can be created using standard command-line tools.
-
You must have already created an address space.
-
To correctly base64 encode a password for the user definition file, run the following command:
echo -n password | base64 #cGFzc3dvcmQ=
Be sure to use the -nparameter when running this command. Not specifying that parameter will result in an improperly coded password and cause log-in issues. -
Save the user definition to a file:
apiVersion: user.enmasse.io/v1beta1 kind: MessagingUser metadata: name: myspace.user1 spec: username: user1 authentication: type: password password: cGFzc3dvcmQ= # Base64 encoded authorization: - addresses: ["myqueue", "queue1", "queue2", "topic*"] operations: ["send", "recv"] - addresses: ["anycast1"] operations: ["send"] -
Create the user and associated user permissions:
kubectl create -f user-example1.yaml
-
Confirm that the user was created:
kubectl get messagingusers
2.6. Sending and receiving messages
-
Installed Apache Qpid Proton Python bindings.
-
An address space named
myspacemust be created. -
An address named
myqueuemust be created. -
A user named
user1with passwordpasswordmust be created.
-
Save Python client example to a file:
from __future__ import print_function, unicode_literals import optparse from proton import Message from proton.handlers import MessagingHandler from proton.reactor import Container class HelloWorld(MessagingHandler): def __init__(self, url): super(HelloWorld, self).__init__() self.url = url def on_start(self, event): event.container.create_receiver(self.url) event.container.create_sender(self.url) def on_sendable(self, event): event.sender.send(Message(body="Hello World!")) event.sender.close() def on_message(self, event): print("Received: " + event.message.body) event.connection.close() parser = optparse.OptionParser(usage="usage: %prog [options]") parser.add_option("-u", "--url", default="amqps://localhost:5672/myqueue", help="url to use for sending and receiving messages") opts, args = parser.parse_args() try: Container(HelloWorld(opts.url)).run() except KeyboardInterrupt: pass -
Retrieve the address space messaging endpoint host name:
kubectl get addressspace myspace -o 'jsonpath={.status.endpointStatuses[?(@.name=="messaging")].externalHost}'Use the output as the host name in the following step.
-
Run the client:
python client-example1.py -u amqps://user1:password@messaging.example1.com:443/myqueue
We have seen how to set up EnMasse on Kubernetes, and how to communicate with it using an AMQP client.
3. Service admin guide
The service administrator guide provides resources on how to set up and manage EnMasse, infrastructure configuration, and plans.
3.1. Installing EnMasse
EnMasse can be installed by applying the YAML files using the kubectl command-line tool, or by using the Operator Marketplace.
-
To install EnMasse, you must have Kubernetes installed. You can use minikube if you want to install EnMasse on your laptop.
-
A user on the Kubernetes cluster with
cluster-adminpermissions is required, in order to set up the required cluster roles and API services.
3.1.1. Downloading EnMasse
-
Download one of the releases from the GitHub repository and unpack it.
3.1.2. Installing EnMasse using a YAML bundle
The simplest way to install EnMasse is to use the predefined YAML bundles.
-
Create the namespace where you want to deploy EnMasse:
kubectl create namespace enmasse-infra
kubectl config set-context $(kubectl config current-context) --namespace=enmasse-infra
-
Change the directory to the location of the downloaded release files.
-
Deploy using the
enmassebundle:kubectl apply -f install/bundles/enmasse
-
(Optional) Install the example plans and infrastructure configuration:
kubectl apply -f install/components/example-plans
-
(Optional) Install the example roles:
kubectl apply -f install/components/example-roles
-
(Optional) Install the
standardauthentication service:kubectl apply -f install/components/example-authservices/standard-authservice.yaml
3.1.3. Installing EnMasse using Operator Marketplace
If the version of EnMasse you want to install is not available in the Operator
Hub, you can install a custom OperatorSource for EnMasse following these steps.
-
Operator Lifecycle Manager must be installed.
-
Operator Marketplace must be installed.
-
Create an
OperatorSource:cat <<EOF | kubectl apply -f - apiVersion: operators.coreos.com/v1 kind: OperatorSource metadata: name: enmasse-operators namespace: marketplace spec: type: appregistry endpoint: https://quay.io/cnr registryNamespace: enmasse displayName: "EnMasse Operators" publisher: "EnMasse" EOF
-
Create a
CatalogSourceConfigto enable the operator on your Kubernetes cluster:cat <<EOF | kubectl apply -f - apiVersion: operators.coreos.com/v1 kind: CatalogSourceConfig metadata: name: installed-enmasse-operators namespace: marketplace spec: csDisplayName: EnMasse Operators csPublisher: EnMasse packages: enmasse source: enmasse-operators targetNamespace: marketplace EOF
-
Create a
Subscriptionto install the operator and receive updates:cat <<EOF | kubectl apply -f - apiVersion: operators.coreos.com/v1alpha1 kind: Subscription metadata: name: enmasse namespace: enmasse-infra spec: channel: alpha name: enmasse source: installed-enmasse-operators sourceNamespace: marketplace EOF
3.2. Configuring EnMasse
3.2.1. Minimal service configuration
Configuring EnMasse for production takes some time and consideration. The following procedure will get
you started with a minimal service configuration. For a more complete example, navigate to the
install/components/example-plans folder of the EnMasse distribution. All of the commands
must be run in the namespace where EnMasse is installed.
-
Save the example configuration:
apiVersion: admin.enmasse.io/v1beta1 kind: StandardInfraConfig metadata: name: default spec: {} --- apiVersion: admin.enmasse.io/v1beta2 kind: AddressPlan metadata: name: standard-small-queue spec: addressType: queue resources: router: 0.01 broker: 0.1 --- apiVersion: admin.enmasse.io/v1beta2 kind: AddressSpacePlan metadata: name: standard-small spec: addressSpaceType: standard infraConfigRef: default addressPlans: - standard-small-queue resourceLimits: router: 2.0 broker: 3.0 aggregate: 4.0 --- apiVersion: admin.enmasse.io/v1beta1 kind: AuthenticationService metadata: name: none-authservice spec: type: none -
Apply the example configuration:
kubectl apply -f service-config.yaml
3.2.2. Address space plans
Address space plans are used to configure quotas and control the resources consumed by address spaces. Address space plans are configured by the EnMasse service operator and are selected by the messaging tenant when creating an address space.
EnMasse includes a default set of plans that are sufficient for most use cases.
Plans are configured as custom resources. The following example shows a plan for the standard address space:
apiVersion: admin.enmasse.io/v1beta2
kind: AddressSpacePlan
metadata:
  name: restrictive-plan
  labels:
    app: enmasse
spec:
  displayName: Restrictive Plan
  displayOrder: 0
  infraConfigRef: default (1)
  shortDescription: A plan with restrictive quotas
  longDescription: A plan with restrictive quotas for the standard address space
  addressSpaceType: standard (2)
  addressPlans: (3)
  - small-queue
  - small-anycast
  resourceLimits: (4)
    router: 2.0
    broker: 2.0
aggregate: 2.0| 1 | A reference to the StandardInfraConfig (for the standard address space type) or the BrokeredInfraConfig (for the brokered address space type) describing the infrastructure deployed for address spaces using this plan. |
| 2 | The address space type this plan applies to, either standard or brokered. |
| 3 | A list of address plans available to address spaces using this plan. |
| 4 | The maximum number of routers (router) and brokers (broker) for address spaces using this plan. For the brokered address space type, only the broker field is required. |
The other fields are used by the EnMasse Console UI. Note the field spec.infraConfigRef, which
points to an infrastructure configuration that must exist when an address space using this plan is created.
For more information about infrastructure configurations, see Infrastructure configuration.
3.2.3. Creating address space plans
-
Create an address space plan definition:
apiVersion: admin.enmasse.io/v1beta2 kind: AddressSpacePlan metadata: name: restrictive-plan labels: app: enmasse spec: displayName: Restrictive Plan displayOrder: 0 infraConfigRef: default shortDescription: A plan with restrictive quotas longDescription: A plan with restrictive quotas for the standard address space addressSpaceType: standard addressPlans: - small-queue - small-anycast resourceLimits: router: 2.0 broker: 2.0 aggregate: 2.0 -
Create the address space plan:
kubectl create -f restrictive-plan.yaml
-
Verify that schema has been updated and contains the plan:
kubectl get addressspaceschema standard -o yaml
3.2.4. Address plans
Address plans specify the expected resource usage of a given address. The sum of the resource usage for all resource types determines the amount of infrastructure provisioned for an address space. A single router and broker pod has a maximum usage of one. If a new address requires additional resources and the resource consumption is within the address space plan limits, a new pod will be created automatically to handle the increased load.
Address plans are configured by the EnMasse service operator and are selected when creating an address.
EnMasse includes a default set of address plans that are sufficient for most use cases.
In the Address space plans section, the address space plan references two address plans: small-queue and small-anycast. These address plans are stored as custom resources and are defined as follows:
apiVersion: admin.enmasse.io/v1beta2
kind: AddressPlan
metadata:
  name: small-queue
  labels:
    app: enmasse
spec:
  displayName: Small queue plan
  displayOrder: 0
  shortDescription: A plan for small queues
  longDescription: A plan for small queues that consume little resources
  addressType: queue (1)
  resources: (2)
    router: 0.2
    broker: 0.3
  partitions: 1 (3)
  messageTtl: (4)
    minimim: 30000
    maximum: 300000
  messageRedelivery: (5)
    maximumDeliveryAttempts: 3
    redeliveryDelay: 5000
    redeliveryDelayMultiplier: 1.5
maximumDeliveryDelay: 30000| 1 | The address type to which this plan applies. |
| 2 | The resources consumed by addresses using this plan. The router field is optional for address plans referenced by a brokered address space plan. |
| 3 | The number of partitions that should be created for queues using this plan. Only available in the standard address space. |
| 4 | (Optional) Restricts message time-to-live (TTL). Applies to address types queue and topic only. |
| 5 | (Optional) Provides message redelivery settings. Applies to address types queue and subscription only. |
The other fields are used by the EnMasse Console UI.
A single router can support five instances of addresses and broker can support three instances of addresses with this plan. If the number of addresses with this plan increases to four, another broker is created. If it increases further to six, another router is created as well.
In the standard address space, address plans for the queue address type may contain a field
partitions, which allows a queue to be sharded across multiple brokers for HA and improved performance. Specifying an amount of broker resource above 1 will automatically cause a queue to be partitioned.
The messageTtl field is used to restrict the effective absolute-expiry-time of
any message put to a queue or topic. The maximum and minimum values are defined in milliseconds. The system adjusts the TTL value of an incoming message to a particular address based on these values:
-
If a messages arrives at the address with a TTL value that is greater than the
maximumvalue, the system changes the message TTL to the maximum value. -
If a message arrives at the address with a TTL value that is less than the
minimumvalue, the system changes the message TTL to the minimum value.
Messages that arrive without a TTL defined are considered to have a TTL value of infinity.
The messageRedelivery field is used to control the behavior of a queue or subscription when a receiver is unsuccessful in its processing
a message and the system returns the message to the queue for redelivery. By default, the system redelivers messages indefinitely.
However, the messageRedelivery field allows you to modify the behavior either by delaying redelivery or redirecting the message to a
deadletter address.
| A sharded queue no longer guarantees message ordering. |
Although the example address space plan in Address space plans allows two routers and two brokers to be deployed, it only allows two pods to be deployed in total. This means that the address space is restricted to three addresses with the small-queue plan.
The small-anycast plan does not consume any broker resources, and can provision two routers at the expense of not being able to create any brokers:
apiVersion: admin.enmasse.io/v1beta2
kind: AddressPlan
metadata:
  name: small-anycast
  labels:
    app: enmasse
spec:
  addressType: anycast
  resources:
    router: 0.2
With this plan, up to 10 addresses can be created.
3.2.5. Creating address plans
-
Create an address plan definition:
apiVersion: admin.enmasse.io/v1beta2 kind: AddressPlan metadata: name: small-anycast labels: app: enmasse spec: addressType: anycast resources: router: 0.2 -
Create the address plan:
kubectl create -f small-anycast-plan.yaml
-
Verify that schema has been updated and contains the plan:
kubectl get addressspaceschema standard -o yaml
3.2.6. Infrastructure configuration
EnMasse creates infrastructure components such as routers, brokers, and consoles. These components can be configured while the system is running, and EnMasse automatically updates the components with the new settings. The EnMasse service operator can edit the EnMasse default infrastructure configuration or create new configurations.
Infrastructure configurations can be referred to from one or more address space plans. For more information about address space plans, see Address space plans.
Infrastructure configuration can be managed for both brokered and standard infrastructure
using BrokeredInfraConfig and StandardInfraConfig resources.
Brokered infrastructure configuration
BrokeredInfraConfig resources are used to configure infrastructure deployed by brokered address
spaces. Address space plans reference the brokered infrastructure configuration using the
spec.infraConfigRef field. For more information about address space plans, see Address space plans.
For detailed information about the available brokered infrastructure configuration fields, see the Brokered infrastructure configuration fields table.
Brokered infrastructure configuration example
The following example of a brokered infrastructure configuration file shows the various settings that can be specified.
apiVersion: admin.enmasse.io/v1beta1
kind: BrokeredInfraConfig
metadata:
  name: brokered-infra-config-example
spec:
  version: "0.33.1-rc1" (1)
  admin: (2)
    resources:
      memory: 256Mi
    podTemplate:
      metadata:
        labels:
          key: value
  broker: (3)
    resources:
      memory: 2Gi
      storage: 100Gi
    addressFullPolicy: PAGE
    globalMaxSize: 256Mb
    podTemplate: (4)
      spec:
priorityClassName: messaging| 1 | Specifies the EnMasse version used. When upgrading, EnMasse uses this field to determine whether to upgrade the infrastructure to the requested version. If omitted, the version is assumed to be the same version as the controllers reading the configuration. |
| 2 | Specifies the settings you can configure for the admin components. |
| 3 | Specifies the settings you can configure for the broker components. Note that changing
the .broker.resources.storage setting does not configure the existing broker storage size. |
| 4 | For both admin and broker components you can configure the following podTemplate elements:
|
For detailed information about all of the available brokered infrastructure configuration fields, see the Brokered infrastructure configuration fields table.
-
For more information about the
podTemplatesettings, see the following Kubernetes documentation:
Overriding the probe timing for brokered infrastructure configuration
You can override the default values for the probe timing on broker resources. You might want to change the default values if, for example, it takes longer than expected for the broker storage to become available, or a server is slow.
The following example shows how to override certain default values of the readiness probe for broker resources.
apiVersion: admin.enmasse.io/v1beta1
kind: BrokeredInfraConfig
metadata:
  name: brokered-infra-config
spec:
  broker:
    ...
    podTemplate:
      spec:
        containers:
          - name: broker (1)
            readinessProbe:
              failureThreshold: 6 (2)
initialDelaySeconds: 20 (3)| 1 | The name value must match the target container name. For a broker, the podTemplate name is broker. |
| 2 | Specifies the number of times that Kubernetes tries when a Pod starts and the probe fails before either the Pod is marked Unready for a readiness probe, or restarting the container for a liveness probe. The default value is 3, and the minimum value is 1. |
| 3 | Specifies the number of seconds before performing the first probe after the container starts. |
Standard infrastructure configuration
StandardInfraConfig resources are used to configure infrastructure deployed by standard address
spaces. Address space plans reference the standard infrastructure configuration using the
spec.infraConfigRef field. For more information about address space plans, see Address space plans.
For detailed information about the available standard infrastructure configuration fields, see the Standard infrastructure configuration fields table.
Standard infrastructure configuration example
The following example of a standard infrastructure configuration file shows the various settings that can be specified.
apiVersion: admin.enmasse.io/v1beta1
kind: StandardInfraConfig
metadata:
  name: myconfig
spec:
  version: "0.33.1-rc1" (1)
  admin: (2)
    resources:
      memory: 256Mi
  broker: (3)
    resources:
      cpu: 0.5
      memory: 2Gi
      storage: 100Gi
    addressFullPolicy: PAGE
  router: (4)
    resources:
      cpu: 1
      memory: 256Mi
    linkCapacity: 1000
    minReplicas: 1
    policy:
      maxConnections: 1000
      maxConnectionsPerHost: 1
      maxConnectionsPerUser: 10
      maxSessionsPerConnection: 10
      maxSendersPerConnection: 5
      maxReceiversPerConnection: 5
    podTemplate: (5)
      spec:
        affinity:
          nodeAffinity:
            preferredDuringSchedulingIgnoredDuringExecution:
            - weight: 1
              preference:
              matchExpressions:
              - key: e2e-az-EastWest
                operator: In
                values:
                - e2e-az-East
- e2e-az-West| 1 | Specifies the EnMasse version used. When upgrading, EnMasse uses this field to determine whether to upgrade the infrastructure to the requested version. If omitted, the version is assumed to be the same version as the controllers reading the configuration. |
| 2 | Specifies the settings you can configure for the admin components. |
| 3 | Specifies the settings you can configure for the broker components. Changing
the .broker.resources.storage setting does not configure the existing broker storage size. |
| 4 | Specifies the settings you can configure for the router components. |
| 5 | For admin, broker, and router components you can configure the following podTemplate elements:
|
For detailed information about all of the available standard infrastructure configuration fields, see the Standard infrastructure configuration fields table.
-
For more information about the
podTemplatesettings, see the following Kubernetes documentation:
Overriding the probe timing for standard infrastructure configuration
You can override the default values for probe timing on broker and router resources. You might want to change the default values if, for example, it takes longer than expected for the broker storage to become available, or a server is slow.
The following example shows how to override certain default values of the readiness probe timeout for a broker resource and a liveness probe for a router resource.
apiVersion: admin.enmasse.io/v1beta1
kind: StandardInfraConfig
metadata:
  name: standard-infra-config
spec:
  broker:
    ...
    podTemplate:
      spec:
        containers:
          - name: broker (1)
            readinessProbe:
              failureThreshold: 6 (2)
              initialDelaySeconds: 20 (3)

  router:
    ...
    podTemplate:
      spec:
        containers:
          - name: router (1)
            livenessProbe:
              failureThreshold: 6 (2)
initialDelaySeconds: 20 (3)| 1 | The name value must match the target container name. For example, for a broker podTemplate, name is broker, and for a router podTemplate, it is router. |
| 2 | Specifies the number of times that Kubernetes tries when a Pod starts and the probe fails before either the Pod is marked Unready for a readiness probe, or restarting the container for a liveness probe. The default value is 3, and the minimum value is 1. |
| 3 | Specifies the number of seconds before performing the first probe after the container starts. |
3.2.7. Creating and editing infrastructure configurations
You can create a new infrastructure configuration or edit an existing one. For more information, see Infrastructure configuration.
-
Edit the existing infrastructure configuration, or create a new infrastructure configuration using the following example:
apiVersion: admin.enmasse.io/v1beta1 kind: StandardInfraConfig metadata: name: myconfig spec: version: "0.33.1-rc1" admin: resources: memory: 256Mi broker: resources: memory: 2Gi storage: 100Gi addressFullPolicy: PAGE router: resources: memory: 256Mi linkCapacity: 1000 minReplicas: 1 -
Apply the configuration changes:
kubectl apply -f standard-infra-config-example.yaml
-
Monitor the pods while they are restarted:
kubectl get pods -w
The configuration changes are applied within several minutes.
3.2.8. Authentication services
Authentication services are used to configure the authentication and authorization endpoints available to messaging clients. The authentication services are configured by the EnMasse service operator, and are specified when creating an address space.
Authentication services are configured as Custom Resources. An authentication service has a type, which can be standard, external, or none.
Standard authentication service
The standard authentication service type allows the tenant administrator to manage users and their related permissions through the MessagingUser Custom Resource. This is achieved by using a Keycloak instance to store user credentials and access policies. For typical use cases only one standard authentication service needs to be defined.
Standard authentication service example
The following example shows an authentication service of type standard:
apiVersion: admin.enmasse.io/v1beta1
kind: AuthenticationService
metadata:
  name: standard
spec:
  type: standard (1)
  standard:
    credentialsSecret: (2)
      name: my-admin-credentials
    certificateSecret (3)
      name: my-authservice-certificate
    resources: (4)
      requests:
        memory: 2Gi
      limits:
        memory: 2Gi
    storage: (5)
      type: persistent-claim
      size: 5Gi
    datasource: (6)
      type: postgresql
      host: example.com
      port: 5432
database: authdb| 1 | Valid values for type are none, standard, or external. |
| 2 | (Optional) The secret must contain the admin.username field for the user and the admin.password field for the password of the Keycloak admin user. If not specified, a random password will be generated and stored in a secret. |
| 3 | (Optional on Kubernetes) A custom certificate can be specified. On Kubernetes, a certificate is automatically created if not specified. |
| 4 | (Optional) Resource limits for the Keycloak instance can be specified. |
| 5 | (Optional) The storage type can be specified as ephemeral or persistent-claim. For persistent-claim, you should also configure the size of the claim. The default type is ephemeral. |
| 6 | (Optional) Specifies the data source to be used by Keycloak. The default option is the embedded h2 data source. For production usage, the postgresql data source is recommended. |
Deploying the standard authentication service
To implement the standard authentication service, you deploy it.
-
Create an
AuthenticationServicedefinition:apiVersion: admin.enmasse.io/v1beta1 kind: AuthenticationService metadata: name: standard-authservice spec: type: standard -
Deploy the authentication service:
kubectl create -f standard-authservice.yaml
Deploying the standard authentication service for high availability (HA)
For production deployment, the authentication services should be setup for high availability in order to reduce downtime during Kubernetes updates or in the event of a node failure. To implement the standard authentication service in HA mode, you deploy it using a PostgreSQL database as the backend.
-
A PostgreSQL database.
-
Create a secret with the database credentials:
kubectl create secret generic db-creds -n enmasse-infra --from-literal=database-user=admin --from-literal=database-password=secure-password -
Create an
AuthenticationServicedefinition:apiVersion: admin.enmasse.io/v1beta1 kind: AuthenticationService metadata: name: standard-authservice spec: type: standard standard: replicas: 2 datasource: type: postgresql host: database.example.com port: 5431 database: auth credentialsSecret: name: db-creds -
Deploy the authentication service:
kubectl create -f standard-authservice.yaml -n enmasse-infra
External authentication service
With the external authentication service you can configure an external provider of authentication and
authorization policies through an AMQP SASL handshake. This configuration can be used to implement a bridge for
your existing identity management system.
Depending on your use case, you might define several external authentication services.
External authentication service example
The following example shows an authentication service of type external:
apiVersion: admin.enmasse.io/v1beta1
kind: AuthenticationService
metadata:
  name: my-external-1
spec:
  type: external
  realm: myrealm (1)
  external:
    host: example.com (2)
    port: 5671 (3)
    caCertSecret: (4)
name: my-ca-cert| 1 | (Optional) The realm is passed in the authentication request. If not specified, an identifier in the form of namespace-addressspace is used as the realm. |
| 2 | The host name of the external authentication server. |
| 3 | The port number of the external authentication server. |
| 4 | (Optional) The CA certificate to trust when connecting to the authentication server. |
The external authentication server must implement the API described in the External authentication server API.
External authentication service example allowing overrides
The following example shows an authentication service of type external that allows overrides to the host name, port number, and realm by the messaging tenant:
apiVersion: admin.enmasse.io/v1beta1
kind: AuthenticationService
metadata:
  name: my-external-2
spec:
  type: external
  realm: myrealm (1)
  external:
    host: example.org (2)
    port: 5671 (3)
    caCertSecret: (4)
      name: my-ca-cert
allowOverride: true (5)| 1 | (Optional) The realm is passed in the authentication request. If not specified, an identifier in the form of namespace-addressspace is used as the realm. |
| 2 | The host name of the external authentication server. |
| 3 | The port number of the external authentication server. |
| 4 | (Optional) The CA certificate to trust when connecting to the authentication server. |
| 5 | (Optional) Specifies whether address space overrides are allowed to the host name, port number, realm, and CA certificate. Valid values are true or false. If not specified, the default value is false. |
The external authentication server must implement the API described in the External authentication server API.
External authentication server API
An external authentication server must implement an AMQP SASL handshake, read the connection properties of the client, and respond with the expected connection properties containing the authentication and authorization information. The authentication server is queried by the address space components, such as the router and broker, whenever a new connection is established to the messaging endpoints.
The requested identity of the client can be read from the SASL handshake username. The
implementation can then authenticate the user.
The authenticated identity is returned in the authenticated-identity map with the following
key/values. While this example uses JSON, it must be set as an AMQP map on the connection
property.
{
    "authenticated-identity": {
        "sub": "myid",
        "preferred_username": "myuser"
    }
}
Authorization is a capability that can be requested by the client using the ADDRESS-AUTHZ
connection capability. If this is set on the connection, the server responds with this
capability in the offered capabilities, and add the authorization information to the connection
properties.
The authorization information is stored within a map that correlates the address to a list of operations allowed on
that address. The following connection property information contains the policies for the addresses
myqueue and mytopic:
{
    "address-authz": {
        "myqueue": [
          "send",
          "recv"
        ],
        "mytopic": [
          "send"
        ]
    }
}
The allowed operations are:
-
send- User can send to the address. -
recv- User can receive from the address.
None authentication service
The none authentication service type allows any client using any user name and password to send and receive messages to any address.
It is not recommended to use the none authentication service in production environments. It is intended only to be used in non-production environments, such as internal test or development environments.
|
Deploying the none authentication service
To implement the none authentication service, you deploy it.
-
Create an
AuthenticationServicedefinition:apiVersion: admin.enmasse.io/v1beta1 kind: AuthenticationService metadata: name: none-authservice spec: type: none -
Deploy the authentication service:
kubectl create -f none-authservice.yaml
3.2.9. EnMasse example roles
EnMasse provides the following example roles that you can use directly or use as models to create your own roles.
For more information about service administrator resources, see the EnMasse service administrator resources table.
For more information about messaging tenant resources, see the EnMasse messaging tenant resources table.
| Role | Description |
|---|---|
enmasse.io:tenant-view |
Specifies |
enmasse.io:tenant-edit |
Specifies |
|
Specifies |
3.2.10. Configuring EnMasse Console on Kubernetes
To use the EnMasse Console on Kubernetes, you must either configure Kubernetes to use OpenID Connect (OIDC) as an Authentication Strategy, or configure the EnMasse Console to use an OIDC provider not configured with the cluster.
If you are running on a Kubernetes cluster with OIDC enabled, then the recommended way to configure the console is to use the OIDC provider of the cluster.
If you are running on a managed Kubernetes cluster, the OIDC Authentication Strategy is usually not enabled, so configuring the console using an external OIDC provider is the only way.
Configuring EnMasse Console to use cluster OpenID Connect
To deploy the console you must create a consoleservice resource refering to your OIDC Provider.
-
Before you begin you need to know the following details from your OpenID Connect provider:
-
OIDC Discovery URL
-
OIDC scopes
-
Client ID
-
Client secret
If using a public OIDC provider (such as Google, Azure, GitHub, etc) the OAuthProxy configuration guide offers specific guidance.
-
-
The Kubernetes api-server must be configured to use the OpenID Connect plugin.
If you are using minikube, see these instructions. will guide you.
-
Select the namespace where EnMasse is installed:
kubectl config set-context $(kubectl config current-context) --namespace=enmasse-infra
-
Create a secret definition with the client-id/client-secret pair of your OIDC provider:
kubectl create secret generic my-google-oidc-secret --from-literal=client-id=myclientid --from-literal=client-secret=mysecret
-
Create a console services definition:
cat <<EOF | kubectl apply -f -
apiVersion: admin.enmasse.io/v1beta1
kind: ConsoleService
metadata:
    name: console
spec:
    discoveryMetadataURL: https://accounts.google.com/.well-known/openid-configuration
    oauthClientSecret:
        name: my-google-oidc-secret
    scope: openid email
EOF
Replace the discovery URL and scopes with the appropriate values from your OIDC provider. Ensure that oauthClientSecret references the secret created in the previous step.
Configuring EnMasse Console to use external OpenID Connect
To deploy the console you must create a consoleservice resource refering to your OIDC Provider.
-
Before you begin you need to know the following details from your OpenID Connect provider:
-
OIDC Discovery URL
-
OIDC scopes
-
Client ID
-
Client secret
If using a public OIDC provider (such as Google, Azure, GitHub, etc) the OAuthProxy configuration guide offers specific guidance.
-
-
Select the namespace where EnMasse is installed:
kubectl config set-context $(kubectl config current-context) --namespace=enmasse-infra
-
Create a secret definition with the client-id/client-secret pair of your OIDC provider:
kubectl create secret generic my-google-oidc-secret --from-literal=client-id=myclientid --from-literal=client-secret=mysecret
-
Grant impersonation privileges to the console server:
kubectl apply -f install/components/example-console
-
Create a console services definition:
cat <<EOF | kubectl apply -f -
apiVersion: admin.enmasse.io/v1beta1
kind: ConsoleService
metadata:
    name: console
spec:
    discoveryMetadataURL: https://accounts.google.com/.well-known/openid-configuration
    impersonation:
      userHeader: X-Forwarded-Email
    oauthClientSecret:
        name: my-google-oidc-secret
    scope: openid email
EOF
Replace the discovery URL and scopes with the appropriate values from your OIDC provider. Ensure that oauthClientSecret references the secret created in the previous step.
3.3. Upgrading EnMasse
EnMasse supports upgrades between minor versions using cloud-native tools. When upgrading, applying the configuration change automatically triggers the upgrade process to begin.
Upgrading EnMasse is accomplished by applying the YAML files for the new version.
3.3.1. Upgrading EnMasse using a YAML bundle
-
A new release of EnMasse. For more information, see Downloading EnMasse.
-
Select the namespace where EnMasse is installed:
kubectl config set-context $(kubectl config current-context) --namespace=enmasse-infra
-
Apply the new release bundle:
kubectl apply -f install/bundles/enmasse
-
Monitor pods while they are restarted:
kubectl get pods -w
The pods restart and become active within several minutes.
-
Delete
api-serverresources not needed after upgrade:kubectl delete sa api-server -n enmasse-infra kubectl delete clusterrolebinding enmasse.io:api-server-enmasse-infra kubectl delete clusterrole enmasse.io:api-server kubectl delete rolebinding api-server -n enmasse-infra kubectl delete role enmasse.io:api-server -n enmasse-infra
3.4. Uninstalling EnMasse
You must uninstall EnMasse using the same method that you used to install EnMasse.
3.4.1. Uninstalling EnMasse using the YAML bundle
This method uninstalls EnMasse that was installed using the YAML bundle.
-
Delete the cluster-level resources:
kubectl delete crd -l app=enmasse
kubectl delete clusterrolebindings -l app=enmasse
kubectl delete clusterroles -l app=enmasse
kubectl delete apiservices -l app=enmasse
-
Delete the namespace where EnMasse is deployed:
kubectl delete namespace enmasse-infra
3.5. Monitoring EnMasse
You can monitor EnMasse by deploying built-in monitoring tools or using your pre-existing monitoring infrastructure.
3.5.1. (Optional) Deploying the Application Monitoring Operator
To monitor EnMasse, an operator that acts on the monitoring Custom Resource Definitions must be deployed. You may skip this step if you have such an operator installed on your Kubernetes cluster.
-
(Optional) If you want to deploy to a namespace other than
enmasse-monitoringyou must run the following command and substituteenmasse-monitoringin subsequent steps:sed -i 's/enmasse-monitoring/my-namespace/' install/bundles/enmasse/*.yaml
-
Create the enmasse-monitoring namespace:
kubectl create namespace enmasse-monitoring
kubectl config set-context $(kubectl config current-context) --namespace=enmasse-monitoring
-
Deploy the
monitoring-operatorresources:kubectl apply -f install/components/monitoring-operator
-
Deploy the
monitoring-operatorcomponent:kubectl apply -f install/components/monitoring-deployment
3.5.2. (Optional) Deploying the kube-state-metrics agent
You can monitor EnMasse pods using the kube-state-metrics agent.
-
Select the
enmasse-infranamespace:kubectl config set-context $(kubectl config current-context) --namespace=enmasse-infra
-
Deploy the
kube-state-metricscomponent:kubectl apply -f install/components/kube-state-metrics
3.5.3. Enabling monitoring
If you are not using a default installation configuration, the simplest way to deploy monitoring is to enable the monitoring environment variable on the
enmasse-operator deployment.
-
The Application Monitoring Operator or an operator managing the same resources must be installed.
-
Label the enmasse-infra namespace:
kubectl label namespace enmasse-infra monitoring-key=middleware
-
Enable monitoring on the operator:
kubectl set env deployment -n enmasse-infra enmasse-operator ENABLE_MONITORING=true
3.5.4. Configuring alert notifications
To configure alert notifications, such as emails, you must change the default configuration of Alertmanager.
-
Create an Alertmanager configuration file following the Alertmanager documentation. An example configuration file for email notifications is shown:
apiVersion: v1 kind: ConfigMap metadata: labels: app: enmasse name: alertmanager-config data: alertmanager.yml: | global: resolve_timeout: 5m smtp_smarthost: localhost smtp_from: alerts@localhost smtp_auth_username: admin smtp_auth_password: password route: group_by: ['alertname'] group_wait: 60s group_interval: 60s repeat_interval: 1h receiver: 'sysadmins' receivers: - name: 'sysadmins' email_configs: - to: sysadmin@localhost inhibit_rules: - source_match: severity: 'critical' target_match: severity: 'warning' equal: ['alertname'] -
Your Alertmanager configuration file must be named
alertmanager.yamlso it can be read by the Prometheus Operator.
-
Delete the secret containing the default configuration:
kubectl delete secret alertmanager-application-monitoring
-
Create a secret containing your new configuration:
kubectl create secret generic alertmanager-application-monitoring --from-file=alertmanager.yaml
3.5.5. Metrics and rules
Common metrics
The following components export these common metrics:
-
enmasse-operator -
address-space-controller -
standard-controllerenmasse_version-
- Type
-
version
- Description
-
Provides the current version of each component in EnMasse using the version label. The metric always returns a value of
1. - Example
enmasse_version{job="address-space-controller",version="1.0.1"} 1
enmasse_version{job="enmsse-operator",version="1.0.1"} 1
enmasse_version{job="standard-controller",version="1.0.1"} 1
Address space controller metrics
The following metrics for address-space-controller are available for EnMasse.
Summary
For every metric exported of the type enmasse_address_space_status_ready there is a corresponding metric of type enmasse_address_space_status_not_ready. The values of each can never be the same.
For example:
enmasse_address_space_status_ready{name="my-address-space"} 1
enmasse_address_space_status_not_ready{name="my-address-space"} 0
The total number of address spaces equals the sum of all address spaces in the ready state plus the sum of all address spaces in the not ready state:
enmasse_address_spaces_total == (sum(enmasse_address_space_status_ready) + sum(enmasse_address_space_status_not_ready))enmasse_address_space_status_ready-
- Type
-
Boolean
- Description
-
Indicates each address space that is in a
readystate. - Example
enmasse_address_space_status_ready{name="prod-space"} 1
enmasse_address_space_status_ready{name="dev-space"} 0enmasse_address_space_status_not_ready-
- Type
-
Boolean
- Description
-
Indicates each address space that is in a
not readystate. - Example
enmasse_address_space_status_not_ready{name="prod-space"} 0
enmasse_address_space_status_not_ready{name="dev-space"} 1enmasse_address_spaces_total-
- Type
-
Gauge
- Description
-
Returns the total number of address spaces, regardless of whether they are in a
readyornot readystate. - Example
-
enmasse_address_spaces_total 1
enmasse_address_space_connectors_total-
- Type
-
Gauge
- Description
-
Returns the total number of address space connectors in each address space.
- Example
enmasse_address_space_connectors_total{name="space-one"} 0
enmasse_address_space_connectors_total{name="space-two"} 2
Standard controller and agent metrics
The following standard-controller and agent metrics are available for Brokered address spaces only in EnMasse.
Summary
The total number of addresses equals the sum of the total number of addresses in the ready state and the total number of addresses in the not ready state:
enmasse_addresses_total == enmasse_addresses_ready_total + enmasse_addresses_not_ready_totalThe total number of addresses equals the total number of addresses in all phases:
enmasse_addresses_total == enmasse_addresses_active_total + enmasse_addresses_configuring_total + enmasse_addresses_failed_total + enmasse_addresses_pending_total + enmasse_addresses_terminating_totalenmasse_addresses_total-
- Description
-
Provides the total number of addresses, per address space, regardless of state.
- Type
-
Gauge
- Example
enmasse_addresses_total{addressspace="space-one"} 5
enmasse_addresses_total{addressspace="space-two"} 3
enmasse_addresses_ready_total-
- Type
-
Gauge
- Description
-
Provides the total number of addresses currently in the ready state.
- Example
enmasse_addresses_ready_total{addressspace="space-one"} 3
enmasse_addresses_ready_total{addressspace="space-two"} 2
enmasse_addresses_not_ready_total-
- Type
-
Gauge
- Description
-
Provides the total number of addresses currently in the not ready state.
- Example
enmasse_addresses_not_ready_total{addressspace="space-one"} 2
enmasse_addresses_not_ready_total{addressspace="space-two"} 1enmasse_addresses_active_total-
- Type
-
Gauge
- Description
-
Provides the total number of addresses currently in the active phase.
- Example
-
enmasse_addresses_active_total{addressspace="space-one"} 2
enmasse_addresses_configuring_total-
- Type
-
Gauge
- Description
-
Provides the total number of addresses currently in the configuring phase.
- Example
-
enmasse_addresses_configuring_total{addressspace="space-one"} 2
enmasse_addresses_failed_total-
- Type
-
Gauge
- Description
-
Provides the total number of addresses currently in the failed phase.
- Example
-
enmasse_addresses_failed_total{addressspace="space-one"} 2
enmasse_addresses_pending_total-
- Type
-
Gauge
- Description
-
Provides the total number of addresses currently in the pending phase.
- Example
-
enmasse_addresses_pending_total{addressspace="space-one"} 2
enmasse_addresses_terminating_total-
- Type
-
Gauge
- Description
-
Provides the total number of addresses currently in the terminating phase.
- Example
-
enmasse_addresses_terminating_total{addressspace="space-one"} 2
enmasse_standard_controller_loop_duration_seconds-
- Type
-
Gauge
- Description
-
Provides the execution time, in seconds, for the most recent standard controller reconcile loop.
- Example
-
enmasse_standard_controller_loop_duration_seconds 0.33
enmasse_standard_controller_router_check_failures_total-
- Type
-
Counter
- Description
-
Provies the total number of router check failures during reconciliation loop.
- Example
enmasse_standard_controller_router_check_failures_total{addressspace="firstspace"}	0
enmasse_standard_controller_router_check_failures_total{addressspace="myspace"} 0enmasse_addresses_forwarders_ready_total-
- Type
-
Gauge
- Description
-
Provides the total number of address forwarders in the ready state.
- Example
-
enmasse_addresses_forwarders_ready_total{addressspace="myspace"} 2
enmasse_addresses_forwarders_not_ready_total-
- Type
-
Gauge
- Description
-
Provides the total number of address forwarders in the not ready state.
- Example
-
enmasse_addresses_forwarders_not_ready_total{addressspace="myspace"} 0
enmasse_addresses_forwarders_total-
- Type
-
Gauge
- Description
-
Provides the total number of address forwarders, regardless of whether they are in a ready or not ready state.
- Example
-
enmasse_addresses_forwarders_total{addressspace="myspace"} 2
enmasse_address_canary_health_failures_total-
- Type
-
Gauge
- Description
-
Total number of health check failures due to failure to send and receive messages to probe addresses.
- Example
-
enmasse_address_canary_health_failures_total{addressspace="myspace"} 2
enmasse_address_canary_health_check_failures_total-
- Type
-
Gauge
- Description
-
Total number of attempted health check runs that failed due to controller errors.
- Example
-
enmasse_address_canary_health_check_failures_total{addressspace="myspace"} 1
Rules
This section details Prometheus rules installed using the PrometheusRule CRD with EnMasse. Two types of Prometheus rules are available in EnMasse:
-
Record: Pre-computed expressions saved as a new set of time series.
-
Alert: Expressions that trigger an alert when evaluated as
true.
Records
Records are a type of Prometheus rule that are pre-computed expressions saved as a new set of time series. The following records are available for EnMasse.
enmasse_address_spaces_ready_total-
- Description
-
Aggregates the
enmasse_address_space_status_readyin a single gauge-type metric that provides the total number of addresses in areadystate. - Expression
sum by(service, exported_namespace) (enmasse_address_space_status_ready)- Example
enmasse_address_spaces_ready_total{exported_namespace="prod_namespace",service="address-space-controller"} 1enmasse_address_spaces_not_ready_total-
- Description
-
Aggregates the
enmasse_address_space_not_status_readyin a single gauge-type metric that provides the total number of addresses in anot readystate. - Expression
sum by(service, exported_namespace) (enmasse_address_space_status_not_ready)- Example
enmasse_address_spaces_not_ready_total{exported_namespace="prod_namespace",service="address-space-controller"} 1enmasse_component_health-
- Description
-
Provides a Boolean-style metric for each
address-space-controllerandapi-serverindicating if they are up and running. - Expression
up{job="address-space-controller"} or on(namespace) (1 - absent(up{job="address-space-controller"}))
up{job="api-server"} or on(namespace) (1 - absent(up{job="api-server"}))- Example
enmasse_component_health{job="address-space-controller"}	1
enmasse_component_health{job="api-server"}	1
Alerts
Alerts are a type of Prometheus rule that are expressions that trigger an alert when evaluated as true. The following alerts are available for EnMasse.
ComponentHealth-
- Description
-
Triggers when a component is not in a healthy state.
- Expression
-
component_health == 0
AddressSpaceHealth-
- Description
-
Triggers when one or more address spaces are not in a
readystate. - Expression
-
enmasse_address_spaces_not_ready_total > 0
AddressHealth-
- Description
-
Triggers when one or more addresses are not in a
readystate. - Expressions
-
enmasse_addresses_not_ready_total > 0
3.5.6. Enabling Tenant Metrics
Metrics from brokers and routers can be exposed to tenants without exposing system-admin metrics. To expose tenant metrics create a service monitor in any non-enmasse-infra namespace, ideally the namespace of the concerned address space(s).
-
The
servicemonitorCustom Resource Definition provided by the Prometheus Operator must be installed. -
The tenant must have their own monitoring stack installed.
-
Creata a
servicemonitorresource with a the selector configured to match labels ofmonitoring-key: enmasse-tenantsand theenmasse-infraas the namespace selector. An example service monitor is shown below:apiVersion: monitoring.coreos.com/v1 kind: ServiceMonitor metadata: name: enmasse-tenants labels: app: enmasse spec: selector: matchLabels: monitoring-key: enmasse-tenants endpoints: - port: health namespaceSelector: matchNames: - enmasse-infra -
Ensure the tenant’s monitoring stack has read permissions for service monitors in the service monitor’s namespace but not in the
enmasse-infraas this would expose service-admin metrics too.
3.6. Operation procedures for EnMasse
3.6.1. Restarting components to acquire security fixes
Restarting EnMasse components is required to get image updates for CVEs. The scripts are provided in the EnMasse installation files within the script folder. To restart all components, run all scripts.
Restarting Operators
Operators can be restarted without affecting the messaging system.
-
Run the
restart-operators.shscript:./scripts/restart-operators.sh enmasse-infra
Restarting authentication services
Authentication service restarts will temporarily affect new messaging connections. Existing connections will continue to work even if the authentication service is restarted.
-
Run the
restart-authservices.shscript:./scripts/restart-authservices.sh enmasse-infra
Restarting routers
Messaging routers are only deployed in the standard address space type. The script assumes that at least two replicas of the router are running and performs a rolling restart. Messaging clients connected to the restarting router are disconnected and must reconnect to be served by a different router.
-
Run the
restart-routers.shscript, which requires at least one router to be available:./scripts/restart-routers.sh enmasse-infra 1
Restarting brokers
For the brokered address space type, restarting the broker causes downtime temporarily to messaging clients while the broker is restarted. For the standard address space type, messaging clients are not disconnected from the messaging routers, but clients are not able to consume messages stored on the restarting broker.
-
Run the
restart-brokers.shscript:./scripts/restart-brokers.sh enmasse-infra
3.6.2. Viewing router logs
For the standard address space type, you can view the router logs to troubleshoot issues with clients not connecting or issues with sending and receiving messages.
-
List all router Pods and choose the Pod for the relevant address space:
kubectl get pods -l name=qdrouterd -o go-template --template '\t\n'
-
Display the logs for the Pod:
kubectl logs pod -c router
3.6.3. Viewing broker logs
For the brokered or standard address space type, you can view the broker logs to troubleshoot issues with clients not connecting or issues with sending and receiving messages.
-
List all broker Pods and choose the Pod for the relevant address space:
kubectl get pods -l role=broker -o go-template --template '\t\n' -
Display the logs for the Pod:
kubectl logs pod
3.6.4. Enabling an AMQP protocol trace for the router
For diagnostic purposes, you can enable an AMQP protocol trace for a router. This can be helpful when troubleshooting issues related to client connectivity or with sending and receiving messages. There are two methods for enabling a protocol trace for the router.
-
You can dynamically enable/disable the protocol trace for a single router using a
qdmangecommand. This method avoids the need to restart the router. The setting will be lost the next time the router restarts. -
Alternatively, you can apply configuration to the
standardinfraconfigthat enables the protocol trace for all routers of all address spaces using thatstandardinfraconfig. This method will cause all the routers to restart.
| Enabling the protocol trace increases the CPU overhead of the router(s) and may decrease messaging performance. It may also increase the disk space requirements associated with any log retention system. Therefore, it is recommended that you enable the protocol trace for as short a time as possible. |
Dynamically enabling the protocol trace for a single router
-
List all router Pods and choose the Pod for the relevant address space:
kubectl get pods -l name=qdrouterd -o go-template --template '\t\n'
-
Enable the protocol trace for a single router:
echo '{"enable":"trace+"}' | kubectl exec qdrouterd-podname --stdin=true --tty=false -- qdmanage update -b 127.0.0.1:7777 --type=log --name=log/PROTOCOL --stdin -
Display the logs for the Pod that will include the protocol trace:
kubectl logs pod
-
Disable the protocol trace:
echo '{"enable":"info"}' | kubectl exec qdrouterd-podname --stdin=true --tty=false -- qdmanage update -b 127.0.0.1:7777 --type=log --name=log/PROTOCOL --stdin
Enabling the protocol trace using the StandardInfraConfig environment variable
-
Determine the
addresspaceplanname for the address space concerned:kubectl get addressspace -n namespace address-space-name --output 'jsonpath={.spec.plan}{"\n"}' -
Determine the
standardinfraconfigname for theaddressspaceplanname:kubectl get addressspaceplan address-space-plan --output 'jsonpath={.spec.infraConfigRef}{"\n"}' -
Enable the protocol trace for all routers of all address spaces using that
standardinfraconfig:kubectl patch standardinfraconfig standardinfraconfig-name --type=merge -p '{"spec":{"router":{"podTemplate":{"spec":{"containers":[{"env":[{"name":"PN_TRACE_FRM","value":"true"}],"name":"router"}]}}}}}' -
Display the logs for the Pod that will include the protocol trace:
kubectl logs pod
-
Disable the protocol trace:
kubectl patch standardinfraconfig standardinfraconfig-name --type=merge -p '{"spec":{"router":{"podTemplate":{"spec":{"containers":[{"env":[{"name":"PN_TRACE_FRM"}],"name":"router"}]}}}}}'
3.6.5. Enabling an AMQP protocol trace for the broker
For diagnostic purposes, you can enable an AMQP protocol trace for a broker. This can be helpful when troubleshooting issues with sending or receiving messages.
To enable the protocol trace, you apply configuration to the standardinfraconfig (for standard
address spaces) or brokeredinfraconfig (for brokered address spaces) that enables the protocol trace for all
brokers of all address spaces using that configuration. Applying this configuration will cause the
brokers to restart.
| Enabling the protocol trace increases the CPU overhead of the broker(s) and may decrease messaging performance. It may also increase the disk space requirements associated with any log retention system. Therefore, it is recommended that you enable the protocol trace for as short a time as possible. |
-
Determine the
addresspaceplanname for the address space concerned:kubectl get addressspace -n namespace address-space-name --output 'jsonpath={.spec.plan}{"\n"}' -
Determine the
standardinfraconfigorbrokeredinfraconfigname for theaddressspaceplanname:kubectl get addressspaceplan address-space-plan --output 'jsonpath={.spec.infraConfigRef}{"\n"}' -
Enable the protocol trace for all brokers of all address spaces using that
standardinfraconfigorbrokeredinfraconfig:kubectl patch infraconfig-resource infraconfig-name --type=merge -p '{"spec":{"broker":{"podTemplate":{"spec":{"containers":[{"env":[{"name":"PN_TRACE_FRM","value":"true"}],"name":"broker"}]}}}}}' -
Display the logs for the Pod that will include the protocol trace:
kubectl logs pod
-
Disable the protocol trace:
kubectl patch infraconfig-resource infraconfig-name --type=merge -p '{"spec":{"broker":{"podTemplate":{"spec":{"containers":[{"env":[{"name":"PN_TRACE_FRM"}],"name":"broker"}]}}}}}'
3.6.6. Examining the state of a broker using the Apache ActiveMQ Artemis management interfaces
If a problem is suspected with a Broker associated with an address space, you can examine the state of the broker directly using its built-in management interfaces. EnMasse exposes the Apache ActiveMQ Artemis’s CLI and JMX (via Jolokia). It does not expose the Apache ActiveMQ Artemis Console.
-
Retrieve the uuid for the address space:
kubectl get addressspace myspace -o jsonpath='{.metadata.annotations.enmasse\.io/infra-uuid}' -
Retrieve the broker support credentials (username and password) for the address space:
kubectl get secret broker-support-uuid  --template='' | base64 --decode
kubectl get secret broker-support-uuid  --template='' | base64 --decode
-
Identify the broker pod name:
kubectl get pods -l infraUuid=uuid,role=broker
In the standard address, there may be many brokers. To identify the broker(s) hosting a particular queue, use this command:
kubectl get address address-resource-name -o jsonpath="{.status.brokerStatuses[*].containerId}" -
Execute support commands on the broker’s pod:
To execute an Apache ActiveMQ Artemis CLI command, use a command similar to the following:
kubectl exec broker-pod-name -- /opt/apache-artemis/bin/artemis address show --user username --password password
To execute an Apache ActiveMQ Artemis Jolokia JMX command, use a command similar to the following:
kubectl exec broker-pod-name -- curl --silent --insecure --user username:_password_ -H "Origin: https://localhost:8161" 'https://localhost:8161/console/jolokia/read/org.apache.activemq.artemis:broker="broker pod name"/AddressMemoryUsage'
The double quotes around the broker pod name within the URL are required. Make sure you protect them from your command shell using single quotes surrounding the whole URL, as shown in the above command. If they are not present, you will receive an authorization failure.
3.6.7. Changing the broker logging level at runtime
For diagnostic purposes, you can change the broker logging level at runtime, which can be helpful when troubleshooting issues with sending or receiving messages.
To do this, use the kubectl rsh command to connect to the broker Pod and adjust the logging.properties file used by the broker. The broker automatically reloads this file and immediately applies the changes without interrupting established messaging connections.
The changes made to logging.properties are transient. The system reverts the logging level to default levels the next time the broker Pod restarts.
| Increasing the logging verbosity increases the CPU overhead of the broker(s) and might decrease messaging performance. It might also increase the disk space requirements associated with any log retention system. Therefore, it is recommended that you increase the logging verbosity for as short a time as possible. |
-
List all broker Pods and choose the Pod for the relevant address space:
kubectl get pods -l role=broker -o go-template --template '\t\n'
-
To change the logging level for a single broker, use the
kubectl rshcommand to connect to the broker Pod and edit thelogging.propertiesfile. The broker uses the JBoss Logging framework. Adjust the logging levels of the packages corresponding to the area of interest. There are comments in the file to guide you.kubectl rsh pod cp /var/run/artemis/split-1/broker/etc/logging.properties /tmp/logging.properties vi /var/run/artemis/split-1/broker/etc/logging.properties exit
-
Display the logs for the Pod that will include the protocol trace:
kubectl logs pod
-
To revert to normal logging levels, revert the contents of the
logging.propertiesfile.kubectl rsh pod cp /tmp/logging.properties /var/run/artemis/split-1/broker/etc/logging.properties exit
3.7. EnMasse configuration sizing guidelines
The following information provides guidelines on how to size EnMasse installations. More specifically, these guidelines offer specific configuration recommendations for components and plans based on use cases, and the trade-offs involved when adjusting the configuration settings. Sizing EnMasse involves configuration of:
-
Brokers
-
Routers (standard address space only)
-
Operator(s)
-
Plans
For example, each address space type has certain distinct features that need to be considered when creating the address plans. For more information about address space types and their semantics, see address spaces.
|
Properly sizing EnMasse components also requires taking into consideration the following points regarding your Kubernetes cluster:
|
3.7.1. Broker component sizing
Brokers are configured using the BrokeredInfraConfig and StandardInfraConfig resources, depending on the type of address space. When sizing a broker, consider:
-
The average message size
-
The number of messages stored
-
The number of queues and topics
-
The address full policy
| In EnMasse, you can only restrict the total amount of memory allocated for a broker. You cannot restrict the amount of memory used by individual addresses. |
The broker persists all messages to disk. When the BLOCK, FAIL, or DROP address full policy is specified, the number of messages that can be persisted is limited to the amount of memory in the broker. By using the PAGE address full policy, more messages can be stored than can be held in memory, at the expense of a potential performance degradation from reading data from disk. Therefore, paging is useful in the case of large messages or a large backlog of messages in your system.
Example use case for a broker component configuration
Given 10 queues with a maximum of 1000 messages stored per queue and an average message size of 128 kB, the amount of storage space required to store messages is:
10 queues * 1000 messages * (128 + (128 kB * 1024)) = 1.25 GBIn addition, the broker has a fixed storage footprint of about 50 MB.
The amount of memory required for the broker depends on which address full policy is specified. If the PAGE policy is used, the memory requirements can be reduced since the messages are stored separately from the journal (which always needs to fit in memory). If the FAIL, BLOCK, or DROP policies are specified, all messages must also be held in memory, even if they are persisted.
There is also constant memory cost associated with running the broker as well as the JVM. The memory available to store message is automatically derived from the memory set in the broker configuration and is set to be half the JVM memory, which in turn is set to half of the system memory.
In the standard address space type, multiple broker instances might be created. The sizing of these broker instances also depends on the address plan configuration and how many addresses you expect each broker to be able to handle before another broker is spawned.
|
Example broker component configuration without paging
For broker configurations not using a PAGE policy, take into consideration an additional 5 percent bookkeeping overhead per address should be taken into account (1.05 * 1.25 = 1.35 GB):
apiVersion: admin.enmasse.io/v1beta1
kind: BrokeredInfraConfig
metadata:
  name: cfg1
spec:
  broker:
    addressFullPolicy: FAIL
    globalMaxSize: 1.35Gb
    resources:
      memory: 8Gi
      storage: 2Gi
  ...
Example broker component configuration with paging
When paging is enabled, the original formula can be modified to only account for a reference to the message as well as holding 1000 in-flight messages in memory:
(1000 messages * 1000 * 128 kB) + (10 queues * 128 kB * 1024) = 123.5 MBSo, the amount of memory specified for the broker can now be reduced, as seen in this configuration example:
apiVersion: admin.enmasse.io/v1beta1
kind: BrokeredInfraConfig
metadata:
  name: cfg1
spec:
  broker:
    addressFullPolicy: PAGE
    globalMaxSize: 124Mb
    resources:
      memory: 1Gi
      storage: 2Gi
  ...
Broker scaling (standard address space only)
Brokers are deployed on demand, that is, when addresses of type queue or topic are created. The number of brokers deployed is restricted by the resource limits specified in the AddressSpacePlan configuration. The following AddressSpacePlan configuration example specifies a limit of four brokers in total per address space:
apiVersion: admin.enmasse.io/v1beta2
kind: AddressSpacePlan
metadata:
  name: cfg1
spec:
  resourceLimits:
    broker: 4.0
  ...
In terms of capacity, multiply the memory requirements for the broker by the limit.
The number of broker instances are scaled dynamically between one and the maximum limit specified based on the AddressPlan used for the different addresses. An AddressPlan specifies the fraction of a broker that is required by an address. The fraction specified in the plan is multiplied by the number of addresses referencing this plan, and then rounded up to produce the number of desired broker replicas.
AddressPlan configuration exampleapiVersion: admin.enmasse.io/v1beta2
kind: AddressPlan
metadata:
name: plan1
spec:
...
resources:
broker: 0.01
If you create 110 addresses with plan1 as the address plan, the number of broker replicas is ceil(110 addresses * 0.01 broker) = 2 replicas.
The total number of brokers is capped by the address space plan resource limits.
3.7.2. Router component sizing
Routers are configured in the StandardInfraConfig resource. In determining router sizing, consider:
-
The number of addresses
-
The number of connections and links
-
Link capacity
The router does not persist any state and therefore does not require persistent storage.
Address configuration itself does not require a significant amount of router memory. However, queues and subscriptions require an additional two links between the router and broker per address.
The total number of links is then two times the number of queues/subscriptions plus the number of client links. Each link requires metadata and buffers in the router to handle routing messages for that link.
The router link capacity affects how many messages the router can handle per link. Setting the link capacity to a higher value might improve performance, but at the cost of potentially more memory being used to hold in-flight messages if senders are filling the links. If you have many connections and links, consider specifying a lower value to balance the memory usage.
In addition, the router has to parse the message headers, manage dispositions and settlements of messages, and other per-link activities. The per-link cost can be derived using a constant factor of the link capacity and message size. This factor varies depending on the message size. The following table provides an approximation of this factor for different message size ranges:
| Message size (bytes) | Factor |
|---|---|
20-1000 |
18,000 |
1000-4000 |
22,000 |
4000-10,000 |
30,000 |
>10,000 |
50,000 |
Example use case for router component sizing
Consider the following example use case:
-
500 anycast and 1000 queued addresses
-
10,000 connected clients (one link per client)
-
Link capacity of 10
-
An average message size of 512 bytes
Based on measurements, an estimated 7 kB overhead per anycast address is realistic, so:
500 anycast addresses * 7 kB overhead per address = 3.5 MB
Memory usage of queues and topics is slightly higher than that of anycast addresses, with an estimated 32 kB overhead per address. In addition, each router-broker link can have up to linkCapacity message deliveries to keep track of. Also, we need to multiply the link capacity with the multiplication factor to account for the worst-case scenario:
(1000 queued addresses * 32,768) + (2000 * 18,000 link multiplication factor * 100 links) = 374 MB
Memory usage of client connections/links:
10,000 clients * 10 link capacity * 18,000 link multiplication factor = 1717 MB
|
The memory usage of client connections/links can be divided by the number of router instances. If you have N routers, the total amount of router memory required for this configuration, including a constant base memory of 50 MB, is |
To ensure the maximum number of connections and links is not exceeded, a router policy can be applied as well. The following configuration example shows two routers with a router policy specified:
apiVersion: admin.enmasse.io/v1beta1
kind: StandardInfraConfig
metadata:
  name: cfg1
spec:
  router:
    resources:
      memory: 1100Mi
    linkCapacity: 10
    policy:
      maxConnections: 5000
      maxSessionsPerConnection: 1
      maxSendersPerConnection: 1
      maxReceiversPerConnection: 1
  ...
High availability (HA)
To configure routers for high availability (HA), multiply the minimum number of required router replicas by the amount of memory per router to calculate the amount of expected memory usage. Although all connections and links are distributed across all routers, if one router fails, you must plan for those connections and links to be redistributed across the remaining routers.
Router scaling
Routers are scaled dynamically on demand within the limits specified for minReplicas in the StandardInfraConfig resource and the resourceLimits.router specified in the AddressSpacePlan. To restrict the number of routers to a maximum number of four, but require a minimum amount of two routers for HA purposes, the following configuration is needed:
apiVersion: admin.enmasse.io/v1beta1
kind: StandardInfraConfig
metadata:
  name: cfg1
spec:
  router:
    minReplicas: 2
  ...
---
apiVersion: admin.enmasse.io/v1beta2
kind: AddressSpacePlan
metadata:
  name: plan1
spec:
  infraConfigRef: cfg1
  resourceLimits:
    router: 4
  ...
In terms of capacity, multiply the memory requirements for the router by the resource limit. The router will then scale up to the resource limits specified in the AddressSpacePlan for the address space.
The number of router replicas is scaled dynamically between the minimum and maximum limits based on the AddressPlan used for the different addresses. An AddressPlan describes the fraction of a router that is required by an address. The fraction defined in the plan is multiplied by the number of addresses referencing this plan, and then rounded up to produce the number of desired router replicas.
AddressPlan configuration example:apiVersion: admin.enmasse.io/v1beta2
kind: AddressPlan
metadata:
name: plan1
spec:
...
resources:
router: 0.01
If you create 110 addresses with plan1 as the address plan, the number of router replicas is ceil(110 addresses * 0.01 router) = 2 replicas.
If the number of replicas exceeds the address space plan limit, the addresses exceeding the maximum number remain in the Pending state and an error message describing the issue is displayed in the Address status section.
3.7.3. Operator component sizing
The operator component is tasked with reading all address configuration and applying these configurations to the routers and brokers. It is important to size the operator component proportionally to the number of addresses.
In the standard address space, the admin Pod contains two processes, agent and standard-controller. These processes cannot be sized individually, but the memory usage of both is proportional to the number of addresses. In the brokered address space, only a single agent process exists.
| The operator processes are running on either a JVM or a Node.JS VM. Sizing the amount of memory for these processes at twice the amount of memory required for the address configuration itself is recommended. |
Operator component configuration example
Each address adds about 20 kB overhead to the operator process. With 1500 addresses, an additional 1500 * 2 kB = 30 MB is needed for the operator process.
In addition, these processes have a base memory requirement of 256 MB. So, the total operator memory needed is 256 MB + 30 MB = 286 MB. This value can be configured in both the StandardInfraConfig and BrokeredInfraConfig resources:
apiVersion: admin.enmasse.io/v1beta1
kind: StandardInfraConfig
metadata:
  name: cfg1
spec:
  admin:
    resources:
      memory: 300Mi
  ...
3.7.4. Plan sizing
Plans enable dynamic scaling in the standard address space, as shown in the broker and router sizing sections. At the cluster level, the combination of plans and infrastructure configuration settings determines the maximum number of Pods that can be deployed on the cluster. Since EnMasse does not support limiting the number of address spaces that can be created, it is a best practice to apply a policy to limit who is allowed to create address spaces. Such policy configuration can be handled through the standard Kubernetes policies.
From a capacity-planning perspective, it is useful to calculate the maximum number of Pods and the maximum amount of memory that can be consumed for a given address space. To make this calculation using a script, see Running the check-memory calculation script.
Running the check-memory calculation script
You can use this script to calculate the maximum number of Pods and the maximum amount of memory that can be consumed for a given address space.
In this script, memory is assumed to be specified using the Mi unit, while storage is assumed to be specified using the Gi unit. Also, all three components, admin, router, and broker, must have limits specified for the script to work as intended.
-
Save the following script as
check-memory.sh:#!/usr/bin/env bash PLAN=$1 total_pods=0 total_memory_mb=0 total_storage_gb=0 routers=$(oc get addressspaceplan $PLAN -o jsonpath='{.spec.resourceLimits.router}') brokers=$(oc get addressspaceplan $PLAN -o jsonpath='{.spec.resourceLimits.broker}') infra=$(oc get addressspaceplan $PLAN -o jsonpath='{.spec.infraConfigRef}') operator_memory=$(oc get standardinfraconfig $infra -o jsonpath='{.spec.admin.resources.memory}') broker_memory=$(oc get standardinfraconfig $infra -o jsonpath='{.spec.broker.resources.memory}') broker_storage=$(oc get standardinfraconfig $infra -o jsonpath='{.spec.broker.resources.storage}') router_memory=$(oc get standardinfraconfig $infra -o jsonpath='{.spec.router.resources.memory}') total_pods=$((routers + brokers + 1)) total_memory_mb=$(( (routers * ${router_memory%Mi}) + (brokers * ${broker_memory%Mi}) + ${operator_memory%Mi})) total_storage_gb=$(( brokers * ${broker_storage%Gi})) echo "Pods: ${total_pods}. Memory: ${total_memory_mb} MB. Storage: ${total_storage_gb} GB" -
Run the script using the following command:
bash calculate-memory.sh standard-small
If all components have limits defined in the assumed units, the script outputs the total resource limits for address spaces using this plan, as in the following example:
Pods: 3. Memory: 1280 MB. Storage: 2 GB
3.7.5. Address sizing
Per address broker memory limits are calculated from the address plan configuration. EnMasse determines the maximum size allowed for each queue by multiplying the broker configuration globalMaxSize (specified in the standardinfraconfig or brokeredinfraconfig) by the address plan’s broker resource limit. The behavior when the queue reaches its memory limit is governed by the address full policy. For more information on the address full policy, see Broker component sizing.
For example, if the broker’s configuration specifies globalMaxSize = 124 MB and the address plan configuration specifies addressplan.spec.resources.broker = 0.2, the maximum size allowed for each queue is 25 MB (124 * 0.2 = 25 MB).
3.8. Understanding EnMasse resource configuration
3.8.1. Address space and address concepts in EnMasse
Before you begin configuring resources for EnMasse, you must first understand the concepts of an address space and an address in EnMasse.
Address space
An address space is a group of addresses that can be accessed through a single connection (per protocol). This means that clients connected to the endpoints of an address space can send messages to or receive messages from any authorized address within that address space. An address space can support multiple protocols, as defined by the address space type.
| You cannot modify endpoints for an existing address space. |
EnMasse has two types of address spaces:
Address
An address is part of an address space and represents a destination for sending and receiving messages. An address has a type, which defines the semantics of sending messages to and receiving messages from that address.
The types of addresses available in EnMasse depend on the address space type.
3.8.2. Service configuration resources and definition
The service administrator configures EnMasse by creating Custom Resources that comprise the "service configuration." This service configuration contains instances of the following Custom Resource types:
| Custom Resource type | Description |
|---|---|
|
Specifies an authentication service instance used to authenticate messaging clients. |
|
Specifies the messaging resources available for address spaces using this plan, such as the available address plans and the amount of router and broker resources that can be used. |
|
Specifies the messaging resources consumed by a particular address using this plan, such as the fraction of routers and brokers an address can use and other properties that can be specified for multiple addresses. |
|
For the |
|
For the |
When created, these Custom Resources define the configuration that is available to the messaging tenants.
The following diagram illustrates the relationship between the different service configuration resources and how they are referenced by the messaging tenant resources.
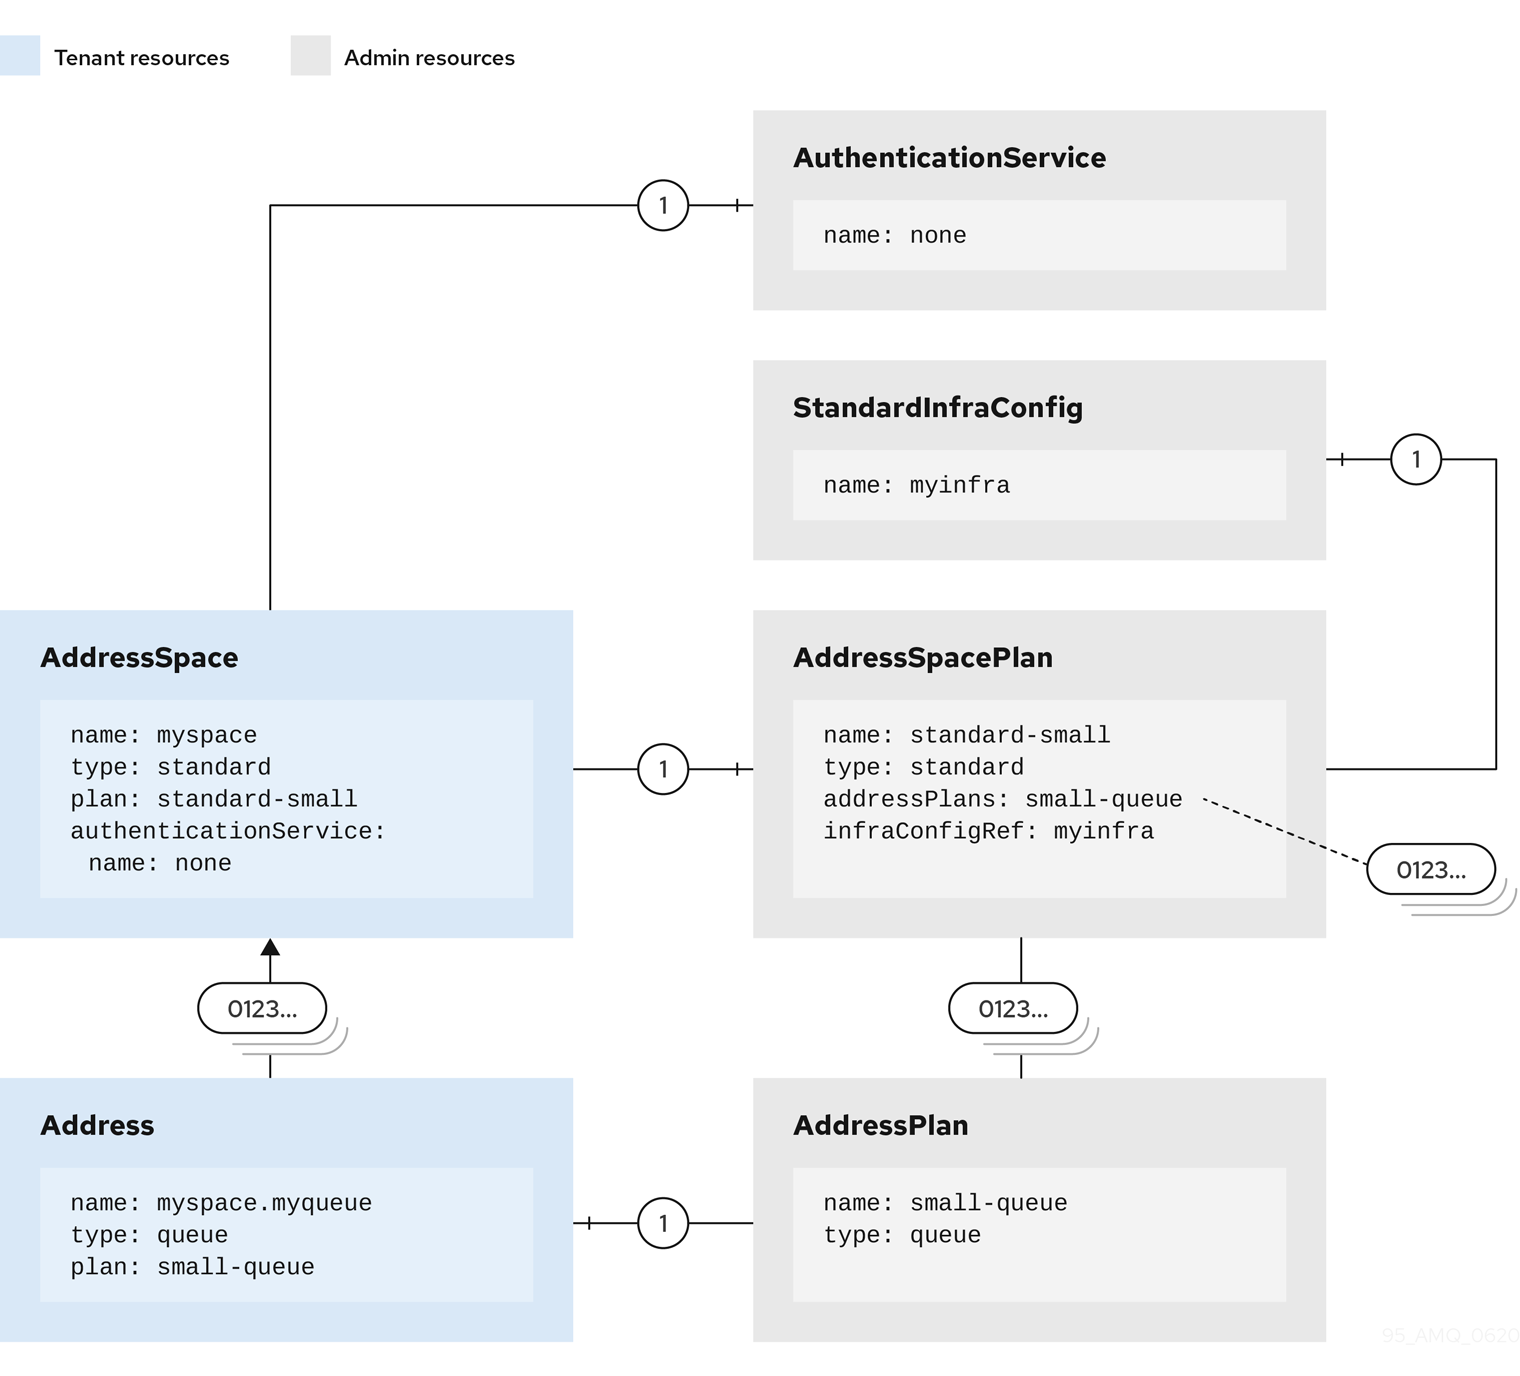
3.8.3. Example use case for configuring EnMasse
To help illustrate how the service configuration resources can be defined to satisfy a particular use case, the requirements of Company X for using EnMasse are outlined. This use case is referenced throughout the following documentation describing the service configuration resource types in further detail.
Company X has the following requirements:
-
Ability to accommodate multiple separate teams—for example, engineering and quality assurance (QA) work teams—that use messaging independently. To meet this requirement, multiple address spaces are needed.
-
Since the applications for Company X are written to use JMS APIs and make extensive use of local transactions and they use a mixture of AMQP and OpenWire clients, using the brokered address space type is required.
-
For engineering work, restricting the messaging infrastructure to support storage of no more than 1000 messages of approximately 1 KB per message, with up to 10 queues and topics is required.
For QA work, restricting the messaging infrastructure to support storage of no more than 10,000 messages of approximately 100 KB, with up to 50 queues and topics is required.
-
For engineering work, the ability to restrict who can connect into the address space is required.
-
For engineering work, the engineering team does not need to create distinct users that need to be individually authenticated.
For QA work, the QA team must be able to create users for each instance.
Each of these requirements and how they can be met by configuring the appropriate resources is discussed in the following sections.
Restricting messaging infrastructure
Company X has the following requirements for using EnMasse:
-
For engineering work, restricting the messaging infrastructure to support storage of no more than 1000 messages of approximately 1 KB per message, with up to 10 queues and topics is required.
For QA work, restricting the messaging infrastructure to support storage of no more than 10,000 messages of approximately 100 KB, with up to 50 queues and topics is required.
Meeting this requirement involves configuring the BrokeredInfraConfig resource. The following points need to be taken into consideration:
-
Calculate the memory size for the broker: Given the requirements, specifying a relatively small memory size for engineering work is likely sufficient, while more memory is required for the QA work. For more information about broker sizing guidelines, see Broker component sizing.
-
Calculate the minimum amount of storage for the broker. For more information about broker sizing guidelines, see Broker component sizing.
Examples of brokered infrastructure configurations
The following brokered infrastructure configuration examples show broker component resource values that meet the requirements of Company X.
apiVersion: admin.enmasse.io/v1beta1
kind: BrokeredInfraConfig
metadata:
  name: engineering
spec:
  broker:
    resources:
      memory: 512Mi
storage: 20MiapiVersion: admin.enmasse.io/v1beta1
kind: BrokeredInfraConfig
metadata:
name: qa
spec:
broker:
resources:
memory: 4Gi
storage: 50GiAbility to restrict address space connections
Company X has the following requirement for using EnMasse: For engineering work, the ability to restrict who can connect into the address space is required.
To meet this requirement you must set a network policy in the brokered infrastructure configuration. For more information about network policies, see
-
Kubernetes documentation about Network policies.
apiVersion: admin.enmasse.io/v1beta1
kind: BrokeredInfraConfig
metadata:
  name: engineering
spec:
  networkPolicy:
    ingress:
      - from:
        - namespaceSelector:
            matchLabels:
              org: engineering
  broker:
    resources:
      memory: 512Mi
      storage: 20Mi
In addition, the address space plan references the previous BrokeredInfraConfig Custom Resource.
apiVersion: admin.enmasse.io/v1beta2
kind: AddressSpacePlan
metadata:
  name: engineering
spec:
  infraConfigRef: engineering
  addressSpaceType: brokered
  addressPlans:
  - brokered-queue
  - brokered-topic
Authentication service resource examples
Company X has the following requirement for using EnMasse: For engineering work, the engineering team does not need to create distinct users that need to be individually authenticated. To meet this requirement, you specify the none authentication service:
apiVersion: admin.enmasse.io/v1beta1
kind: AuthenticationService
metadata:
  name: engineering
spec:
  type: none
For QA work, the QA team must be able to create users for each instance. Also, QA has a database they want to use for persisting the users. To meet this requirement, you must use the standard authentication service and specify a data source:
apiVersion: admin.enmasse.io/v1beta1
kind: AuthenticationService
metadata:
  name: qa
spec:
  type: standard
  standard:
    storage:
      type: persistent-claim
      size: 5Gi
    datasource:
      type: postgresql
      host: db.example.com
      port: 5432
      database: authdb
4. Tenant guide
The tenant guide provides resources on how to manage address spaces, addresses, and users as a messaging tenant.
4.1. Minimal tenant configuration
The following procedure will get you started with a minimal configuration for a messaging application.
-
Save the example configuration:
apiVersion: enmasse.io/v1beta1
kind: AddressSpace
metadata:
  name: myspace
spec:
  type: standard
  plan: standard-small
---
apiVersion: enmasse.io/v1beta1
kind: Address
metadata:
  name: myspace.myqueue
spec:
  address: myqueue
  type: queue
  plan: standard-small-queue
-
Apply the example configuration:
kubectl apply -f application-config.yaml
4.2. Managing address spaces
EnMasse is configured to support managing address spaces using the Kubernetes command-line
tools. Address spaces are managed like any other Kubernetes resource using kubectl.
4.2.1. Address space
An address space is a group of addresses that can be accessed through a single connection (per protocol). This means that clients connected to the endpoints of an address space can send messages to or receive messages from any authorized address within that address space. An address space can support multiple protocols, as defined by the address space type.
| You cannot modify endpoints for an existing address space. |
EnMasse has two types of address spaces:
4.2.2. Standard address space
The standard address space is the default address space in EnMasse. It consists of an AMQP router network in combination with attachable storage units. Clients connect to a message router, which forwards messages to or from one or more message brokers. This address space type is appropriate when you have many connections and addresses. However, the standard address space has the following limitations:
-
No transaction support
-
No message ordering
-
No selectors on queues
-
No browsing on queues
-
No message groups
Clients connect and send and receive messages in this address space using the AMQP or MQTT protocols. Note that MQTT does not support qos2 or retained messages.
Standard address types
The standard address space supports five different address types:
-
queue
-
topic
-
anycast
-
multicast
-
subscription
Queue
The queue address type is a store-and-forward queue. This address type is appropriate for implementing a distributed work queue, handling traffic bursts, and other use cases when you want to decouple the producer and consumer. A queue can be sharded across multiple storage units. By sharding the queue, throughput may be higher in some cases and the queue’s availability is improved in that the queue continues to be available even if one of the storage units hosting a portion of the queue is temporarily offline. However, messages on the offline storage unit are unavailable until the storage unit returns. When queues are sharded, message ordering is lost.
Topic
The topic address type supports the publish-subscribe messaging pattern where there are 1..N producers and 1..M consumers. Each message published to a topic address is forwarded to all subscribers for that address. A subscriber can also be durable, in which case messages are kept until the subscriber has acknowledged them.
If you create a subscription on a topic, any senders to that topic must specify the topic capability.
|
A client receiving from a topic address can specify a wildcard address with the topic address as the root. The wildcard behavior follows the MQTT syntax:
-
/is a separator -
+matches one level -
#matches one or more levels
So, for example:
-
a/#/bmatchesa/foo/b,a/bar/b, anda/foo/bar/b -
a/+/bmatchesa/foo/banda/bar/b, but would not matcha/foo/bar
In the standard address space, the first level must always be a defined topic address; that is, # and + are not valid as the first characters of a subscribing address.
A known issue exists where creating a subscriber on a hierarchical topic in EnMasse causes the broker to instead create it as a competing consumer (handling the address like a queue rather than a topic). For more information about the specific workaround for your client, see the applicable client example section in Connecting applications to EnMasse.
Anycast
The anycast address type is a scalable direct address for sending messages to one consumer. Messages sent to an anycast address are not stored, but are instead forwarded directly to the consumer. This method makes this address type ideal for request-reply (RPC) uses or even work distribution. This is the cheapest address type as it does not require any persistence.
Multicast
The multicast address type is a scalable direct address for sending messages to multiple consumers. Messages sent to a multicast address are forwarded to all consumers receiving messages on that address. Because message acknowledgments from consumers are not propagated to producers, only pre-settled messages can be sent to multicast addresses.
Subscription
Using the subscription address type you can create a subscription for a topic that holds messages
published to the topic even if the subscriber is not attached. The consumer accesses the subscription using the following address syntax: <topic-address>::<subscription-address>. For example, for a subscription mysub on a topic mytopic the consumer accesses the subscription from the address mytopic::mysub. The default setting permits only a single consumer per subscription. This setting can be changed by editing the maxConsumers field of the subscription address.
The maxConsumers setting cannot be modified for existing subscriptions.
|
4.2.3. Brokered address space
The brokered address space is designed to support broker-specific features, at the cost of limited scale in terms of the number of connections and addresses. This address space supports JMS transactions, message groups, and selectors on queues and topics.
Clients can connect as well as send and receive messages in this address space using the following protocols:
-
AMQP
-
CORE
-
OpenWire
-
MQTT
-
STOMP
Brokered address types
The brokered address space supports two address types:
-
queue
-
topic
Queue
The queue address type is a store-and-forward queue. This address type is appropriate for implementing a distributed work queue, handling traffic bursts, and other use cases where you want to decouple the producer and consumer. A queue in the brokered address space supports selectors, message groups, transactions, and other JMS features. Message order can be lost with released messages.
Topic
The topic address type supports the publish-subscribe messaging pattern in which there are 1..N producers and 1..M consumers. Each message published to a topic address is forwarded to all subscribers for that address. A subscriber can also be durable, in which case messages are kept until the subscriber has acknowledged them.
A client receiving from a topic address can specify a wildcard address with the topic address as the root. The wildcard behavior follows the MQTT syntax:
-
/is a separator -
+matches one level -
#matches one or more levels
So, for example:
-
a/#/bmatchesa/foo/b,a/bar/b,a/foo/bar/b -
a/+/bmatchesa/foo/banda/bar/b, but would not matcha/foo/bar
A known issue exists where creating a subscriber on a hierarchical topic in EnMasse causes the broker to instead create it as a competing consumer (handling the address like a queue rather than a topic). For more information about the specific workaround for your client, see the applicable client example section in Connecting applications to EnMasse.
4.2.4. Address space plans
An address space is configured with an address space plan, which describes the allowed resource usage of that address space. The address space plans are configured by the service administrator and can vary between EnMasse installations.
The address space plan can be changed if the address space requires more, or less, resources.
4.2.5. Listing available address space plans using the command line
You can list the address space plans available for your address space type.
-
Retrieve the schema showing available address space plans (replace
standardwithbrokeredfor the brokered address space type):kubectl get addressspaceschema standard -o jsonpath='{.spec.plans[*].name}'
4.2.6. Listing available authentication services using the command line
You can list the authentication services available for your address space type.
-
Retrieve the schema with the authentication services listed (replace
standardwithbrokeredfor the brokered address space type):kubectl get addressspaceschema standard -o jsonpath='{.spec.authenticationServices}'
4.2.7. Address space examples
Address space example
This address space example shows only the required options to create an AddressSpace.
apiVersion: enmasse.io/v1beta1
kind: AddressSpace
metadata:
  name: myspace
spec:
  type: standard (1)
plan: standard-unlimited (2)| 1 | The address space type can be either brokered or standard. |
| 2 | The address space plan depends on the address space type and what has been configured by the EnMasse administrator. To view your available address space plans, see Listing available address space plans. |
Address space example using an authentication service
This address space example shows how you can configure the authentication service of an AddressSpace.
apiVersion: enmasse.io/v1beta1
kind: AddressSpace
metadata:
  name: myspace
spec:
  type: standard
  plan: standard-unlimited
  authenticationService:
name: standard-authservice (1)| 1 | The authentication service name depends on the available authentication services configured by the EnMasse administrator. To view the available authentication services for your address space type, see Listing available authentication services. |
Address space example using an external authentication service allowing overrides
This address space example shows how you can override the host name, port number, and realm for an external authentication service. Note that the ability to specify overrides depends on how the external authentication service is configured by the EnMasse administrator.
For more information about how to configure an external authentication service to allow a messaging tenant to override host name, port number, and realm, see External authentication service example allowing overrides.
apiVersion: enmasse.io/v1beta1
kind: AddressSpace
metadata:
  name: myspace
spec:
  type: standard
  plan: standard-unlimited
  authenticationService:
    name: external-authservice (1)
    type: external
    overrides: (2)
      realm: enmasse-infra-space-standard-auth
      host: standard-authservice-enmasse-infra.apps.wfd-28d9.openshiftworkshop.com
      port: 5671
      caCertSecret:
name: my-ca-cert| 1 | The authentication service name depends on the available authentication services configured by the EnMasse administrator. To view the available authentication services for your address space type, see Listing available authentication services. |
| 2 | Specifies the override values. |
Address space examples exposing endpoints externally
These address space examples show how you can configure the external endpoints of an AddressSpace
to access messaging endpoints outside the Kubernetes cluster.
Kubernetes LoadBalancer service example
To expose AddressSpace endpoints through Kubernetes LoadBalancer services, the loadbalancer type is used:
apiVersion: enmasse.io/v1beta1
kind: AddressSpace
metadata:
  name: myspace
spec:
  type: standard
  plan: standard-unlimited
  authenticationService:
    name: standard-authservice
  endpoints:
  - name: messaging (1)
    service: messaging (2)
    expose:
     type: loadbalancer (3)
     loadBalancerPorts: (4)
     - amqp
     - amqps
      annotations: (5)
        mykey: myvalue
      loadBalancerSourceRanges: (6)
- 10.0.0.0/8| 1 | (Required) The name of the endpoint. The name specified affects the name of the Kubernetes service to be created as well as the name of the endpoint in the status section of the AddressSpace. |
| 2 | (Required) The service configured for the endpoint. Valid values for service are messaging and mqtt. However, the mqtt service is supported for the standard address space type only. |
| 3 | (Required) The type of endpoint being exposed. The loadbalancer type creates an Kubernetes LoadBalancer service. Valid values are route and loadbalancer. |
| 4 | (Required) A list of the ports to be exposed on the LoadBalancer service. For the messaging service, the valid values are amqp and amqps. |
| 5 | (Optional) A set of key-value annotation pairs that are added to the LoadBalancer Service object. |
| 6 | (Optional) The allowed source ranges that are accepted by the load balancer. |
Address space certificate provider configuration examples
The following address space examples show how you can configure the endpoints of an AddressSpace using different certificate providers. The certificate provider determines how certificates are issued for the endpoints of an AddressSpace.
selfsigned provider
The selfsigned certificate provider can be used to configure endpoints with self-signed
certificates. The CA for these certificates can be found in the status.caCert field of the
AddressSpace resource.
| Using a self-signed certificate in production environments is not recommended. |
apiVersion: enmasse.io/v1beta1
kind: AddressSpace
metadata:
  name: myspace
spec:
  type: standard
  plan: standard-unlimited
  authenticationService:
    name: standard-authservice
  endpoints:
  - name: messaging
    service: messaging
    cert:
provider: selfsigned (1)| 1 | (Required) The certificate provider type. Valid values are openshift (on OpenShift only), certBundle, and selfsigned (default value). |
certBundle provider
The certBundle certificate provider can be used to configure endpoints with user-supplied
certificates signed by your own CA. Certificate rotation can be performed by updating the tlsKey and
tlsCert fields with updated certificates, and then updating the AddressSpace resource.
apiVersion: enmasse.io/v1beta1
kind: AddressSpace
metadata:
  name: myspace
spec:
  type: standard
  plan: standard-unlimited
  authenticationService:
    name: standard-authservice
  endpoints:
  - name: messaging
    service: messaging
    cert:
     provider: certBundle (1)
     tlsKey: Y2VydGJ1bmRsZXByb3ZpZGVyY2VydA== (2)
tlsCert: Y2VydGJ1bmRsZXByb3ZpZGVyY2VydA== (3)| 1 | (Required) The certificate provider type. Valid values are openshift (on OpenShift only), certBundle, and selfsigned (default value). |
| 2 | (Required) The base64-encoded value of the PEM private key (including the preamble). |
| 3 | (Required) The base64-encoded value of the PEM certificate (including the preamble). |
Address space example exports
You can export your address space information using the following three export types:
-
ConfigMap -
Secret -
Service
ConfigMap and Secret type export examples
This example shows the format used by the ConfigMap export type. The format of the Secret export type uses the same keys as the ConfigMap export type, but the values are Base64-encoded.
service.host: messaging.svc
service.port.amqp: 5672
external.host: external.example.com
external.port: 5671
ca.crt: // PEM formatted CA
Service type export example
This example shows the format used by the Service export type.
  externalName:  messaging.svc
    ports:
    - name: amqp
      port: 5672
      protocol: TCP
      targetPort: 5672
4.2.8. Example address space status output
The AddressSpace resource contains a status field that can be used to retrieve information about
its state and endpoints. The following output is an example of the output you can get from running
kubectl get addressspace myspace -o yaml:
apiVersion: enmasse.io/v1beta1
kind: AddressSpace
metadata:
  name: myspace
spec:
  ...
status:
  isReady: false (1)
  messages:
    - "One or more deployments are not ready: "
  endpointStatuses: (2)
    - name: messaging
      cert: aGVsbG8= (3)
      serviceHost: messaging-123.enmasse-infra.svc (4)
      servicePorts: (5)
        - name: amqp
          port: 5672
        - name: amqps
          port: 5671
      externalHost: messaging.example.com (6)
      externalPorts: (7)
        - name: amqps
port: 443| 1 | The status.isReady field can be either true or false. |
| 2 | The status.endpointStatuses field provides information about available endpoints for this address space. |
| 3 | The cert field contains the base64-encoded certificate for a given endpoint. |
| 4 | The serviceHost field contains the cluster-internal host name for a given endpoint. |
| 5 | The servicePorts field contains the available ports for the cluster-internal host. |
| 6 | The externalHost field contains the external host name for a given endpoint. |
| 7 | The externalPorts field contains the available ports for the external host. |
4.2.9. Example of exporting address space information into the application namespace
This address space example shows how you can export the endpoint information of an AddressSpace
resource to a ConfigMap, Secret, or Service in the same namespace as the messaging
application.
apiVersion: enmasse.io/v1beta1
kind: AddressSpace
metadata:
  name: myspace
spec:
  type: standard
  plan: standard-unlimited
  authenticationService:
    name: standard-authservice
  endpoints:
  - name: messaging
    service: messaging
    exports:
    - kind: ConfigMap (1)
name: my-config (2)| 1 | (Required) The type of export: ConfigMap, Secret, or Service. The resulting ConfigMap contains the values in the format
shown in example exports format. For Secret, the same keys are used, but the values are base64-encoded. For
Service, a Kubernetes service of the type ExternalName is created. This provides applications running on Kubernetes with a way to
inject endpoint information or provide a proxy service in the same namespace as the application. For more information, see example exports format. |
| 2 | (Required) The name of the resource to create and update. |
When exporting endpoint information, the system:serviceaccounts:_enmasse-infra_ group must be granted privileges to create, update, and delete the
configmap specified in the exports list. You can do this by creating an RBAC role and role-binding such as this one:
apiVersion: rbac.authorization.k8s.io/v1
kind: Role
metadata:
  name: rbac
rules:
  - apiGroups: [ "" ]
    resources: [ "configmaps" ]
    verbs: [ "create" ]
  - apiGroups: [ "" ]
    resources: [ "configmaps" ]
    resourceNames: [ "my-config" ]
    verbs: [ "get", "update", "patch" ]
---
apiVersion: rbac.authorization.k8s.io/v1
kind: RoleBinding
metadata:
  name: rbac-binding
roleRef:
  apiGroup: rbac.authorization.k8s.io
  kind: Role
  name: rbac
subjects:
- kind: Group
  name: system:serviceaccounts:_enmasse-infra_
4.2.10. Address space connector examples
You can federate a standard address space type with another AMQP server. Two methods of operation are supported: remote address connection and message store-and-forward.
Remote address connection involves mapping addresses on a remote AMQP endpoint into an address space. For example, suppose an AMQP server is running on the host messaging.example.com that you want to access by connecting using the EnMasse endpoints. To enable remote address connection, you need to create an address space connector.
Message store-and-forward involves enabling address forwarding. First you need to create an address space connector. Then, you need to create an address forwarder for each address. For more information about address forwarding, see Address forwarding examples.
The following examples show how you can configure an address space connector.
Address space connector using SASL PLAIN
You can use SASL PLAIN when you do not want to use mutual TLS for authentication. Not enabling TLS is not recommended, since any user names and passwords are then sent as plain text.
apiVersion: enmasse.io/v1beta1
kind: AddressSpace
metadata:
  name: myspace
spec:
  type: standard
  plan: standard-unlimited
  connectors:
  - name: remote1 (1)
    endpointHosts: (2)
    - host: messaging.example.com
      port: 5672
    - host: messaging2.example.com
    idleTimeout: (3)
    maxFrameSize: (4)
    tls: {} (5)
    credentials: (6)
      username:
        value: test
      password:
        valueFromSecret:
          name: password-secret
          key: password.txt
    role: (7)
    addresses: (8)
    - name: p1
      pattern: "prices/*"
    - name: p2
pattern: "clients/*/1"| 1 | (Required) Specifies the name of the connector. All remote addresses are prefixed with the connector name and a forward slash, /. |
| 2 | (Required) Specifies a list of endpoints for this connector. This list must contain at least one entry, and any additional entries are used for failover. If not otherwise specified, the port field value is set to the registered IANA port for AMQP (or AMQPS if TLS is enabled). |
| 3 | (Optional) Idle timeout of the AMQP connection (seconds). 0 disables the idle timeout. |
| 4 | (Optional) Max frame size of the AMQP connection. |
| 5 | (Optional) Enable TLS. The connector trusts global root CAs by default. To use a custom CA, specify a value for the caCert field. |
| 6 | (Optional) Specifies the username and password credentials to use for this connector. The values can be specified inline or by referencing a secret along with an optional key specifying the location within the secret. The secret must be readable by the system:serviceaccounts:_enmasse-infra_ group. |
| 7 | (Optional) Role of the connector. Valid values are "normal", "edge", and "route-container" (default value). |
| 8 | (Required) Specifies a list of patterns matching addresses to be exposed on the remote endpoint. The pattern consists of one or more tokens separated by a forward slash, /. A token can be one of the following: a * character, a # character, or a sequence of characters that do not include /, *, or #. The * token matches any single token. The # token matches zero or more tokens. * has higher precedence than #, and exact match has the highest precedence. |
Address space connector using mutual TLS
Configuring a client TLS certificate enables SASL EXTERNAL to be used for authentication. The certificates can be specified inline or using a secret reference.
apiVersion: enmasse.io/v1beta1
kind: AddressSpace
metadata:
  name: myspace
spec:
  type: standard
  plan: standard-unlimited
  connectors:
  - name: remote1 (1)
    endpointHosts: (2)
    - host: messaging.example.com
      port: 5671
    tls:
      caCert: (3)
        valueFromSecret:
          name: remote-certs
          key: ca.crt
      clientCert: (4)
        valueFromSecret:
          name: remote-certs
          key: tls.crt
      clientKey: (5)
        valueFromSecret:
          name: remote-certs
          key: tls.key
    addresses:
    - name: p1
pattern: "*"| 1 | (Required) Specifies the name of the connector. All remote addresses are prefixed with the connector name and a forward slash, /. |
| 2 | (Required) Specifies a list of endpoints for this connector. This list must contain at least one entry, and any additional entries are used for failover. If not otherwise specified, the port field value is set to the registered IANA port for AMQP (or AMQPS if TLS is enabled). |
| 3 | (Optional) Specifies the CA certificate to trust for the remote connection. The referenced secret must be readable by the system:serviceaccounts:_enmasse-infra_ group. |
| 4 | (Optional) Specifies the client certificate to use for mutual TLS authentication. The referenced secret must be readable by the system:serviceaccounts:_enmasse-infra_ group. |
| 5 | (Optional) Specifies the client private key to use for mutual TLS authentication. The referenced secret must be readable by the system:serviceaccounts:_enmasse-infra_ group. |
4.2.11. Creating address spaces using the command line
In EnMasse, you create address spaces using standard command-line tools.
-
Create an address space definition:
apiVersion: enmasse.io/v1beta1 kind: AddressSpace metadata: name: myspace spec: type: standard plan: standard-unlimited -
Create the address space:
kubectl create -f standard-address-space.yaml
-
Check the status of the address space:
kubectl get addressspace myspace -o jsonpath={.status.isReady}The address space is ready for use when the previous command outputs
true.
4.2.12. Creating an address space using the EnMasse Console
You can create a new address space using the EnMasse Console, including configuring the endpoints of an address space using different certificate providers and creating endpoints to make the address space available for messaging applications to use.
| If you choose not to configure endpoints for your address space, the system creates a cluster service, by default. |
-
Log in to the EnMasse Console.
For more information about how to access the EnMasse Console, see Accessing the EnMasse Console.
-
Click Create Address Space. The Create an instance wizard opens.
-
Complete the required fields and when you are finished, click Finish to create the new address space.
When the address space has been successfully created, you can click the address space name to view information about the newly created address space, including messaging and application statistics and endpoint information.
4.2.13. Changing the address space plan associated with an address space using the EnMasse Console
You can change the address space plan that is associated with an address space using the EnMasse Console.
-
You must have already created an address space. For more information, see Creating an address space using the EnMasse Console.
-
Log in to the EnMasse Console. For more information, see Accessing the EnMasse Console.
-
Locate the address space for which you want to change the address space plan.
-
In the far right column, click the vertical ellipsis icon and select Edit. The Edit window opens.
-
In the Address space plan field, select a different plan from the list and click Confirm. The address space plan is changed for that address space.
4.2.14. Changing the authentication service associated with an address space using the EnMasse Console
You can change the authentication service that is associated with an address space using the EnMasse Console.
-
You must have already created an address space. For more information, see Creating an address space using the EnMasse Console.
-
Log in to the EnMasse Console. For more information, see Accessing the EnMasse Console.
-
Locate the address space for which you want to change the authentication service.
-
In the far right column, click the vertical ellipsis icon and select Edit. The Edit window opens.
-
In the Authentication Service field, select a different authentication service from the list and click Confirm. The authentication service is changed for that address space.
4.2.15. Deleting an address space using the EnMasse Console
You can delete an existing address space using the EnMasse Console.
-
Log in to the EnMasse Console.
For more information about how to access the EnMasse Console, see Accessing the EnMasse Console.
-
Locate the address space that you want to delete.
-
In the far right column, click the vertical ellipsis icon and select Delete. The delete confirmation window opens.
-
Confirm your selection by clicking Delete. The address space is deleted.
4.2.16. Example commands for retrieving address space information
The following table shows the commands for retrieving address space information.
| To retrieve the… | Run this command: |
|---|---|
status of an address space |
|
base64-encoded PEM certificate for the messaging endpoint |
|
host name for the messaging endpoint |
|
4.2.17. Replacing address spaces using the command line
Address spaces can be replaced in order to change the plan, endpoints, or network policies, or
to replace certificates if using the certBundle certificate provider. When changing the plan,
EnMasse will attempt to apply the new plan if the current set of addresses fits within the new
quota. If it does not, an error is provided on the AddressSpace resource.
-
Update address space definition:
apiVersion: enmasse.io/v1beta1 kind: AddressSpace metadata: name: myspace spec: type: standard plan: standard-small -
Replace the address space:
kubectl replace -f standard-address-space-replace.yaml
-
Check the status of the address space:
kubectl get addressspace myspace -o jsonpath={.status.isReady}The address space is ready for use when the above command outputs
true.
4.3. Managing addresses
EnMasse is configured to support managing addresses using the Kubernetes command-line tools
and the EnMasse Console. Address resources can be managed like any other Kubernetes
API resource using kubectl.
4.3.1. Address
An address is part of an address space and represents a destination for sending and receiving messages. An address has a type, which defines the semantics of sending messages to and receiving messages from that address.
The types of addresses available in EnMasse depend on the address space type.
4.3.2. Address plans
An address is configured with an address plan, which describes the resource usage of that address. The address plans are configured by the service administrator and can vary between EnMasse installations. The number of addresses that can be created, and what plans are available, depends on quota enforced by the address space plan.
Some address types also support changing the plan field: queue, anycast, and multicast
address types in the standard address space support changing the plan as long as the new plan
does not exceed the allowed quota. For queues, addresses are dynamically migrated across brokers,
which might cause reordering of messages.
Address example
apiVersion: enmasse.io/v1beta1
kind: Address
metadata:
    name: myspace.myqueue (1)
spec:
    address: myqueue (2)
    type: queue (3)
plan: standard-small-queue (4)| 1 | The address name must be prefixed with the address space name and a dot. Address names can only include alphanumeric characters. |
| 2 | The address is the messaging address this address resource represents. |
| 3 | The address type dictates the semantics of this address. |
| 4 | The address plan describes the resource usage for the address. For more information about how to view the available plans, see Listing available address plans. |
Topic and subscription address example
When using topics and subscriptions, the subscription references the topic to which it belongs using the topic: field, as shown in the following example.
apiVersion: enmasse.io/v1beta1
kind: Address
metadata:
    name: myspace.mytopic
spec:
    address: mytopic
    type: topic
    plan: standard-small-topic
apiVersion: enmasse.io/v1beta1
kind: Address
metadata:
name: myspace.mysub
spec:
address: mysub
type: subscription
plan: standard-small-subscription
topic: mytopic (1)| 1 | The address of topic that this subscription refers to. |
Address TTL restriction example
apiVersion: enmasse.io/v1beta1
kind: Address
metadata:
    name: myspace.myqueue
spec:
    address: myqueue
    type: queue
    plan: standard-small-queue
    expiry: myexpiry (1)
    messageTtl: (2)
        minimim: 30000
maximum: 300000| 1 | (Optional) Destination for expired messages. This address must be of type deadletter. |
| 2 | (Optional) Restricts message time-to-live (TTL). Applies to address types queue and topic only. |
The messageTtl field is used to restrict the effective absolute-expiry-time of
any message put to a queue or topic. The maximum and minimum values are defined in milliseconds. The system adjusts the TTL value of an incoming message to a particular address based on these values:
-
If a messages arrives at the address with a TTL value that is greater than the
maximumvalue, the system changes the message TTL to the maximum value. -
If a message arrives at the address with a TTL value that is less than the
minimumvalue, the system changes the message TTL to the minimum value.
Messages that arrive without a TTL defined are considered to have a TTL value of infinity.
TTL restrictions may also be imposed by the address plan. If a TTL restriction is imposed at both the plan and the address,
the address TTL restriction can only further narrow the TTL restriction. The address status section shows the
TTL values that are in force.
If the address has an expiry address assigned, expired messages are automatically moved to it. If the address has no expiry address assigned or
if the address is a temporary topic subscription, expired messages are removed. These messages are lost.
Message expiration occurs periodically at an interval of 30 seconds.
Address message redelivery/dead letter example
apiVersion: enmasse.io/v1beta1
kind: Address
metadata:
    name: myspace.myqueue
spec:
    address: myqueue
    type: queue
    plan: standard-small-queue
    deadletter: mydeadletter (1)
    messageRedelivery: (2)
        maximumDeliveryAttempts: 3 (3)
        redeliveryDelay: 5000 (4)
        redeliveryDelayMultiplier: 1.5 (5)
maximumDeliveryDelay: 30000 (6)| 1 | (Optional) Destination for messages that have exceeded the maximum number of delivery attempts. This address must be of type deadletter. |
| 2 | (Optional) Provides message redelivery settings. Applies to address types queue and subscription only. |
| 3 | (Optional) Maximum number of delivery attempts made for a message before the message is directed to a deadletter address (or dropped). Set to -1 for infinite re-deliveries. Defaults to 10. |
| 4 | (Optional) The number of milliseconds to wait before redelivery. Set to 0 for no redelivery delay. Defaults to 0. |
| 5 | (Optional) The redelivery multiplier. This factor is applied to the last redelivery delay. Defaults to 1. |
| 6 | (Optional) The maximum delivery delay in milliseconds. Imposes an upper limit on the delivery delay. Set to 0 for no maximum. Defaults to 0. |
The messageRedelivery field is used to control the behavior of a queue or subscription when a receiver is unsuccessful in its processing
a message and the system returns the message to the queue for redelivery. By default, the system redelivers messages indefinitely.
However, the messageRedelivery field allows you to modify the behavior either by delaying redelivery or redirecting the message to a
deadletter address.
Message redelivery settings may also be defined by the address plan. If both the address and address plan provide a message redelivery setting,
the value provided by the address takes priority. The address status section shows the
message redelivery settings that are in force.
If the address has a deadletter address assigned, messages that have exceeded the maximum number of delivery attempts are automatically moved to it.
If the address has no deadletter address assigned, the system drops the messages. These messages are lost permanently.
Address forwarding examples
You can use forwarders to:
-
automatically forward messages from a local address to a remote AMQP server outside of EnMasse, or
-
forward messages from a remote AMQP server to a local address.
To use an address forwarder, you must first configure a connector to the remote AMQP server for the address space. For more information about address space connectors, see Address space connector examples.
Address forwarding is supported only in the standard address space type, and only for the queue and subscription address types. With the queue address type, you can forward messages to a remote AMQP server or from a remote AMQP server to a local queue. With the subscription address type, you can create a forwarder to a remote AMQP address, but you cannot create a forwarder that copies messages to the subscription. That is, the subscription address type supports forwarding in the out direction only, as shown in the example.
For outgoing forwarders, you can assign a priority value to the consumer associated with the forwarder. This allows you to influence message routing within the AMQP network by favoring one link over another. If the forwarder has
a lower priority than other consumers, messages will only flow through the forwarder when the other consumers do not have credit or cannot accept a message for other reasons (for example, message selectors). The value must be an integral number in the range
-2^31 to 2^31-1. Values lower than zero reduce the forwarder’s priority relative to other consumers, while values greater than zero raise it. If the priority is unassigned, a default value of 0 is used.
In the following examples, it is assumed that a connector, remote1, has been configured for the address space.
Forwarding messages from a local queue to a remote AMQP server
In this example, messages in myqueue are forwarded to the remote AMQP server with an address of clients/me/1.
apiVersion: enmasse.io/v1beta1
kind: Address
metadata:
  name: myspace.myqueue
spec:
  address: myqueue
  type: queue
  plan: standard-small-queue
  forwarders:
  - name: f1 (1)
    remoteAddress: remote1/clients/me/1 (2)
    direction: out (3)
priority: 10 (4)| 1 | (Required) Specifies the name of the forwarder, which is used to ensure a unique identity. |
| 2 | (Required) Specifies the remote address to forward messages to. The address must be prefixed with the connector name and must be identical to the address matching patterns defined on the connector. |
| 3 | (Required) Specifies the direction of message flow, which is either out or in. A value of out forwards messages to the remote endpoint. A value of in forwards messages from the remote endpoint. |
| 4 | (Optional) Specifies the priority assigned to the consumer used by the forwarder (integral number in the range -2^31 to 2^31-1 with a default of 0). Applies to outgoing forwarders only. |
Forwarding messages from a remote AMQP server to a local queue
In this example, you receive messages from an address prices/milk on a remote AMQP server. The messages are then moved to a local queue, myqueue.
apiVersion: enmasse.io/v1beta1
kind: Address
metadata:
  name: myspace.myqueue
spec:
  address: myqueue
  type: queue
  plan: standard-small-queue
  forwarders:
  - name: f1 (1)
    remoteAddress: remote1/prices/milk (2)
direction: in (3)| 1 | (Required) Specifies the name of the forwarder, which is used to ensure a unique identity. |
| 2 | (Required) Specifies the remote address to forward messages to. The address must be prefixed with the connector name and must be identical to the address matching patterns defined on the connector. |
| 3 | (Required) Specifies the direction of message flow, which is either out or in. A value of out forwards messages to the remote endpoint. A value of in forwards messages from the remote endpoint. |
4.3.3. Listing available address plans using the command line
You can list the address plans available for an address type, such as queue.
-
Retrieve the schema with the address plans listed (replace
standardwithbrokeredfor the brokered address space type):kubectl get addressspaceschema standard -o 'jsonpath={.spec.addressTypes[?(@.name=="queue")].plans[*].name}'
4.3.4. Creating addresses using the command line
You can create addresses using the command line.
-
Create an address definition:
apiVersion: enmasse.io/v1beta1
kind: Address
metadata:
    name: myspace.myqueue
spec:
    address: myqueue
    type: queue
    plan: standard-small-queue
Prefixing the name with the address space name is required to ensure addresses from different address spaces do not collide. -
Create the address:
kubectl create -f standard-small-queue.yaml -
List the addresses:
kubectl get addresses -o yaml
4.3.5. Creating addresses using the EnMasse Console
You can create new addresses using the EnMasse Console. The type of addresses that you can create are determined by the type of address space.
-
You must have created an address space. For more information, see Creating an address space.
-
Log in to the EnMasse Console. For more information, see Accessing the EnMasse Console.
-
Click the address space link for the address space where you want to create a new address.
-
Click Create Address. The Create new address wizard opens.
-
Complete the required fields and when you are finished, click Finish to create the new address. Your address is displayed in the EnMasse Console.
| If you select the subscription address type, from the Topic list, select the topic name to which you want to create a subscription. |
4.3.6. Replacing addresses using the command line
-
Update an address definition:
apiVersion: enmasse.io/v1beta1 kind: Address metadata: name: myspace.myqueue spec: address: myqueue type: queue plan: standard-xlarge-queue -
Replace the address:
kubectl replace -f standard-xlarge-queue.yaml -
List the addresses:
kubectl get addresses -o yaml
4.3.7. Deleting addresses using the EnMasse Console
You can delete existing addresses using the EnMasse Console.
-
Log in to the EnMasse Console.
For more information about how to access the EnMasse Console, see Accessing the EnMasse Console.
-
Click the address space link for the address space where you want to delete an existing address.
-
Locate the address that you want to delete.
-
In the far right column, click the vertical ellipsis icon and select Delete. The delete confirmation window opens.
-
Confirm your selection by clicking Delete. The address is deleted.
4.4. Using the EnMasse Console
-
You must have configured Kubernetes and the {Product Name} Console to use OpenID Connect. For more information see Configuring the EnMasse Console to use OpenID Connect.
You can use the EnMasse Console to perform tasks such as creating and deleting an address space, creating an address, and viewing message and connection statistics.
4.4.1. EnMasse Console user permissions
EnMasse Console uses the Kubernetes RBAC permissions model.
To use EnMasse Console, the OIDC user requires a role that grants access to addressspace and address resources. For example, for edit access, create, update and delete permissions need be to given to the associated role object, and for view-only access, list permissions need to be granted.
For more information about the EnMasse example roles, see EnMasse example roles.
4.4.2. Accessing the EnMasse Console
-
In a web browser, navigate to
https://console-host-namewhereconsole-host-nameis the EnMasse Console host name. -
Log in with your OIDC user credentials. The EnMasse Console opens and lists all the address spaces that you can administer. For information on creating an address space, see Creating an address space using the EnMasse Console.
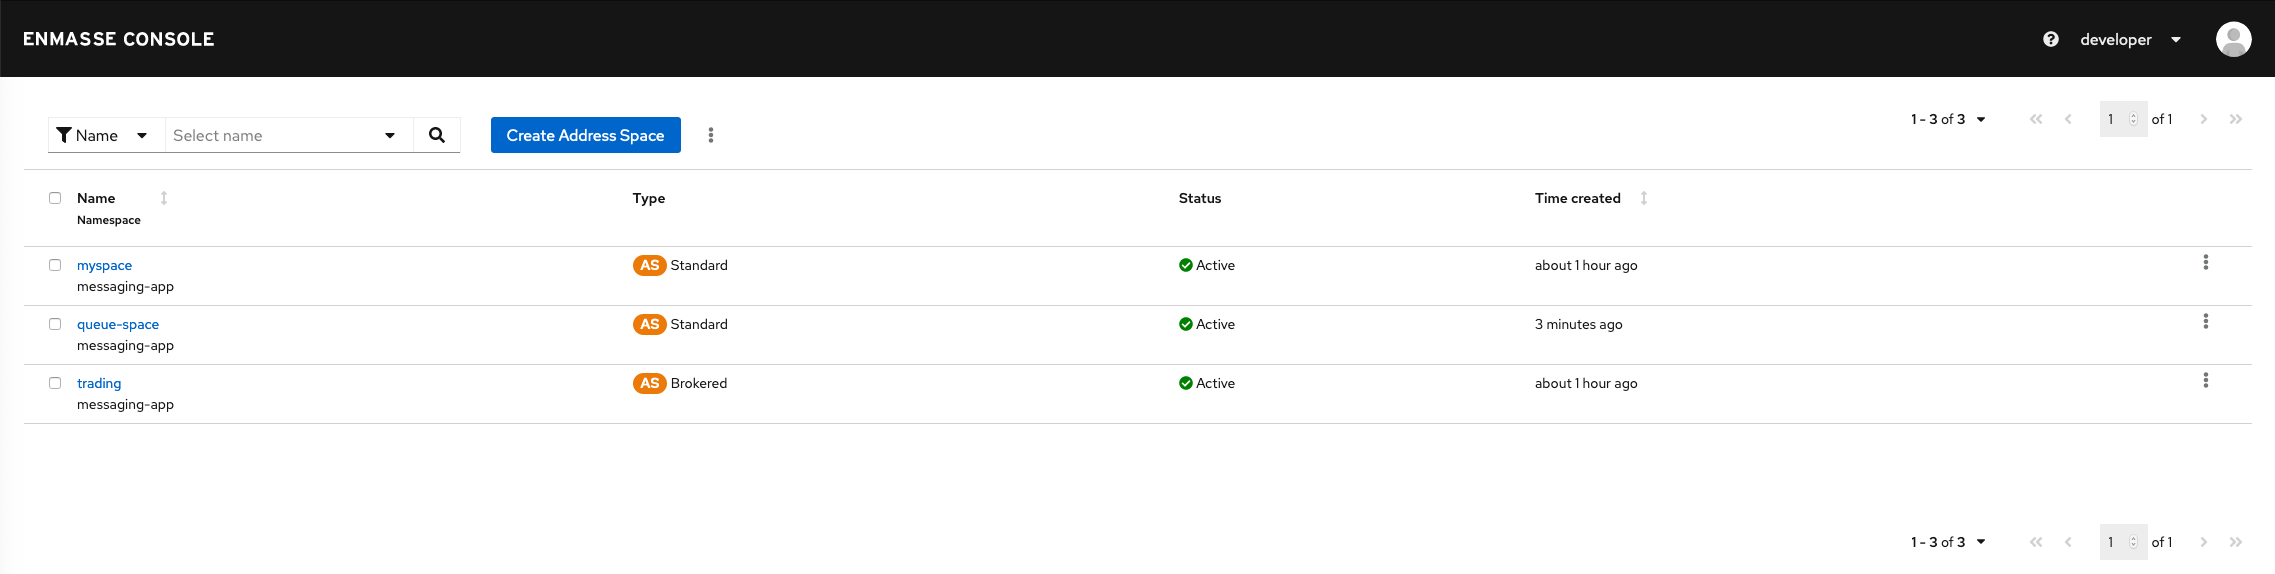
4.4.3. Viewing message and application connection statistics using the EnMasse Console
-
You must be logged into the EnMasse Console.
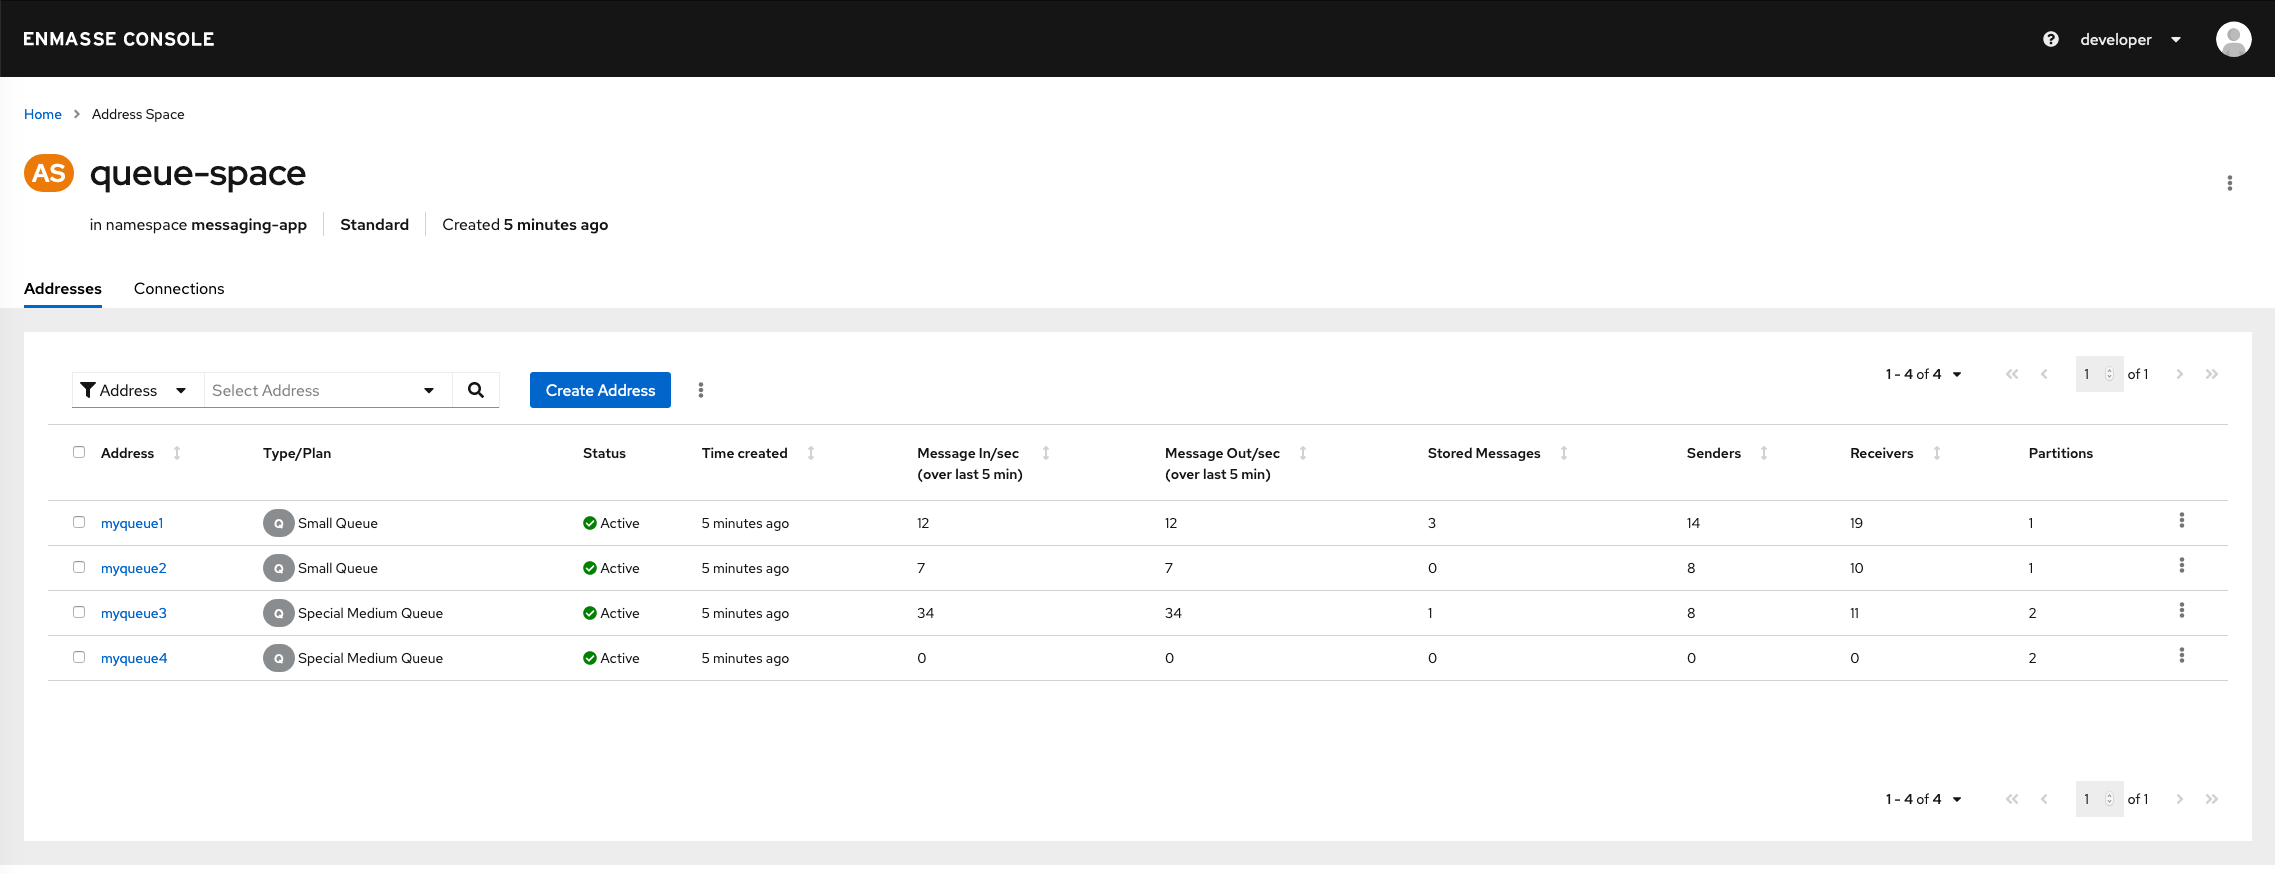
| To view… | On the Addresses page… |
|---|---|
Address type |
See the first icon in the second column, Type/plan |
Address plan |
See the string that follows the icon in the second column, Type/plan |
Address status |
See the third column, Status |
Messages received per second (computed over the last 5 minutes) |
See Messages In/sec |
Messages sent per second (computed over the last 5 minutes) |
See Messages Out/sec |
Queue and topic address types only: Number of stored messages on the broker or brokers |
Stored Messages |
Number of senders attached |
See Senders |
Number of receivers attached |
See Receivers |
Standard address space only: Message deliveries per second |
Click the desired address, which then shows the links page for that address; see the Delivery Rate column. |
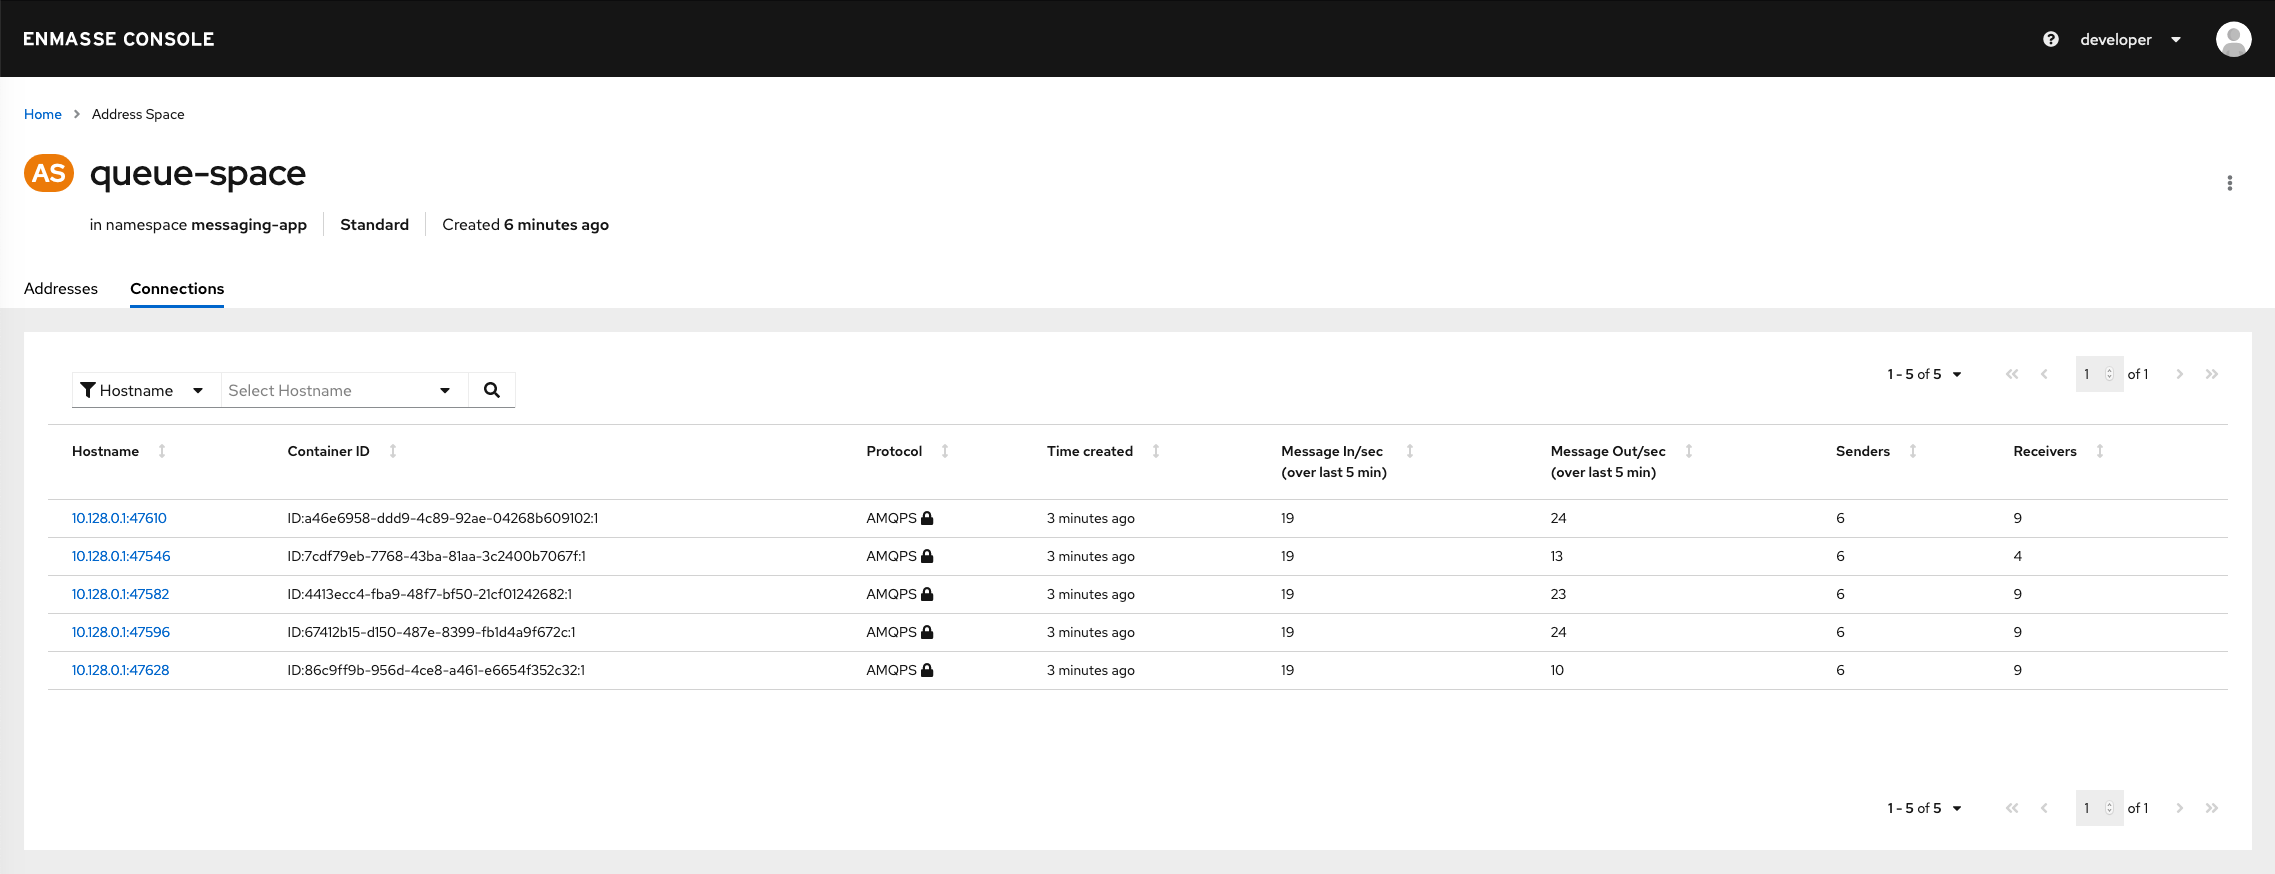
| To view… | On the Connections page… |
|---|---|
Messages received per second (computed over the last 5 minutes) |
See Messages In/sec |
Standard address space only: Messages sent per second (computed over the last 5 minutes) |
See Messages Out/sec |
Total number of messages delivered |
Click the desired host name to show the list of senders and receivers; see the Deliveries column. |
For the brokered address space only, on the Connections page, the number of senders is either 0 or 1. As soon as one or more senders exist, 1 is displayed rather than reflecting the actual number of senders.
|
4.4.4. Viewing endpoint information using the EnMasse Console
You can use the EnMasse Console to view information about the endpoints configured for a given address space. You need this information to connect your messaging application to EnMasse.
-
You must be logged into the EnMasse Console. For more information, see Accessing the EnMasse Console.
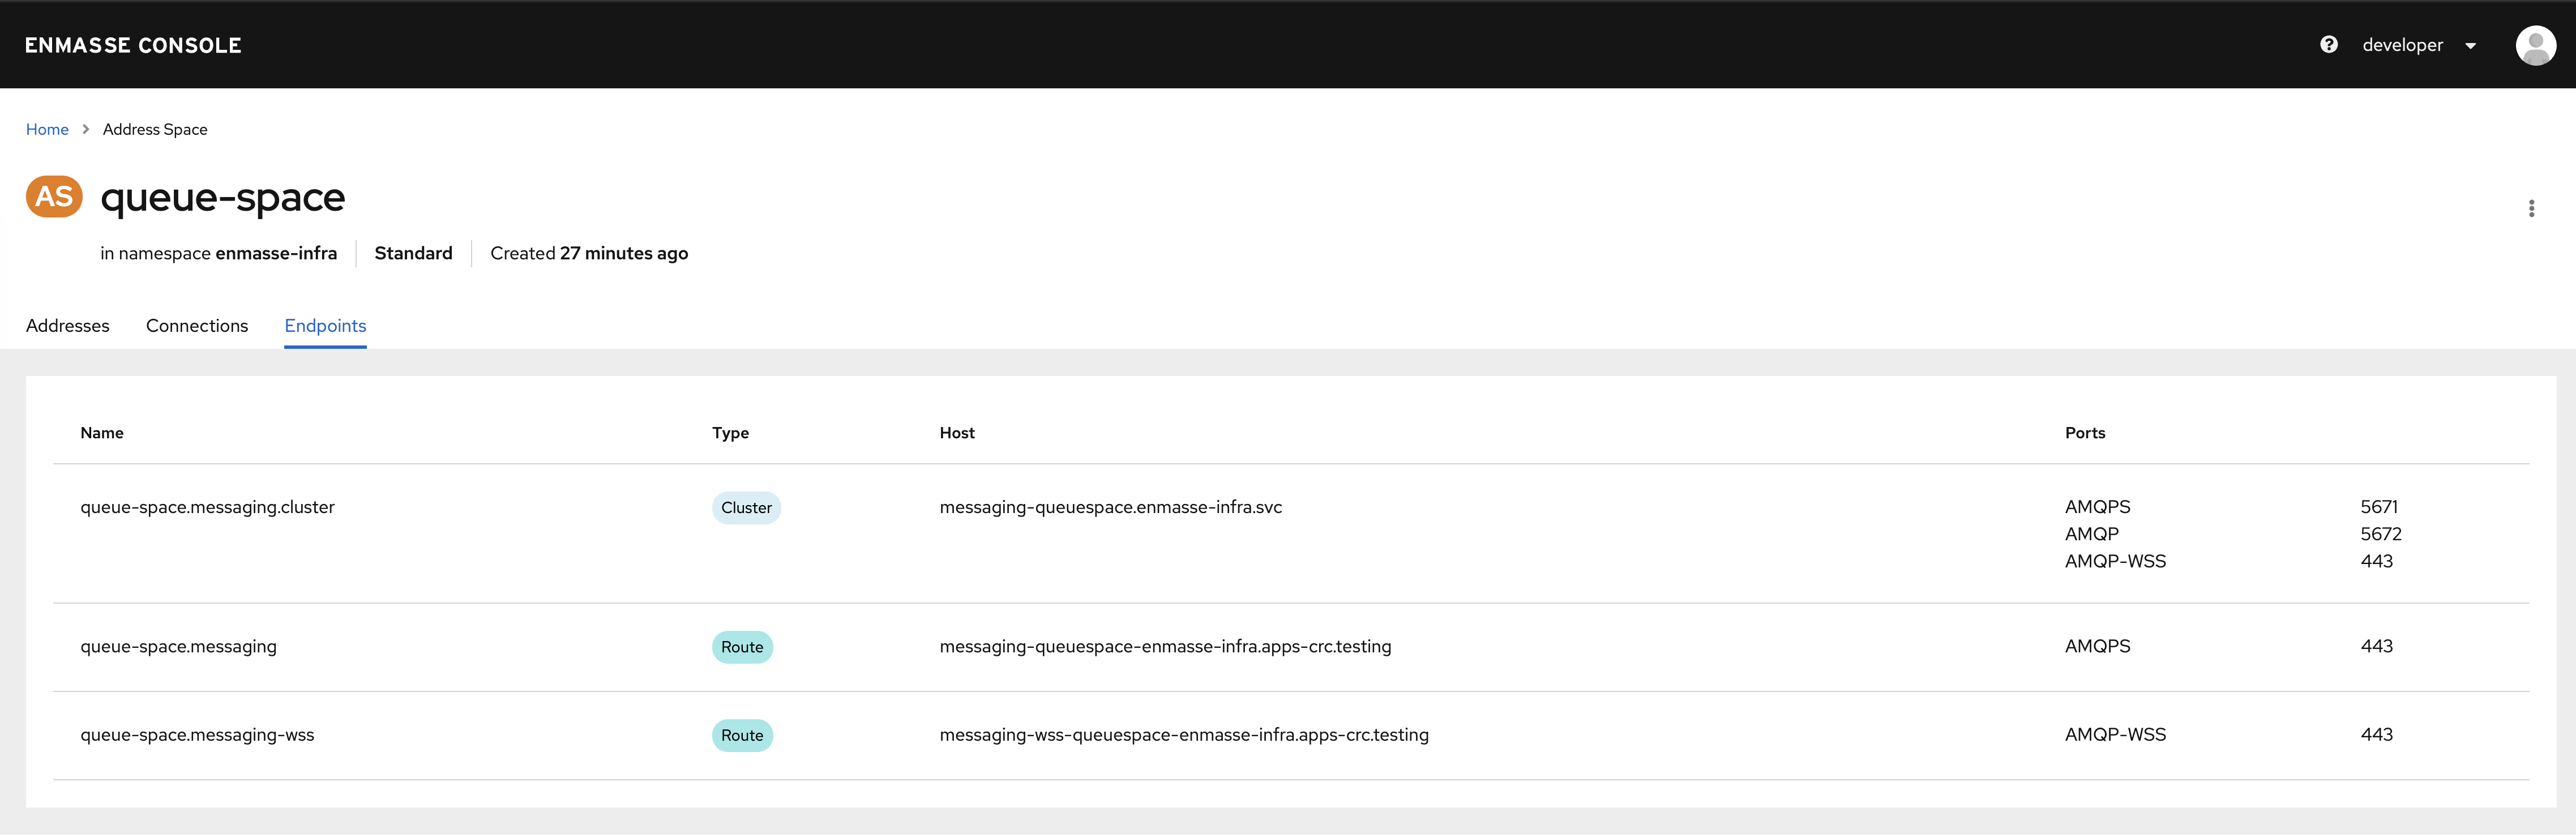
| Column | Description |
|---|---|
Name |
Displays the name of the endpoint. |
Type |
Displays the type of endpoint. Valid values include:
For more information, see the Kubernetes documentation. |
Host |
Displays the host name of the endpoint. |
Ports |
Displays the port protocol name and port number of the endpoint. Valid port names include:
|
4.4.5. Purging queues and subscriptions
You can purge—that is, clear all messages from—a queue or subscription address type of its stored messages by using the EnMasse Console.
-
You must have a queue or subscription that contains stored messages.
-
Log in to the EnMasse Console. For more information, see Accessing the EnMasse Console.
-
Navigate to the Addresses page.
-
Select the check box next to the queue or subscription that you want to purge.
-
At the top of the page, right-click the vertical ellipsis icon and select Purge. The queue or subscription is purged, and the
Storedmessage count drops to zero for the selected queue or subscription.
4.4.6. Closing connections using the EnMasse Console
If an application has unexpectedly stopped processing messages, you can force the application’s messaging connections to close using the EnMasse Console. This may be a useful way to return the application to service.
Be aware that closing a connection closes the application’s connection to EnMasse. If the application is configured to do so, the application should reconnect automatically.
-
Log in to the EnMasse Console. For more information, see Accessing the EnMasse Console.
-
Navigate to the Connections page.
-
To close a single connection:
-
Locate the connection that you want to close.
-
In the far right column, click the vertical ellipsis icon and select Close.
-
When prompted, click Confirm to confirm that you want to close the connection. The connection is closed.
-
-
To close multiple connections in a single operation:
-
Select the check box next to the connections that you want to close.
-
At the top of the page, right-click the vertical ellipsis icon and select Close Selected.
-
When prompted, click Confirm to confirm that you want to close the connections. The connections are closed.
-
4.5. User model
A messaging client connects using a MessagingUser. A MessagingUser specifies an authorization policy that controls which addresses may be used and the operations that may be performed on those addresses.
Users are configured as MessagingUser resources. Users can be created, deleted, read, updated, and listed.
The following example shows the user-example1.yaml file:
apiVersion: user.enmasse.io/v1beta1
kind: MessagingUser
metadata:
  name: myspace.user1
spec:
  username: user1
  authentication:
    type: password
    password: cGFzc3dvcmQ= # Base64 encoded
  authorization:
    - addresses: ["myqueue", "queue1", "queue2", "topic*"]
      operations: ["send", "recv"]
    - addresses: ["anycast1"]
      operations: ["send"]
The following fields are required:
-
metadata.name -
metadata.namespace -
spec.authentication -
spec.authorization
The spec.authentication object defines how the user is authenticated, whereas
spec.authorization defines the authorization policies for that user.
4.5.1. Authentication
The supported values for the authentication type are password and serviceaccount. When using the password authentication type, you specify the username and password to be used by your messaging client when connecting. With the serviceaccount authentication type, you use the special string @@serviceaccount@@ as the username, and a Kubernetes service account token as the password.
Password authentication type
For the password type, an additional field password must be set to a base64-encoded value of the
password for that user. The password will not be printed out when reading the resource.
A password can be base64-encoded on the command line. To encode my-password, for example:
$ echo -n my-password | base64
bXktcGFzc3dvcmQ=
Serviceaccount authentication type
For the serviceaccount type, the username field must contain the Kubernetes serviceaccount name that will be used to authenticate. When connecting with the messaging client, use the string @@serviceaccount@@ as the username, and the service account token as the password. The AMQP client used by the application must be configured to use the SASL mechanism type PLAIN.
4.5.2. Authorization
In addition, authorization policies can be defined using operations and addresses. Valid operations
are send, recv, view, and manage.
The manage and view operations apply to all addresses in the address space.
In the standard address space, the asterisk wildcard can be used at the end of an address. The address top*
matches addresses topic and topic/sub.
In the brokered address space, the plus sign and asterisk wildcards can be used at the end of an address to match a single word (plus sign) or all words (asterisk) after the forward slash delimiter. So, the address topic/+ matches
topic/sub but not topic/s/sub. The address topic/* matches topic/sub and topic/s/sub.
4.6. Managing users
EnMasse user management is only supported when using the standard authentication service. On Kubernetes, users can
be managed using the Kubernetes command-line tools.
-
You must have already created an address space.
4.6.1. Creating users using the command line
In EnMasse users can be created using standard command-line tools.
-
You must have already created an address space.
-
To correctly base64 encode a password for the user definition file, run the following command:
echo -n password | base64 #cGFzc3dvcmQ=
Be sure to use the -nparameter when running this command. Not specifying that parameter will result in an improperly coded password and cause log-in issues. -
Save the user definition to a file:
apiVersion: user.enmasse.io/v1beta1 kind: MessagingUser metadata: name: myspace.user1 spec: username: user1 authentication: type: password password: cGFzc3dvcmQ= # Base64 encoded authorization: - addresses: ["myqueue", "queue1", "queue2", "topic*"] operations: ["send", "recv"] - addresses: ["anycast1"] operations: ["send"] -
Create the user and associated user permissions:
kubectl create -f user-example1.yaml
-
Confirm that the user was created:
kubectl get messagingusers
4.6.2. Deleting users using the command line
Users can be deleted using standard command-line tools.
-
An address space must have been created.
-
A user must have been created.
-
List the current users:
kubectl get messagingusers
-
Delete the desired user:
kubectl delete messaginguser myspace.user1
4.6.3. Managing user permissions using the command line
You can edit the permissions for an existing user using the command line.
-
You must have already created a user. For more information, see Creating users using the command line.
-
Retrieve the user whose permissions you want to edit:
kubectl get messaginguser myspace.user1 -o yaml > user-example1.yaml
-
Make the desired permissions change and save the file.
-
From the command line, run the following command to apply the change:
kubectl apply -f user-example1.yaml
The new user permissions are applied.
4.7. EnMasse example roles
EnMasse provides the following example roles that you can use directly or use as models to create your own roles.
For more information about service administrator resources, see the EnMasse service administrator resources table.
For more information about messaging tenant resources, see the EnMasse messaging tenant resources table.
| Role | Description |
|---|---|
enmasse.io:tenant-view |
Specifies |
enmasse.io:tenant-edit |
Specifies |
|
Specifies |
4.8. Connecting applications to EnMasse
You can connect your application to EnMasse using one of the following client examples.
To connect to the messaging service from outside the Kubernetes cluster, TLS must be used with SNI set to specify the fully qualified host name for the address space. The port used is 443.
The messaging protocols supported depends on the type of address space used. For more information about address space types, see Address space.
4.8.1. Retrieving the self-signed CA certificate
If you opted for the selfsigned certificate provider type in your AddressSpace endpoint configuration, the generated CA
that signed the AddressSpace server certificate is required when connecting to the messaging client application. You can retrieve the
certificate from the AddressSpace using the following procedure.
| Using a self-signed certificate in production environments is not recommended. |
-
Retrieve the CA certificate from the
AddressSpace.This will give you a file containing the CA certificate, in PEM format.
kubectl get addressspace myspace -n namespace -o jsonpath='{.status.caCert}{"\n"}' | base64 --decode > ca.crt -
If a PKCS12 or JKS format trust store is required, use the following commands to generate one:
For PKS:
keytool -import -trustcacerts -alias root -file ca.crt -storetype pkcs12 -keystore ca.pkcs12 -storepass password -noprompt
For JKS:
keytool -import -trustcacerts -alias root -file ca.crt -storetype jks -keystore ca.jsk -storepass password -noprompt
4.8.2. Client examples
Apache Qpid Proton Python example
You can use the following Apache Qpid Proton Python example to connect your application to EnMasse. This example assumes you have created an address of type queue named myqueue.
from __future__ import print_function, unicode_literals
from proton import Message
from proton.handlers import MessagingHandler
from proton.reactor import Container

class HelloWorld(MessagingHandler):
    def __init__(self, server, address):
        super(HelloWorld, self).__init__()
        self.server = server
        self.address = address

    def on_start(self, event):
        conn = event.container.connect(self.server)
        event.container.create_receiver(conn, self.address)
        event.container.create_sender(conn, self.address)

    def on_sendable(self, event):
        event.sender.send(Message(body="Hello World!"))
        event.sender.close()

    def on_message(self, event):
        print(event.message.body)
        event.connection.close()

Container(HelloWorld("amqps://_messaging-route-hostname_:443", "myqueue")).run()
Known issue with creating a subscriber on a hierarchical topic
A known issue exists where creating a subscriber on a hierarchical topic in EnMasse causes the broker to instead create it as a competing consumer (handling the address like a queue rather than a topic).
The workaround for this issue involves setting the capability "topic" in the source.
-
In the
simple_recv.pyfile, modify thefrom proton.reactor import Containerto add theReceiverOption:
class CapabilityOptions(ReceiverOption):
    def apply(self, receiver):
receiver.source.capabilities.put_object(symbol("topic"))-
Modify the following line to add
options=CapabilityOptions():
def on_start(self, event):
        event.container.create_receiver(conn, self.address, options=CapabilityOptions())
Apache Qpid JMS example
You can use the following Apache Qpid JMS example to connect your application to EnMasse. This example assumes you have created an address of type queue named myqueue.
package org.apache.qpid.jms.example;

import javax.jms.Connection;
import javax.jms.ConnectionFactory;
import javax.jms.DeliveryMode;
import javax.jms.Destination;
import javax.jms.ExceptionListener;
import javax.jms.JMSException;
import javax.jms.Message;
import javax.jms.MessageConsumer;
import javax.jms.MessageProducer;
import javax.jms.Session;
import javax.jms.TextMessage;
import javax.naming.Context;
import javax.naming.InitialContext;

public class HelloWorld {
    public static void main(String[] args) throws Exception {
        try {
            // The configuration for the Qpid InitialContextFactory has been supplied in
            // a jndi.properties file in the classpath, which results in it being picked
            // up automatically by the InitialContext constructor.
            Context context = new InitialContext();

            ConnectionFactory factory = (ConnectionFactory) context.lookup("myFactoryLookup");
            Destination queue = (Destination) context.lookup("myQueueLookup");

            Connection connection = factory.createConnection(System.getProperty("USER"), System.getProperty("PASSWORD"));
            connection.setExceptionListener(new MyExceptionListener());
            connection.start();

            Session session = connection.createSession(false, Session.AUTO_ACKNOWLEDGE);

            MessageProducer messageProducer = session.createProducer(queue);
            MessageConsumer messageConsumer = session.createConsumer(queue);

            TextMessage message = session.createTextMessage("Hello world!");
            messageProducer.send(message, DeliveryMode.NON_PERSISTENT, Message.DEFAULT_PRIORITY, Message.DEFAULT_TIME_TO_LIVE);
            TextMessage receivedMessage = (TextMessage) messageConsumer.receive(2000L);

            if (receivedMessage != null) {
                System.out.println(receivedMessage.getText());
            } else {
                System.out.println("No message received within the given timeout!");
            }

            connection.close();
        } catch (Exception exp) {
            System.out.println("Caught exception, exiting.");
            exp.printStackTrace(System.out);
            System.exit(1);
        }
    }

    private static class MyExceptionListener implements ExceptionListener {
        @Override
        public void onException(JMSException exception) {
            System.out.println("Connection ExceptionListener fired, exiting.");
            exception.printStackTrace(System.out);
            System.exit(1);
        }
    }
}
with jndi.properties:
connectionfactory.myFactoryLookup = amqps://messaging-route-hostname:443?transport.trustAll=true&transport.verifyHost=false
queue.myQueueLookup = myqueue
Rhea JavaScript Client example
You can use the following Rhea JavaScript Client example to connect your application to EnMasse. This example assumes you have created an address of type queue named myqueue.
var container = require('rhea');
container.on('connection_open', function (context) {
    context.connection.open_receiver('myqueue');
    context.connection.open_sender('myqueue');
});
container.on('message', function (context) {
    console.log(context.message.body);
    context.connection.close();
});
container.on('sendable', function (context) {
    context.sender.send({body:'Hello World!'});
    context.sender.detach();
});
container.connect({username: 'username', password: 'password', port:443, host:'messaging-route-hostname', transport:'tls', rejectUnauthorized:false});
Rhea JavaScript Client example using WebSockets
var container = require('rhea');
var WebSocket = require('ws');

container.on('connection_open', function (context) {
    context.connection.open_receiver('myqueue');
    context.connection.open_sender('myqueue');
});
container.on('message', function (context) {
    console.log(context.message.body);
    context.connection.close();
});
container.on('sendable', function (context) {
    context.sender.send({body:'Hello World!'});
    context.sender.detach();
});

var ws = container.websocket_connect(WebSocket);
container.connect({username: 'username', password: 'password', connection_details: ws("wss://messaging-route-hostname:443", ["binary"], {rejectUnauthorized: false})});
Apache Qpid Proton C++ example
The C++ client has equivalent simple_recv and simple_send examples with the same options as Python. However, the C++ library does not perform the same level of processing on the URL; in particular it will not accept amqps:// to imply using TLS, so the example needs to be modified as follows:
#include <proton/connection.hpp>
#include <proton/container.hpp>
#include <proton/default_container.hpp>
#include <proton/delivery.hpp>
#include <proton/message.hpp>
#include <proton/messaging_handler.hpp>
#include <proton/ssl.hpp>
#include <proton/thread_safe.hpp>
#include <proton/tracker.hpp>
#include <proton/url.hpp>

#include <iostream>

#include "fake_cpp11.hpp"

class hello_world : public proton::messaging_handler {
  private:
    proton::url url;

  public:
    hello_world(const std::string& u) : url(u) {}

    void on_container_start(proton::container& c) OVERRIDE {
        proton::connection_options co;
        co.ssl_client_options(proton::ssl_client_options());
        c.client_connection_options(co);
        c.connect(url);
    }

    void on_connection_open(proton::connection& c) OVERRIDE {
        c.open_receiver(url.path());
        c.open_sender(url.path());
    }

    void on_sendable(proton::sender &s) OVERRIDE {
        proton::message m("Hello World!");
        s.send(m);
        s.close();
    }

    void on_message(proton::delivery &d, proton::message &m) OVERRIDE {
        std::cout << m.body() << std::endl;
        d.connection().close();
    }
};

int main(int argc, char **argv) {
    try {
        std::string url = argc > 1 ? argv[1] : "messaging-route-hostname:443/myqueue";

        hello_world hw(url);
        proton::default_container(hw).run();

        return 0;
    } catch (const std::exception& e) {
        std::cerr << e.what() << std::endl;
    }

    return 1;
}
Known issue with creating a subscriber on a hierarchical topic
A known issue exists where creating a subscriber on a hierarchical topic in EnMasse causes the broker to instead create it as a competing consumer (handling the address like a queue rather than a topic).
The workaround involves setting the capability "topic" in the source.
-
In the
topic_receive.cppfile, edit the code so that it is similar to what is shown in this example:
void on_container_start(proton::container& cont) override {
        proton::connection conn = cont.connect(conn_url_);
        proton::receiver_options opts {};
        proton::source_options sopts {};

        sopts.capabilities(std::vector<proton::symbol> { "topic" });
        opts.source(sopts);

        conn.open_receiver(address_, opts);
    }
AMQP.Net Lite example
You can use the following AMQP.Net Lite example to connect your application to EnMasse. This example assumes you have created an address of type queue named myqueue.
using System;
using Amqp;

namespace Test
{
    public class Program
    {
        public static void Main(string[] args)
        {
            String url = (args.Length > 0) ? args[0] : "amqps://messaging-route-hostname:443";
            String address = (args.Length > 1) ? args[1] : "myqueue";

            Connection.DisableServerCertValidation = true;
            Connection connection = new Connection(new Address(url));
            Session session = new Session(connection);
            SenderLink sender = new SenderLink(session, "test-sender", address);

            Message messageSent = new Message("Test Message");
            sender.Send(messageSent);

            ReceiverLink receiver = new ReceiverLink(session, "test-receiver", address);
            Message messageReceived = receiver.Receive(TimeSpan.FromSeconds(2));
            Console.WriteLine(messageReceived.Body);
            receiver.Accept(messageReceived);

            sender.Close();
            receiver.Close();
            session.Close();
            connection.Close();
        }
    }
}
Appendix A: Troubleshooting
The following troubleshooting information provides solutions to common problems when running EnMasse. Certain steps in the procedures might require service administrator privileges.
A.1. Determine which pods belong to an address space
-
Retrieve the uuid for the address space:
kubectl get addressspace myspace -o jsonpath='{.metadata.annotations.enmasse\.io/infra-uuid}' -
Find all pods with a matching
infraUuidlabel:kubectl get pods -l infraUuid=uuid
A.2. Determine the currently running version of EnMasse
-
Determine the
enmasse-operatorpod name:kubectl get pods | grep enmasse-operator
-
Print the
VERSIONenvironment of theenmasse-operatorpod:kubectl rsh enmasse-operator-.... env | grep VERSION
The
VERSIONcorresponds to the major.minor version of EnMasse, whereasMAVEN_VERSIONcorresponds to the build number.
A.3. Unable to find a custom address space plan
-
Ensure that the address space plan was created in the namespace where EnMasse is installed.
-
Ensure that the address space plan has passed validation and is in the
Activephase:kubectl get addressspaceplans -o wide -n enmasse-infra
A.4. Unable to find a custom address plan
-
Ensure that the address plan was created in the namespace where EnMasse is installed.
-
Ensure that the address plan has passed validation and is in the
Activephase:kubectl get addressplans -o wide -n enmasse-infra
A.5. Address space is not ready and clients are unable to connect to messaging endpoints
-
Check the address space status message for errors:
kubectl get addressspace myspace -o wide
-
Check address space controller logs for errors:
kubectl logs deployment/address-space-controller
A.6. Addresses are not getting ready
-
Check the address status message for errors:
kubectl get address myspace.myaddress -o wide
-
If using the
brokeredaddress space, check theagentpod logs for errors:kubectl logs deployment/agent.uuid
If using the
standardaddress space, check theadminpod logs for errors:kubectl logs deployment/admin.uuid -c standard-controller kubectl logs deployment/admin.uuid -c agent
Appendix B: EnMasse resources for service administrators
The following table describes the EnMasse resources that pertain to the service administrator role.
| Resource | Description |
|---|---|
|
Specifies the address plan. |
|
Specifies the address space plan. |
|
Defines the service characteristics available to an |
|
Specifies the infrastructure configuration for brokered address spaces. For more information see Brokered infrastructure configuration fields table. |
|
Specifies the infrastructure configuration for standard address spaces. For more information see Standard infrastructure configuration fields table. |
Appendix C: EnMasse resources for messaging tenants
The following table describes the EnMasse resources that pertain to the messaging tenant role.
| Resource | Description |
|---|---|
|
Specifies the address. |
|
Specifies the address space. |
|
Specifies the authorization policy that controls which addresses may be used and the operations that may be performed on those addresses. |
Appendix D: Brokered infrastructure configuration fields
This table shows the fields available for the brokered infrastructure configuration and a brief description.
Field |
Description |
|
Specifies the EnMasse version used. When upgrading, EnMasse uses this field to determine whether to upgrade the infrastructure to the requested version. |
|
Specifies the amount of memory allocated to the admin Pod. |
|
Specifies the labels added to the admin Pod. |
|
Specifies the affinity settings for the admin Pod so you can specify where on particular nodes a Pod runs, or if it cannot run together with other instances. |
|
Specifies the priority class to use for the admin Pod so you can prioritize admin Pods over other Pods in the Kubernetes cluster. |
|
Specifies the toleration settings for the admin Pod, which allows this Pod to run on certain nodes that other Pods cannot run on. |
|
Specifies the action taken when a queue is full: |
|
Specifies the maximum amount of memory used for queues in the broker. |
|
Specifies the amount of memory allocated to the broker. |
|
Specifies the amount of storage requested for the broker. |
|
Specifies the labels added to the broker Pod. |
|
Specifies the affinity settings for the broker Pod so you can specify where on particular nodes a Pod runs, or if it cannot run together with other instances. |
|
Specifies the priority class to use for the broker Pod so you can prioritize broker Pods over other Pods in the Kubernetes cluster. |
|
Specifies the toleration settings for the broker Pod, which allows this Pod to run on certain nodes that other Pods cannot run on. |
|
Specifies the security context for the broker Pod. |
|
Specifies environment variables for the broker Pod. |
|
Specifies the number of times that Kubernetes tries when a broker Pod starts and the probe fails before restarting the container. |
|
Specifies the probe delay value in seconds for the broker Pod. |
|
Specifies the probe timeout value in seconds for the broker Pod. |
|
Specifies the number of times that Kubernetes tries when a broker Pod starts and the probe fails before the Pod is marked |
|
Specifies the probe delay value in seconds for the broker Pod. |
|
Specifies the probe timeout value in seconds for the broker Pod. |
|
Specifies broker Pod resource requests and limits for CPU and memory. |
|
Specifies what storage class to use for the persistent volume for the broker. |
|
If the persistent volume supports resizing, setting this value to |
Appendix E: Standard infrastructure configuration fields
This table shows the fields available for the standard infrastructure configuration and a brief description.
Field |
Description |
|
Specifies the EnMasse version used. When upgrading, EnMasse uses this field to determine whether to upgrade the infrastructure to the requested version. |
|
Specifies the amount of memory allocated to the admin Pod. |
|
Specifies the labels added to the admin Pod. |
|
Specifies the affinity settings for the admin Pod so you can specify where on particular nodes a Pod runs, or if it cannot run together with other instances. |
|
Specifies the priority class to use for the admin Pod so you can prioritize admin pods over other Pods in the Kubernetes cluster. |
|
Specifies the toleration settings for the admin Pod, which allow this Pod to run on certain nodes on which other Pods cannot run. |
|
Specifies the action taken when a queue is full: |
|
Specifies the maximum amount of memory used for queues in the broker. |
|
Specifies the amount of memory allocated to the broker. |
|
Specifies the amount of storage requested for the broker. |
|
Specifies the labels added to the broker Pod. |
|
Specifies the affinity settings for the broker Pod so you can specify where on particular nodes a Pod runs, or if it cannot run together with other instances. |
|
Specifies the priority class to use for the broker Pod so you can prioritize broker Pods over other Pods in the Kubernetes cluster. |
|
Specifies the toleration settings for the broker Pod, which allow this Pod to run on certain nodes on which other Pods cannot run. |
|
Specifies the security context for the broker Pod. |
|
Specifies environment variables for the broker Pod. |
|
Specifies the number of times that Kubernetes tries when a broker Pod starts and the probe fails before restarting the container. |
|
Specifies the probe delay value in seconds for the broker Pod. |
|
Specifies the probe timeout value in seconds for the broker Pod. |
|
Specifies the number of times that Kubernetes tries when a broker Pod starts and the probe fails before the Pod is marked |
|
Specifies the probe delay value in seconds for the broker Pod. |
|
Specifies the probe timeout value in seconds for the broker Pod. |
|
Specifies broker Pod resource requests and limits for CPU and memory. |
|
Specifies the AMQP idle timeout to use for connection to router. |
|
Specifies the number of worker threads of the connection to the router. |
|
Specifies what storage class to use for the persistent volume for the broker. |
|
If the persistent volume supports resizing, setting this value to |
|
Specifies the amount of memory allocated to the router. |
|
Specifies the default number of credits issued on AMQP links for the router. |
|
Specifies the amount of time in seconds to wait for the secure handshake to be initiated. |
|
Specifies the minimum number of router Pods to run; a minimum of two are required for high availability (HA) configuration. |
|
Specifies the labels added to the router Pod. |
|
Specifies the affinity settings for the router Pod so you can specify where on particular nodes a pod runs, or if it cannot run together with other instances. |
|
Specifies the priority class to use for the router Pod so you can prioritize router pods over other pods in the Kubernetes cluster. |
|
Specifies the toleration settings for the router Pod, which allow this Pod to run on certain nodes on which other Pods cannot run. |
|
Specifies the security context for the router Pod. |
|
Specifies the environment variables for the router Pod. |
|
Specifies the number of times that Kubernetes tries when a router Pod starts and the probe fails before restarting the container. |
|
Specifies the probe delay value in seconds for the router Pod. |
|
Specifies the probe timeout value in seconds for the router Pod. |
|
Specifies the number of times that Kubernetes tries when a router Pod starts and the probe fails before the Pod is marked |
|
Specifies the probe delay value in seconds for the router Pod. |
|
Specifies the probe timeout value in seconds for the router Pod. |
|
Specifies router Pod resource requests and limits for CPU and memory. |
|
Specifies the AMQP idle timeout to use for all router listeners. |
|
Specifies the number of worker threads to use for the router. |
|
Specifies the maximum number of router connections allowed. |
|
Specifies the maximum number of router connections allowed per user. |
|
Specifies the maximum number of router connections allowed per host. |
|
Specifies the maximum number of sessions allowed per router connection. |
|
Specifies the maximum number of senders allowed per router connection. |
|
Specifies the maximum number of receivers allowed per router connection. |
Appendix F: REST API reference
F.1. EnMasse REST API
F.1.1. Overview
This is the EnMasse API specification.
Version information
Version : 0.33-SNAPSHOT
URI scheme
Schemes : HTTPS
Tags
-
addresses : Operating on Addresses.
-
addressplans : Operating on AddressPlans.
-
addressspaceplans : Operating on AddressSpacePlans.
-
addressspaces : Operate on AddressSpaces
-
brokeredinfraconfigs : Operating on BrokeredInfraConfigs.
-
messagingusers : Operating on MessagingUsers.
-
standardinfraconfigs : Operating on StandardInfraConfigs.
External Docs
Description : Find out more about EnMasse
URL : https://enmasse.io/documentation/
F.1.2. Paths
POST /apis/admin.enmasse.io/v1beta2/namespaces/{namespace}/addressspaceplans
Description
create an AddressSpacePlan
Parameters
| Type | Name | Description | Schema |
|---|---|---|---|
Path |
namespace |
object name and auth scope, such as for teams and projects |
string |
Body |
body |
Responses
| HTTP Code | Description | Schema |
|---|---|---|
200 |
OK |
|
201 |
Created |
|
401 |
Unauthorized |
No Content |
Consumes
-
application/json
Produces
-
application/json
Tags
-
addressspaceplan
-
admin
-
enmasse_v1beta2
GET /apis/admin.enmasse.io/v1beta2/namespaces/{namespace}/addressspaceplans
Description
list objects of kind AddressSpacePlan
Parameters
| Type | Name | Description | Schema |
|---|---|---|---|
Path |
namespace |
object name and auth scope, such as for teams and projects |
string |
Query |
labelSelector |
A selector to restrict the list of returned objects by their labels. Defaults to everything. |
string |
Responses
| HTTP Code | Description | Schema |
|---|---|---|
200 |
OK |
|
401 |
Unauthorized |
No Content |
Produces
-
application/json
Tags
-
addressspaceplan
-
admin
-
enmasse_v1beta2
GET /apis/admin.enmasse.io/v1beta2/namespaces/{namespace}/addressspaceplans/{name}
Description
read the specified AddressSpacePlan
Parameters
| Type | Name | Description | Schema |
|---|---|---|---|
Path |
name |
Name of AddressSpacePlan to read. |
string |
Path |
namespace |
object name and auth scope, such as for teams and projects |
string |
Responses
| HTTP Code | Description | Schema |
|---|---|---|
200 |
OK |
|
401 |
Unauthorized |
No Content |
404 |
Not found |
No Content |
Consumes
-
application/json
Produces
-
application/json
Tags
-
addressspaceplan
-
admin
-
enmasse_v1beta2
PUT /apis/admin.enmasse.io/v1beta2/namespaces/{namespace}/addressspaceplans/{name}
Description
replace the specified AddressSpacePlan
Parameters
| Type | Name | Description | Schema |
|---|---|---|---|
Path |
name |
Name of AddressSpacePlan to replace. |
string |
Path |
namespace |
object name and auth scope, such as for teams and projects |
string |
Body |
body |
Responses
| HTTP Code | Description | Schema |
|---|---|---|
200 |
OK |
|
201 |
Created |
|
401 |
Unauthorized |
No Content |
Produces
-
application/json
Tags
-
addressspaceplan
-
admin
-
enmasse_v1beta2
DELETE /apis/admin.enmasse.io/v1beta2/namespaces/{namespace}/addressspaceplans/{name}
Description
delete an AddressSpacePlan
Parameters
| Type | Name | Description | Schema |
|---|---|---|---|
Path |
name |
Name of AddressSpacePlan to delete. |
string |
Path |
namespace |
object name and auth scope, such as for teams and projects |
string |
Responses
| HTTP Code | Description | Schema |
|---|---|---|
200 |
OK |
|
401 |
Unauthorized |
No Content |
404 |
Not found |
No Content |
Produces
-
application/json
Tags
-
addressspaceplan
-
admin
-
enmasse_v1beta2
POST /apis/enmasse.io/v1beta1/namespaces/{namespace}/addresses
Description
create an Address
Parameters
| Type | Name | Description | Schema |
|---|---|---|---|
Path |
namespace |
object name and auth scope, such as for teams and projects |
string |
Body |
body |
Responses
| HTTP Code | Description | Schema |
|---|---|---|
200 |
OK |
|
201 |
Created |
|
401 |
Unauthorized |
No Content |
Consumes
-
application/json
Produces
-
application/json
Tags
-
addresses
-
enmasse_v1beta1
GET /apis/enmasse.io/v1beta1/namespaces/{namespace}/addresses
Description
list objects of kind Address
Parameters
| Type | Name | Description | Schema |
|---|---|---|---|
Path |
namespace |
object name and auth scope, such as for teams and projects |
string |
Query |
labelSelector |
A selector to restrict the list of returned objects by their labels. Defaults to everything. |
string |
Responses
| HTTP Code | Description | Schema |
|---|---|---|
200 |
OK |
|
401 |
Unauthorized |
No Content |
Produces
-
application/json
Tags
-
addresses
-
enmasse_v1beta1
GET /apis/enmasse.io/v1beta1/namespaces/{namespace}/addresses/{name}
Description
read the specified Address
Parameters
| Type | Name | Description | Schema |
|---|---|---|---|
Path |
name |
Name of Address to read |
string |
Path |
namespace |
object name and auth scope, such as for teams and projects |
string |
Responses
| HTTP Code | Description | Schema |
|---|---|---|
200 |
OK |
|
401 |
Unauthorized |
No Content |
404 |
Not found |
No Content |
Consumes
-
application/json
Produces
-
application/json
Tags
-
addresses
-
enmasse_v1beta1
PUT /apis/enmasse.io/v1beta1/namespaces/{namespace}/addresses/{name}
Description
replace the specified Address
Parameters
| Type | Name | Description | Schema |
|---|---|---|---|
Path |
name |
Name of Address to replace |
string |
Path |
namespace |
object name and auth scope, such as for teams and projects |
string |
Body |
body |
Responses
| HTTP Code | Description | Schema |
|---|---|---|
200 |
OK |
|
201 |
Created |
|
401 |
Unauthorized |
No Content |
Produces
-
application/json
Tags
-
addresses
-
enmasse_v1beta1
DELETE /apis/enmasse.io/v1beta1/namespaces/{namespace}/addresses/{name}
Description
delete an Address
Parameters
| Type | Name | Description | Schema |
|---|---|---|---|
Path |
name |
Name of Address to delete |
string |
Path |
namespace |
object name and auth scope, such as for teams and projects |
string |
Responses
| HTTP Code | Description | Schema |
|---|---|---|
200 |
OK |
|
401 |
Unauthorized |
No Content |
404 |
Not found |
No Content |
Produces
-
application/json
Tags
-
addresses
-
enmasse_v1beta1
PATCH /apis/enmasse.io/v1beta1/namespaces/{namespace}/addresses/{name}
Description
patches (RFC6902) the specified Address
Parameters
| Type | Name | Description | Schema |
|---|---|---|---|
Path |
name |
Name of Address to replace |
string |
Path |
namespace |
object name and auth scope, such as for teams and projects |
string |
Body |
body |
Responses
| HTTP Code | Description | Schema |
|---|---|---|
200 |
OK |
|
401 |
Unauthorized |
No Content |
Consumes
-
application/json-patch+json
Produces
-
application/json
Tags
-
addresses
-
enmasse_v1beta1
POST /apis/enmasse.io/v1beta1/namespaces/{namespace}/addressspaces
Description
create an AddressSpace
Parameters
| Type | Name | Description | Schema |
|---|---|---|---|
Path |
namespace |
object name and auth scope, such as for teams and projects |
string |
Body |
body |
Responses
| HTTP Code | Description | Schema |
|---|---|---|
200 |
OK |
|
201 |
Created |
|
401 |
Unauthorized |
No Content |
Consumes
-
application/json
Produces
-
application/json
Tags
-
addressspaces
-
enmasse_v1beta1
GET /apis/enmasse.io/v1beta1/namespaces/{namespace}/addressspaces
Description
list objects of kind AddressSpace
Parameters
| Type | Name | Description | Schema |
|---|---|---|---|
Path |
namespace |
object name and auth scope, such as for teams and projects |
string |
Query |
labelSelector |
A selector to restrict the list of returned objects by their labels. Defaults to everything. |
string |
Responses
| HTTP Code | Description | Schema |
|---|---|---|
200 |
OK |
|
401 |
Unauthorized |
No Content |
Produces
-
application/json
Tags
-
addressspaces
-
enmasse_v1beta1
GET /apis/enmasse.io/v1beta1/namespaces/{namespace}/addressspaces/{name}
Description
read the specified AddressSpace
Parameters
| Type | Name | Description | Schema |
|---|---|---|---|
Path |
name |
Name of AddressSpace to read |
string |
Path |
namespace |
object name and auth scope, such as for teams and projects |
string |
Responses
| HTTP Code | Description | Schema |
|---|---|---|
200 |
OK |
|
401 |
Unauthorized |
No Content |
404 |
Not found |
No Content |
Consumes
-
application/json
Produces
-
application/json
Tags
-
addressspaces
-
enmasse_v1beta1
PUT /apis/enmasse.io/v1beta1/namespaces/{namespace}/addressspaces/{name}
Description
replace the specified AddressSpace
Parameters
| Type | Name | Description | Schema |
|---|---|---|---|
Path |
name |
Name of AddressSpace to replace |
string |
Path |
namespace |
object name and auth scope, such as for teams and projects |
string |
Body |
body |
Responses
| HTTP Code | Description | Schema |
|---|---|---|
200 |
OK |
|
201 |
Created |
|
401 |
Unauthorized |
No Content |
Produces
-
application/json
Tags
-
addressspaces
-
enmasse_v1beta1
DELETE /apis/enmasse.io/v1beta1/namespaces/{namespace}/addressspaces/{name}
Description
delete an AddressSpace
Parameters
| Type | Name | Description | Schema |
|---|---|---|---|
Path |
name |
Name of AddressSpace to delete |
string |
Path |
namespace |
object name and auth scope, such as for teams and projects |
string |
Responses
| HTTP Code | Description | Schema |
|---|---|---|
200 |
OK |
|
401 |
Unauthorized |
No Content |
404 |
Not found |
No Content |
Produces
-
application/json
Tags
-
addressspaces
-
enmasse_v1beta1
PATCH /apis/enmasse.io/v1beta1/namespaces/{namespace}/addressspaces/{name}
Description
patches (RFC6902) the specified AddressSpace
Parameters
| Type | Name | Description | Schema |
|---|---|---|---|
Path |
name |
Name of AddressSpace to replace |
string |
Path |
namespace |
object name and auth scope, such as for teams and projects |
string |
Body |
body |
Responses
| HTTP Code | Description | Schema |
|---|---|---|
200 |
OK |
|
401 |
Unauthorized |
No Content |
Consumes
-
application/json-patch+json
Produces
-
application/json
Tags
-
addressspaces
-
enmasse_v1beta1
POST /apis/user.enmasse.io/v1beta1/namespaces/{namespace}/messagingusers
Description
create a MessagingUser
Parameters
| Type | Name | Description | Schema |
|---|---|---|---|
Path |
namespace |
object name and auth scope, such as for teams and projects |
string |
Body |
body |
Responses
| HTTP Code | Description | Schema |
|---|---|---|
200 |
OK |
|
201 |
Created |
|
401 |
Unauthorized |
No Content |
Consumes
-
application/json
Produces
-
application/json
Tags
-
auth
-
enmasse_v1beta1
-
user
GET /apis/user.enmasse.io/v1beta1/namespaces/{namespace}/messagingusers
Description
list objects of kind MessagingUser
Parameters
| Type | Name | Description | Schema |
|---|---|---|---|
Path |
namespace |
object name and auth scope, such as for teams and projects |
string |
Query |
labelSelector |
A selector to restrict the list of returned objects by their labels. Defaults to everything. |
string |
Responses
| HTTP Code | Description | Schema |
|---|---|---|
200 |
OK |
|
401 |
Unauthorized |
No Content |
Produces
-
application/json
Tags
-
auth
-
enmasse_v1beta1
-
user
GET /apis/user.enmasse.io/v1beta1/namespaces/{namespace}/messagingusers/{name}
Description
read the specified MessagingUser
Parameters
| Type | Name | Description | Schema |
|---|---|---|---|
Path |
name |
Name of MessagingUser to read. Must include addressSpace and dot separator in the name (that is, 'myspace.user1'). |
string |
Path |
namespace |
object name and auth scope, such as for teams and projects |
string |
Responses
| HTTP Code | Description | Schema |
|---|---|---|
200 |
OK |
|
401 |
Unauthorized |
No Content |
404 |
Not found |
No Content |
Consumes
-
application/json
Produces
-
application/json
Tags
-
auth
-
enmasse_v1beta1
-
user
PUT /apis/user.enmasse.io/v1beta1/namespaces/{namespace}/messagingusers/{name}
Description
replace the specified MessagingUser
Parameters
| Type | Name | Description | Schema |
|---|---|---|---|
Path |
name |
Name of MessagingUser to replace. Must include addressSpace and dot separator in the name (that is, 'myspace.user1'). |
string |
Path |
namespace |
object name and auth scope, such as for teams and projects |
string |
Body |
body |
Responses
| HTTP Code | Description | Schema |
|---|---|---|
200 |
OK |
|
201 |
Created |
|
401 |
Unauthorized |
No Content |
Produces
-
application/json
Tags
-
auth
-
enmasse_v1beta1
-
user
DELETE /apis/user.enmasse.io/v1beta1/namespaces/{namespace}/messagingusers/{name}
Description
delete a MessagingUser
Parameters
| Type | Name | Description | Schema |
|---|---|---|---|
Path |
name |
Name of MessagingUser to delete. Must include addressSpace and dot separator in the name (that is, 'myspace.user1'). |
string |
Path |
namespace |
object name and auth scope, such as for teams and projects |
string |
Responses
| HTTP Code | Description | Schema |
|---|---|---|
200 |
OK |
|
401 |
Unauthorized |
No Content |
404 |
Not found |
No Content |
Produces
-
application/json
Tags
-
auth
-
enmasse_v1beta1
-
user
PATCH /apis/user.enmasse.io/v1beta1/namespaces/{namespace}/messagingusers/{name}
Description
patches (RFC6902) the specified MessagingUser
Parameters
| Type | Name | Description | Schema |
|---|---|---|---|
Path |
name |
Name of MessagingUser to replace. Must include addressSpace and dot separator in the name (that is, 'myspace.user1' |
string |
Path |
namespace |
object name and auth scope, such as for teams and projects |
string |
Body |
body |
Responses
| HTTP Code | Description | Schema |
|---|---|---|
200 |
OK |
|
401 |
Unauthorized |
No Content |
Consumes
-
application/json-patch+json
Produces
-
application/json
Tags
-
auth
-
enmasse_v1beta1
-
user
F.1.3. Definitions
JsonPatchRequest
| Name | Schema |
|---|---|
document |
object |
patch |
< Patch > array |
ObjectMeta
ObjectMeta is metadata that all persisted resources must have, which includes all objects users must create.
| Name | Schema |
|---|---|
name |
string |
namespace |
string |
Patch
| Name | Description | Schema |
|---|---|---|
from |
Required for operations copy, replace |
string |
op |
enum (add, remove, replace, move, copy, test) |
|
path |
Slash separated format |
string |
value |
Required for operations add, replace, test |
string |
Status
Status is a return value for calls that do not return other objects.
| Name | Description | Schema |
|---|---|---|
code |
Suggested HTTP return code for this status, 0 if not set. |
integer (int32) |
io.enmasse.admin.v1beta1.BrokeredInfraConfig
| Name | Schema |
|---|---|
apiVersion |
enum (admin.enmasse.io/v1beta1) |
kind |
enum (BrokeredInfraConfig) |
metadata |
|
spec |
io.enmasse.admin.v1beta1.BrokeredInfraConfigList
| Name | Schema |
|---|---|
apiVersion |
enum (admin.enmasse.io/v1beta1) |
items |
|
kind |
enum (BrokeredInfraConfigList) |
io.enmasse.admin.v1beta1.BrokeredInfraConfigSpec
| Name | Schema |
|---|---|
admin |
|
broker |
|
networkPolicy |
|
version |
string |
networkPolicy
| Name | Schema |
|---|---|
egress |
|
ingress |
io.enmasse.admin.v1beta1.BrokeredInfraConfigSpecAdmin
| Name | Schema |
|---|---|
podTemplate |
|
resources |
resources
| Name | Schema |
|---|---|
memory |
string |
io.enmasse.admin.v1beta1.BrokeredInfraConfigSpecBroker
| Name | Schema |
|---|---|
addressFullPolicy |
enum (PAGE, BLOCK, FAIL) |
podTemplate |
|
resources |
|
storageClassName |
string |
updatePersistentVolumeClaim |
boolean |
resources
| Name | Schema |
|---|---|
memory |
string |
storage |
string |
io.enmasse.admin.v1beta1.InfraConfigPodSpec
| Name | Schema |
|---|---|
metadata |
|
spec |
metadata
| Name | Schema |
|---|---|
labels |
object |
spec
| Name | Schema |
|---|---|
affinity |
object |
containers |
< containers > array |
priorityClassName |
string |
securityContext |
object |
tolerations |
< object > array |
containers
| Name | Schema |
|---|---|
resources |
object |
io.enmasse.admin.v1beta1.StandardInfraConfig
| Name | Schema |
|---|---|
apiVersion |
enum (admin.enmasse.io/v1beta1) |
kind |
enum (StandardInfraConfig) |
metadata |
|
spec |
io.enmasse.admin.v1beta1.StandardInfraConfigList
| Name | Schema |
|---|---|
apiVersion |
enum (admin.enmasse.io/v1beta1) |
items |
|
kind |
enum (StandardInfraConfigList) |
io.enmasse.admin.v1beta1.StandardInfraConfigSpec
| Name | Schema |
|---|---|
admin |
|
broker |
|
networkPolicy |
|
router |
|
version |
string |
networkPolicy
| Name | Schema |
|---|---|
egress |
|
ingress |
io.enmasse.admin.v1beta1.StandardInfraConfigSpecAdmin
| Name | Schema |
|---|---|
podTemplate |
|
resources |
resources
| Name | Schema |
|---|---|
memory |
string |
io.enmasse.admin.v1beta1.StandardInfraConfigSpecBroker
| Name | Schema |
|---|---|
addressFullPolicy |
enum (PAGE, BLOCK, FAIL) |
connectorIdleTimeout |
integer |
connectorWorkerThreads |
integer |
podTemplate |
|
resources |
|
storageClassName |
string |
updatePersistentVolumeClaim |
boolean |
resources
| Name | Schema |
|---|---|
memory |
string |
storage |
string |
io.enmasse.admin.v1beta1.StandardInfraConfigSpecRouter
| Name | Schema |
|---|---|
idleTimeout |
integer |
initialHandshakeTimeout |
integer |
linkCapacity |
integer |
minAvailable |
integer |
minReplicas |
integer |
podTemplate |
|
policy |
|
resources |
|
workerThreads |
integer |
policy
| Name | Schema |
|---|---|
maxConnections |
integer |
maxConnectionsPerHost |
integer |
maxConnectionsPerUser |
integer |
maxReceiversPerConnection |
integer |
maxSendersPerConnection |
integer |
maxSessionsPerConnection |
integer |
resources
| Name | Schema |
|---|---|
memory |
string |
io.enmasse.admin.v1beta2.AddressPlan
| Name | Schema |
|---|---|
apiVersion |
enum (admin.enmasse.io/v1beta2) |
kind |
enum (AddressPlan) |
metadata |
|
spec |
io.enmasse.admin.v1beta2.AddressPlanList
| Name | Schema |
|---|---|
apiVersion |
enum (admin.enmasse.io/v1beta2) |
items |
< io.enmasse.admin.v1beta2.AddressPlan > array |
kind |
enum (AddressPlanList) |
io.enmasse.admin.v1beta2.AddressPlanSpec
| Name | Schema |
|---|---|
addressType |
string |
displayName |
string |
displayOrder |
integer |
longDescription |
string |
partitions |
integer |
resources |
|
shortDescription |
string |
resources
| Name | Schema |
|---|---|
broker |
number |
router |
number |
io.enmasse.admin.v1beta2.AddressSpacePlan
| Name | Schema |
|---|---|
apiVersion |
enum (admin.enmasse.io/v1beta2) |
kind |
enum (AddressSpacePlan) |
metadata |
|
spec |
io.enmasse.admin.v1beta2.AddressSpacePlanList
| Name | Schema |
|---|---|
apiVersion |
enum (admin.enmasse.io/v1beta2) |
items |
|
kind |
enum (AddressSpacePlanList) |
io.enmasse.admin.v1beta2.AddressSpacePlanSpec
| Name | Schema |
|---|---|
addressPlans |
< string > array |
addressSpaceType |
string |
displayName |
string |
displayOrder |
integer |
infraConfigRef |
string |
longDescription |
string |
resourceLimits |
|
shortDescription |
string |
resourceLimits
| Name | Schema |
|---|---|
aggregate |
number |
broker |
number |
router |
number |
io.enmasse.user.v1beta1.MessagingUser
| Name | Schema |
|---|---|
apiVersion |
enum (user.enmasse.io/v1beta1) |
kind |
enum (MessagingUser) |
metadata |
|
spec |
io.enmasse.user.v1beta1.MessagingUserList
| Name | Schema |
|---|---|
apiVersion |
enum (user.enmasse.io/v1beta1) |
items |
< io.enmasse.user.v1beta1.MessagingUser > array |
kind |
enum (MessagingUserList) |
io.enmasse.user.v1beta1.UserSpec
| Name | Schema |
|---|---|
authentication |
|
authorization |
< authorization > array |
username |
string |
authentication
| Name | Description | Schema |
|---|---|---|
federatedUserid |
User id of the user to federate when 'federated' type is specified. |
string |
federatedUsername |
User name of the user to federate when 'federated' type is specified. |
string |
password |
Base64 encoded value of password when 'password' type is specified. |
string |
provider |
Name of provider to use for federated identity when 'federated' type is specified. |
string |
type |
enum (password, serviceaccount) |
| Name | Schema |
|---|---|
addresses |
< string > array |
operations |
< enum (send, recv, view, manage) > array |
io.enmasse.v1beta1.Address
| Name | Schema |
|---|---|
apiVersion |
enum (enmasse.io/v1beta1) |
kind |
enum (Address) |
metadata |
|
spec |
|
status |
io.enmasse.v1beta1.AddressList
| Name | Description | Schema |
|---|---|---|
apiVersion |
Default : |
enum (enmasse.io/v1beta1) |
items |
< io.enmasse.v1beta1.Address > array |
|
kind |
enum (AddressList) |
io.enmasse.v1beta1.AddressSpace
| Name | Schema |
|---|---|
apiVersion |
enum (enmasse.io/v1beta1) |
kind |
enum (AddressSpace) |
metadata |
|
spec |
|
status |
io.enmasse.v1beta1.AddressSpaceList
| Name | Description | Schema |
|---|---|---|
apiVersion |
Default : |
enum (enmasse.io/v1beta1) |
items |
< io.enmasse.v1beta1.AddressSpace > array |
|
kind |
enum (AddressSpaceList) |
io.enmasse.v1beta1.AddressSpaceSpec
| Name | Description | Schema |
|---|---|---|
authenticationService |
||
connectors |
List of connectors to create. |
|
endpoints |
< endpoints > array |
|
networkPolicy |
||
plan |
string |
|
type |
authenticationService
| Name | Schema |
|---|---|
name |
string |
overrides |
|
type |
string |
overrides
| Name | Schema |
|---|---|
host |
string |
port |
integer |
realm |
string |
endpoints
| Name | Schema |
|---|---|
cert |
|
exports |
< exports > array |
expose |
|
name |
string |
service |
string |
cert
| Name | Schema |
|---|---|
provider |
string |
secretName |
string |
tlsCert |
string |
tlsKey |
string |
exports
| Name | Schema |
|---|---|
kind |
enum (ConfigMap, Secret, Service) |
name |
string |
expose
| Name | Schema |
|---|---|
annotations |
object |
loadBalancerPorts |
< string > array |
loadBalancerSourceRanges |
< string > array |
routeHost |
string |
routeServicePort |
string |
routeTlsTermination |
string |
type |
enum (route, loadbalancer) |
networkPolicy
| Name | Schema |
|---|---|
egress |
|
ingress |
io.enmasse.v1beta1.AddressSpaceSpecConnector
| Name | Description | Schema |
|---|---|---|
addresses |
Addresses to make be accessible via this address space. |
< addresses > array |
credentials |
Credentials used when connecting to endpoints. Either 'username' and 'password', or 'secret' must be defined. |
|
endpointHosts |
List of hosts that should be connected to. Must contain at least 1 entry. |
< endpointHosts > array |
name |
Name of the connector. |
string |
tls |
TLS settings for the connectors. If not specified, TLS will not be used. |
addresses
| Name | Description | Schema |
|---|---|---|
name |
Identifier of address pattern. Used to uniquely identify a pattern |
string |
pattern |
Pattern used to match addresses. The pattern will be prefixed by the connector name and a forward slash ('myconnector/'). A pattern consists of one or more tokens separated by a forward slash /. A token can be one of the following: a * character, a # character, or a sequence of characters that do not include /, *, or #. The * token matches any single token. The # token matches zero or more tokens. * has higher precedence than #, and exact match has the highest precedence. |
string |
credentials
| Name | Description | Schema |
|---|---|---|
password |
Password to use for connector. Either 'value' or 'secret' must be specified. |
|
username |
Username to use for connector. Either 'value' or 'secret' must be specified. |
password
| Name | Schema |
|---|---|
value |
string |
valueFromSecret |
valueFromSecret
| Name | Description | Schema |
|---|---|---|
key |
Key to use for looking up password entry. |
string |
name |
Name of Secret containing password. |
string |
username
| Name | Schema |
|---|---|
value |
string |
valueFromSecret |
valueFromSecret
| Name | Description | Schema |
|---|---|---|
key |
Key to use for looking up username entry. |
string |
name |
Name of Secret containing username. |
string |
endpointHosts
| Name | Description | Schema |
|---|---|---|
host |
Host to connect to. |
string |
port |
Port to connect to. |
integer |
tls
| Name | Description | Schema |
|---|---|---|
caCert |
CA certificate to be used by the connector. Either 'value' or 'secret'. |
|
clientCert |
Client certificate to be used by the connector. Either 'value' or 'secret'. |
caCert
| Name | Description | Schema |
|---|---|---|
value |
PEM encoded value of CA certificate |
string |
valueFromSecret |
Secret containing CA certificate to be used by the connector. |
valueFromSecret
| Name | Description | Schema |
|---|---|---|
key |
Key to use for looking up CA certificate entry. |
string |
name |
Name of Secret containing CA certificate. |
string |
clientCert
| Name | Description | Schema |
|---|---|---|
value |
PEM encoded value of client certificate |
string |
valueFromSecret |
Secret containing client certificate to be used by the connector. |
valueFromSecret
| Name | Description | Schema |
|---|---|---|
key |
Key to use for looking up client certificate entry. |
string |
name |
Name of Secret containing client certificate. |
string |
io.enmasse.v1beta1.AddressSpaceStatus
| Name | Description | Schema |
|---|---|---|
connectors |
List of connectors with status. |
|
endpointStatuses |
< endpointStatuses > array |
|
isReady |
boolean |
|
messages |
< string > array |
endpointStatuses
| Name | Schema |
|---|---|
cert |
string |
externalHost |
string |
externalPorts |
< externalPorts > array |
name |
string |
serviceHost |
string |
servicePorts |
< servicePorts > array |
externalPorts
| Name | Schema |
|---|---|
name |
string |
port |
integer |
servicePorts
| Name | Schema |
|---|---|
name |
string |
port |
integer |
io.enmasse.v1beta1.AddressSpaceStatusConnector
| Name | Description | Schema |
|---|---|---|
isReady |
'true' if connector is operating as expected, 'false' if not. |
boolean |
messages |
Messages describing the connector state. |
< string > array |
name |
Name of connector. |
string |
io.enmasse.v1beta1.AddressSpaceType
AddressSpaceType is the type of address space (standard, brokered). Each type supports different types of addresses and semantics for those types.
Type : enum (standard, brokered)
io.enmasse.v1beta1.AddressSpec
| Name | Description | Schema |
|---|---|---|
address |
string |
|
forwarders |
List of forwarders to enable for this address. |
< io.enmasse.v1beta1.AddressSpecForwarder > array |
plan |
string |
|
type |
io.enmasse.v1beta1.AddressSpecForwarder
| Name | Description | Schema |
|---|---|---|
direction |
Direction of forwarder. 'in' means pulling from 'remoteAddress' into this address. 'out' means pushing from this address to 'remoteAddress'. |
enum (in, out) |
name |
Name of forwarder. |
string |
remoteAddress |
Remote address to send/receive messages to. |
string |
io.enmasse.v1beta1.AddressStatus
| Name | Description | Schema |
|---|---|---|
forwarders |
List of forwarders with status. |
|
isReady |
boolean |
|
messages |
< string > array |
|
phase |
enum (Pending, Configuring, Active, Failed, Terminating) |
io.enmasse.v1beta1.AddressStatusForwarder
| Name | Description | Schema |
|---|---|---|
isReady |
'true' if forwarder is operating as expected, 'false' if not. |
boolean |
messages |
Messages describing the forwarder state. |
< string > array |
name |
Name of forwarder. |
string |
io.enmasse.v1beta1.AddressType
Type of address (queue, topic, …). Each address type support different kinds of messaging semantics.
Type : enum (queue, topic, anycast, multicast)
io.k8s.api.networking.v1.IPBlock
IPBlock describes a particular CIDR (Ex. "192.168.1.1/24") that is allowed to the pods matched by a NetworkPolicySpec’s podSelector. The except entry describes CIDRs that should not be included within this rule.
| Name | Description | Schema |
|---|---|---|
cidr |
CIDR is a string representing the IP Block Valid examples are "192.168.1.1/24" |
string |
except |
Except is a slice of CIDRs that should not be included within an IP Block Valid examples are "192.168.1.1/24" Except values will be rejected if they are outside the CIDR range |
< string > array |
io.k8s.api.networking.v1.NetworkPolicyEgressRule
NetworkPolicyEgressRule describes a particular set of traffic that is allowed out of pods matched by a NetworkPolicySpec’s podSelector. The traffic must match both ports and to. This type is beta-level in 1.8
| Name | Description | Schema |
|---|---|---|
ports |
List of destination ports for outgoing traffic. Each item in this list is combined using a logical OR. If this field is empty or missing, this rule matches all ports (traffic not restricted by port). If this field is present and contains at least one item, then this rule allows traffic only if the traffic matches at least one port in the list. |
|
to |
List of destinations for outgoing traffic of pods selected for this rule. Items in this list are combined using a logical OR operation. If this field is empty or missing, this rule matches all destinations (traffic not restricted by destination). If this field is present and contains at least one item, this rule allows traffic only if the traffic matches at least one item in the to list. |
io.k8s.api.networking.v1.NetworkPolicyIngressRule
NetworkPolicyIngressRule describes a particular set of traffic that is allowed to the pods matched by a NetworkPolicySpec’s podSelector. The traffic must match both ports and from.
| Name | Description | Schema |
|---|---|---|
from |
List of sources which should be able to access the pods selected for this rule. Items in this list are combined using a logical OR operation. If this field is empty or missing, this rule matches all sources (traffic not restricted by source). If this field is present and contains at least on item, this rule allows traffic only if the traffic matches at least one item in the from list. |
|
ports |
List of ports which should be made accessible on the pods selected for this rule. Each item in this list is combined using a logical OR. If this field is empty or missing, this rule matches all ports (traffic not restricted by port). If this field is present and contains at least one item, then this rule allows traffic only if the traffic matches at least one port in the list. |
io.k8s.api.networking.v1.NetworkPolicyPeer
NetworkPolicyPeer describes a peer to allow traffic from. Only certain combinations of fields are allowed
| Name | Description | Schema |
|---|---|---|
ipBlock |
IPBlock defines policy on a particular IPBlock. If this field is set then neither of the other fields can be. |
|
namespaceSelector |
Selects Namespaces using cluster-scoped labels. This field follows standard label selector semantics; if present but empty, it selects all namespaces. If PodSelector is also set, then the NetworkPolicyPeer as a whole selects the Pods matching PodSelector in the Namespaces selected by NamespaceSelector. Otherwise it selects all Pods in the Namespaces selected by NamespaceSelector. |
|
podSelector |
This is a label selector which selects Pods. This field follows standard label selector semantics; if present but empty, it selects all pods. If NamespaceSelector is also set, then the NetworkPolicyPeer as a whole selects the Pods matching PodSelector in the Namespaces selected by NamespaceSelector. Otherwise it selects the Pods matching PodSelector in the policy’s own Namespace. |
io.k8s.api.networking.v1.NetworkPolicyPort
NetworkPolicyPort describes a port to allow traffic on
| Name | Description | Schema |
|---|---|---|
port |
The port on the given protocol. This can either be a numerical or named port on a pod. If this field is not provided, this matches all port names and numbers. |
|
protocol |
The protocol (TCP or UDP) which traffic must match. If not specified, this field defaults to TCP. |
string |
io.k8s.apimachinery.pkg.apis.meta.v1.LabelSelector
A label selector is a label query over a set of resources. The result of matchLabels and matchExpressions are ANDed. An empty label selector matches all objects. A null label selector matches no objects.
| Name | Description | Schema |
|---|---|---|
matchExpressions |
matchExpressions is a list of label selector requirements. The requirements are ANDed. |
|
matchLabels |
matchLabels is a map of {key,value} pairs. A single {key,value} in the matchLabels map is equivalent to an element of matchExpressions, whose key field is "key", the operator is "In", and the values array contains only "value". The requirements are ANDed. |
< string, string > map |
io.k8s.apimachinery.pkg.apis.meta.v1.LabelSelectorRequirement
A label selector requirement is a selector that contains values, a key, and an operator that relates the key and values.
| Name | Description | Schema |
|---|---|---|
key |
key is the label key that the selector applies to. |
string |
operator |
operator represents a key’s relationship to a set of values. Valid operators are In, NotIn, Exists and DoesNotExist. |
string |
values |
values is an array of string values. If the operator is In or NotIn, the values array must be non-empty. If the operator is Exists or DoesNotExist, the values array must be empty. This array is replaced during a strategic merge patch. |
< string > array |
io.k8s.apimachinery.pkg.util.intstr.IntOrString
IntOrString is a type that can hold an int32 or a string. When used in JSON or YAML marshalling and unmarshalling, it produces or consumes the inner type. This allows you to have, for example, a JSON field that can accept a name or number.
Type : string (int-or-string)
F.2. Eclipse Hono™ Device Registry API
This API defines how to manage Devices and their Credentials.
F.2.1. Endpoints
Credentials
getAllCredentials
GET /credentials/{tenantId}/{deviceId}
Get credentials set of a device.
Get the credentials set of a device. As long as the device is registered and the user has read access to it, this call should never return \"not found\". Depending on its implementation (or configuration), the device registry can either return all credentials information including full secret details or secret metadata along with the generated identifier (an id property). The identifier can be used for the follow-up update operation).
| Name | Description | Required | Default | Pattern |
|---|---|---|---|---|
tenantId |
The ID of the tenant |
X |
null |
|
deviceId |
The ID of the device |
X |
null |
array[TypedCredentials]
-
application/json
| Code | Message | Datatype |
|---|---|---|
200 |
Operation successful |
List[TypedCredentials] |
400 |
Malformed request |
|
401 |
Authentication credentials are required, but missing. |
<<>> |
404 |
Object not found. This may also be returned for some operations if the user misses read access for the object. |
setAllCredentials
PUT /credentials/{tenantId}/{deviceId}
Update credentials set for registered device
If the device registry is handling full secret details, the updated credential set will be an exact match of the provided content. If it is using secret metadata, data will be merged in based on the secret identities.
| Name | Description | Required | Default | Pattern |
|---|---|---|---|---|
tenantId |
The ID of the tenant |
X |
null |
|
deviceId |
The ID of the device |
X |
null |
| Name | Description | Required | Default | Pattern |
|---|---|---|---|---|
TypedCredentials |
X |
| Name | Description | Required | Default | Pattern |
|---|---|---|---|---|
If-Match |
The expected resource version |
- |
null |
-
-
application/json
| Code | Message | Datatype |
|---|---|---|
204 |
Object updated. |
<<>> |
400 |
Malformed request |
|
401 |
Authentication credentials are required, but missing. |
<<>> |
403 |
Operation not allowed. If the user does not have read access for this object, then `404` will be returned instead. |
|
404 |
Object not found. This may also be returned for some operations if the user misses read access for the object. |
|
412 |
Expected resource version does not match current. This can only happen when the request header `If-Match` was set. |
Devices
createDeviceRegistration
POST /devices/{tenantId}
Create new device registration with auto-generated ID
| Name | Description | Required | Default | Pattern |
|---|---|---|---|---|
tenantId |
The ID of the tenant |
X |
null |
| Name | Description | Required | Default | Pattern |
|---|---|---|---|---|
Device |
New device Device |
- |
-
application/json
| Code | Message | Datatype |
|---|---|---|
201 |
Object created. |
|
400 |
Malformed request |
|
401 |
Authentication credentials are required, but missing. |
<<>> |
403 |
Operation not allowed. If the user does not have read access for this object, then `404` will be returned instead. |
createDeviceRegistrationWithId
POST /devices/{tenantId}/{deviceId}
Create new device registration
| Name | Description | Required | Default | Pattern |
|---|---|---|---|---|
tenantId |
The ID of the tenant |
X |
null |
|
deviceId |
The ID of the device |
X |
null |
| Name | Description | Required | Default | Pattern |
|---|---|---|---|---|
Device |
New device Device |
- |
-
application/json
| Code | Message | Datatype |
|---|---|---|
201 |
Object created. |
|
400 |
Malformed request |
|
401 |
Authentication credentials are required, but missing. |
<<>> |
403 |
Operation not allowed. If the user does not have read access for this object, then `404` will be returned instead. |
|
409 |
Object already exists. If the user has no read access for the existing object, then `403` should be returned instead. |
deleteRegistration
DELETE /devices/{tenantId}/{deviceId}
Delete device registration
| Name | Description | Required | Default | Pattern |
|---|---|---|---|---|
tenantId |
The ID of the tenant |
X |
null |
|
deviceId |
The ID of the device |
X |
null |
| Name | Description | Required | Default | Pattern |
|---|---|---|---|---|
If-Match |
The expected resource version |
- |
null |
-
-
application/json
| Code | Message | Datatype |
|---|---|---|
204 |
Object deleted. |
<<>> |
401 |
Authentication credentials are required, but missing. |
<<>> |
403 |
Operation not allowed. If the user does not have read access for this object, then `404` will be returned instead. |
|
404 |
Object not found. This may also be returned for some operations if the user misses read access for the object. |
|
412 |
Expected resource version does not match current. This can only happen when the request header `If-Match` was set. |
getRegistration
GET /devices/{tenantId}/{deviceId}
Get device registration information
| Name | Description | Required | Default | Pattern |
|---|---|---|---|---|
tenantId |
The ID of the tenant |
X |
null |
|
deviceId |
The ID of the device |
X |
null |
-
application/json
| Code | Message | Datatype |
|---|---|---|
200 |
operation successful |
|
400 |
Malformed request |
|
401 |
Authentication credentials are required, but missing. |
<<>> |
404 |
Object not found. This may also be returned for some operations if the user misses read access for the object. |
updateRegistration
PUT /devices/{tenantId}/{deviceId}
Update existing device registration
| Name | Description | Required | Default | Pattern |
|---|---|---|---|---|
tenantId |
The ID of the tenant |
X |
null |
|
deviceId |
The ID of the device |
X |
null |
| Name | Description | Required | Default | Pattern |
|---|---|---|---|---|
Device |
Updated device registration Device |
X |
| Name | Description | Required | Default | Pattern |
|---|---|---|---|---|
If-Match |
The expected resource version |
- |
null |
-
-
application/json
| Code | Message | Datatype |
|---|---|---|
204 |
Object updated. |
<<>> |
400 |
Malformed request |
|
401 |
Authentication credentials are required, but missing. |
<<>> |
403 |
Operation not allowed. If the user does not have read access for this object, then `404` will be returned instead. |
|
404 |
Object not found. This may also be returned for some operations if the user misses read access for the object. |
|
412 |
Expected resource version does not match current. This can only happen when the request header `If-Match` was set. |
F.2.2. Models
CommonCredentials
| Field Name | Required | Type | Description | Format |
|---|---|---|---|---|
type |
X |
String |
||
auth-id |
X |
String |
||
enabled |
Boolean |
|||
ext |
Map of [object] |
Allows arbitrary properties as extension to the ones specified by the Hono API. |
CommonSecret
| Field Name | Required | Type | Description | Format |
|---|---|---|---|---|
id |
String |
The device registry can assign an identity to the secret. This value can be used to update secrets based on their metadata. |
||
enabled |
Boolean |
|||
not-before |
Date |
date-time |
||
not-after |
Date |
date-time |
||
comment |
String |
Device
| Field Name | Required | Type | Description | Format |
|---|---|---|---|---|
enabled |
Boolean |
|||
defaults |
Map of [object] |
Defaults for properties defined on the tenant and device level. |
||
via |
List of [string] |
The device IDs of the gateways that are registered to act on behalf of this device. Note that "via" and "memberOf" must not be set at the same time. |
||
viaGroups |
List of [string] |
The IDs of the gateway groups that are registered to act on behalf of this device. Note that "viaGroups" and "memberOf" must not be set at the same time. |
||
memberOf |
List of [string] |
The IDs of the gateway groups that this device is a member of. Note that "via" and "memberOf" must not be set at the same time. The same applies for "viaGroups" and "memberOf" which must be set at the same time too. The reason is that Eclipse Hono does not support groups of gateway groups. |
||
ext |
Map of [object] |
Allows arbitrary properties as extension to the ones specified by the Hono API. |
Error
| Field Name | Required | Type | Description | Format |
|---|---|---|---|---|
error |
X |
String |
A human readable error message of what went wrong. |
InlineResponse201
| Field Name | Required | Type | Description | Format |
|---|---|---|---|---|
id |
X |
String |
The ID of the created object |
PSKCredentials
| Field Name | Required | Type | Description | Format |
|---|---|---|---|---|
type |
X |
String |
||
auth-id |
X |
String |
||
enabled |
Boolean |
|||
ext |
Map of [object] |
Allows arbitrary properties as extension to the ones specified by the Hono API. |
||
secrets |
List of PSKSecret |
PSKCredentialsAllOf
| Field Name | Required | Type | Description | Format |
|---|---|---|---|---|
secrets |
List of PSKSecret |
PSKSecret
| Field Name | Required | Type | Description | Format |
|---|---|---|---|---|
id |
String |
The device registry can assign an identity to the secret. This value can be used to update secrets based on their metadata. |
||
enabled |
Boolean |
|||
not-before |
Date |
date-time |
||
not-after |
Date |
date-time |
||
comment |
String |
|||
key |
X |
byte[] |
byte |
PSKSecretAllOf
| Field Name | Required | Type | Description | Format |
|---|---|---|---|---|
key |
X |
byte[] |
byte |
PasswordCredentials
| Field Name | Required | Type | Description | Format |
|---|---|---|---|---|
type |
X |
String |
||
auth-id |
X |
String |
||
enabled |
Boolean |
|||
ext |
Map of [object] |
Allows arbitrary properties as extension to the ones specified by the Hono API. |
||
secrets |
List of PasswordSecret |
PasswordCredentialsAllOf
| Field Name | Required | Type | Description | Format |
|---|---|---|---|---|
secrets |
List of PasswordSecret |
PasswordSecret
| Field Name | Required | Type | Description | Format |
|---|---|---|---|---|
id |
String |
The device registry can assign an identity to the secret. This value can be used to update secrets based on their metadata. |
||
enabled |
Boolean |
|||
not-before |
Date |
date-time |
||
not-after |
Date |
date-time |
||
comment |
String |
|||
hash-function |
String |
The name of the hash function used to create the password hash (defined in `pwd-hash` property). If the password is defined using a `pwd-plain` property, this value will be ignored by the device registry. This property should be empty when returning passwords from the device registry using only secret metadata. In this case the id field must be set instead. |
||
pwd-hash |
byte[] |
The password hash created using the `hash-function` and optional `salt` values. If the password is defined using a `pwd-plain` property, this value will be ignored by the device registry. This property should be empty when returning passwords from the device registry using only secret metadata. In this case the id field must be set instead. |
byte |
|
salt |
byte[] |
The Base64 encoding of the salt used in the password hash (defined in the `pwd-hash` property). If the password is defined using a `pwd-plain` property, this value will be ignored by the device registry. This property should be empty when returning passwords from the device registry using only secret metadata. In this case the id field must be set instead. |
byte |
|
pwd-plain |
byte[] |
The clear text value of the password to be hashed by the device registry. If this property is specified, the device registry will ignore user-provided hash properties (`hash-function`, `pwd-hash` and `salt`). This property must never be stored by the device registry. This property must be empty when returning passwords from the device registry. |
byte |
PasswordSecretAllOf
| Field Name | Required | Type | Description | Format |
|---|---|---|---|---|
hash-function |
String |
The name of the hash function used to create the password hash (defined in `pwd-hash` property). If the password is defined using a `pwd-plain` property, this value will be ignored by the device registry. This property should be empty when returning passwords from the device registry using only secret metadata. In this case the id field must be set instead. |
||
pwd-hash |
byte[] |
The password hash created using the `hash-function` and optional `salt` values. If the password is defined using a `pwd-plain` property, this value will be ignored by the device registry. This property should be empty when returning passwords from the device registry using only secret metadata. In this case the id field must be set instead. |
byte |
|
salt |
byte[] |
The Base64 encoding of the salt used in the password hash (defined in the `pwd-hash` property). If the password is defined using a `pwd-plain` property, this value will be ignored by the device registry. This property should be empty when returning passwords from the device registry using only secret metadata. In this case the id field must be set instead. |
byte |
|
pwd-plain |
byte[] |
The clear text value of the password to be hashed by the device registry. If this property is specified, the device registry will ignore user-provided hash properties (`hash-function`, `pwd-hash` and `salt`). This property must never be stored by the device registry. This property must be empty when returning passwords from the device registry. |
byte |
TypedCredentials
| Field Name | Required | Type | Description | Format |
|---|---|---|---|---|
type |
X |
String |
||
auth-id |
X |
String |
||
enabled |
Boolean |
|||
ext |
Map of [object] |
Allows arbitrary properties as extension to the ones specified by the Hono API. |
||
secrets |
List of X509CertificateSecret |
X509CertificateCredentials
| Field Name | Required | Type | Description | Format |
|---|---|---|---|---|
type |
X |
String |
||
auth-id |
X |
String |
||
enabled |
Boolean |
|||
ext |
Map of [object] |
Allows arbitrary properties as extension to the ones specified by the Hono API. |
||
secrets |
List of X509CertificateSecret |
X509CertificateCredentialsAllOf
| Field Name | Required | Type | Description | Format |
|---|---|---|---|---|
secrets |
List of X509CertificateSecret |
X509CertificateSecret
| Field Name | Required | Type | Description | Format |
|---|---|---|---|---|
id |
String |
The device registry can assign an identity to the secret. This value can be used to update secrets based on their metadata. |
||
enabled |
Boolean |
|||
not-before |
Date |
date-time |
||
not-after |
Date |
date-time |
||
comment |
String |